Introduction to Revit
Objective
This exercise will introduce Autodesk Fusion 360, which is a drafting software that is used by technical professionals, and basic technical design methods will be shown using this computer-aided design (CAD) software. This software will be used in the semester-long design project (SLDP) by constructing physical prototypes with 3D printing. To practice this prototyping procedure, an NYU logo keychain will be created in Autodesk Fusion 360 and prepared in Cura to be 3D printed.
Overview
Computer-Aided Design
CAD programs, which include Autodesk's Fusion 360, AutoCAD, and Revit; Dassault Systèmes SolidWorks; and Google SketchUp, allow engineers to make dimensioned, scaled drawings. These drawings are used to manufacture equipment, build infrastructure, and allow designers to display their designs with complete specifications and detail. Orthographic views (top, bottom, side, front, back) can be used to document the technical specifications in drawings needed for production while axonometric views (isometric, dimetric, trimetric) can be used to view the final 3D representation of a product.
This exercise will teach the basics of Autodesk Fusion 360, 3D file formats, the basics of 3D printing, and the skills needed to create simple 3D files and prepare them to be 3D printed.
| Command | Windows Key Combination | Mac Key Combination |
|---|---|---|
3D Printing
3D printing allows rapid prototyping and onsite manufacturing of products. Initially done with plastic, 3D printing now uses new techniques with new materials, such as aluminum, bronze, and glass. Biomaterials are also being used, such as 3D printing ear cartilage and liver tissue. As the 3D printing industry grows, 3D printing has become a significant part of many engineering fields.
In this course, 3D printing can be used to produce prototype components, building models, SLDP course modifications, robot parts, and a company logo.
Procedure
1. Setting up the File
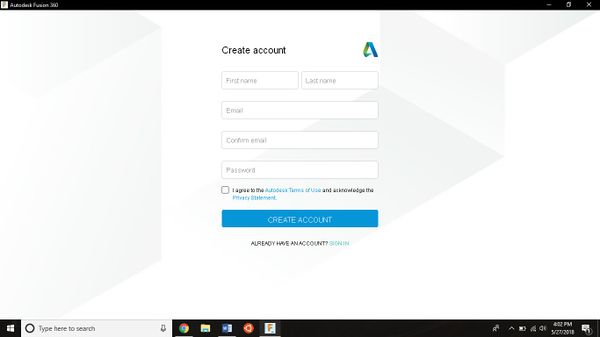
- Launch AutoDesk Fusion 360, click Create Account, and fill in the information. Important: Make sure to use an NYU email (Figure 1).
2. Designing the NYU Keychain
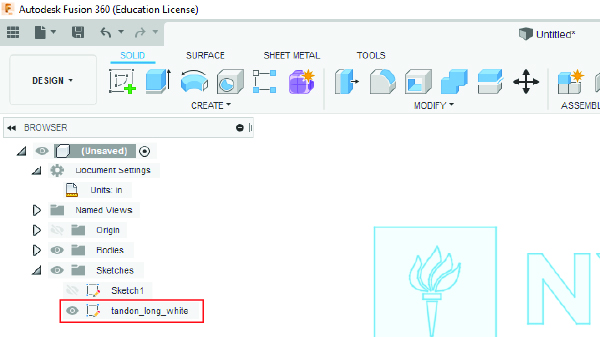
- First, ensure that the units of your drawing are in inches. They are in the Browser on the left side of the window under Document Settings.
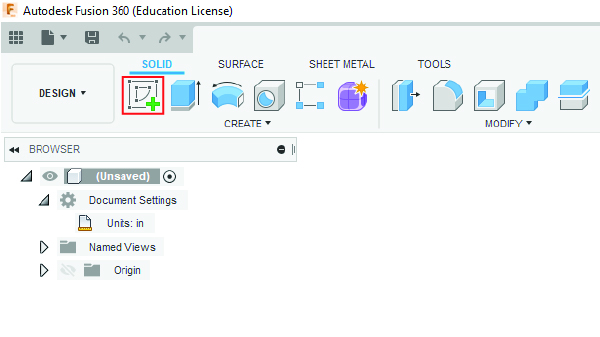
- Start a 2D Sketch by clicking Create Sketch (Figure 2).
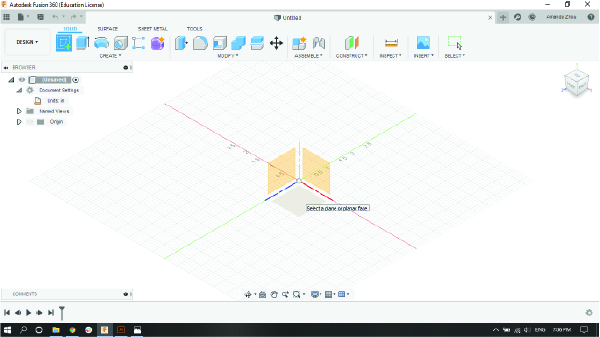
- Select the XZ plane (Figure 3).
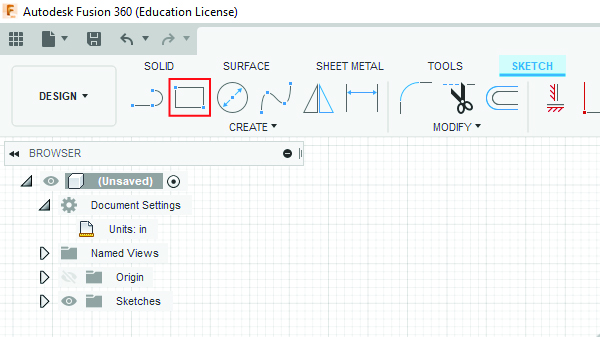
- Select the 2-Point Rectangle from the Sketch section of the toolbar (Figure 4).
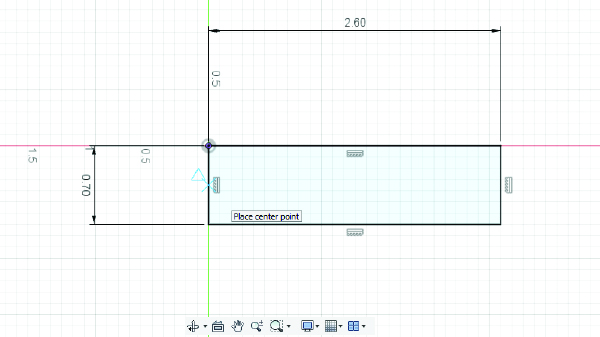
- Draw a 2.6” × 0.7” rectangle starting at the origin. Click once at the origin to place one point of the rectangle and click one more time to place the second point of the rectangle. The length values can be typed in before placing the second point of the rectangle (switching which value is changed is done using the Tab key).
- Select the Center Diameter Circle from the Sketch section of the toolbar.
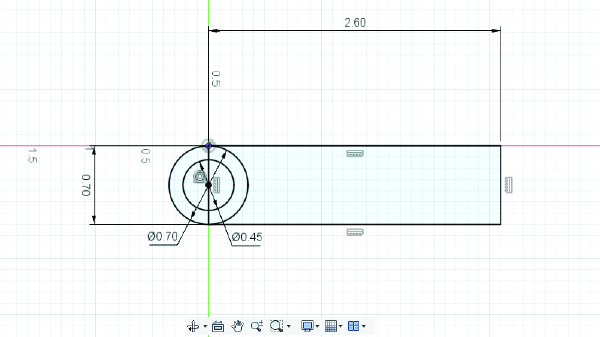
- Draw a 0.7” diameter circle centered in the middle of one of the 0.7" sides of the rectangle (the cursor should become a blue X with a triangle and snap to the midpoint of the line when you get close) (Figure 5). Similar to the 2-Point Rectangle, the diameter of the circle can be typed.
- Draw another circle 0.45” in diameter in the same position. The sketch should look like Figure 6.
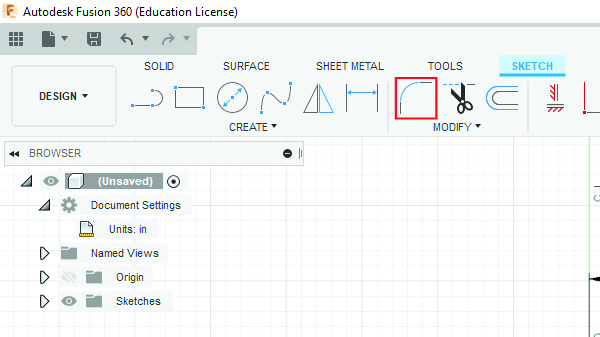
- Fillet (round) the corners of the base. Select the Fillet tool from the Modify section of the toolbar (Figure 7).
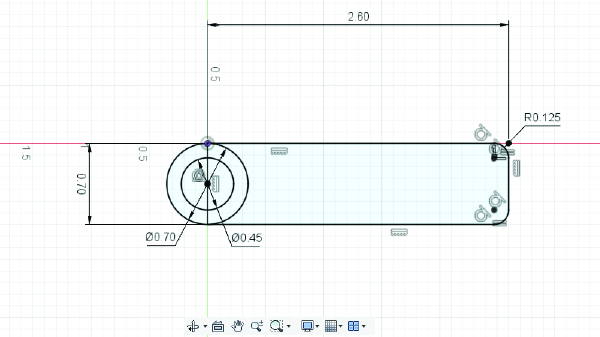
- Select one of the two intersecting lines that form the right angles on the base. Set the fillet radius to 0.125" and repeat on the other corner. The sketch should look like Figure 8.
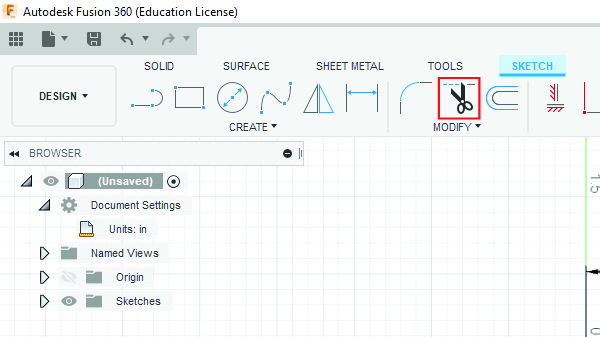
- Remove the extra lines using the trim tool. Select the trim tool from the Modify section of the toolbar.
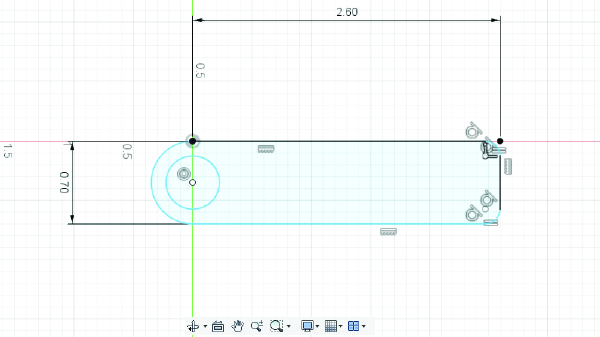
- Select all interior lines that divide the keychain to trim them. If error messages are indicated, remove the dimensions on the rest of the keychain by clicking on them and pressing the Delete key. The sketch should look like Figure 10.
- Exit the sketch using the Finish Sketch button in the top right of the window.
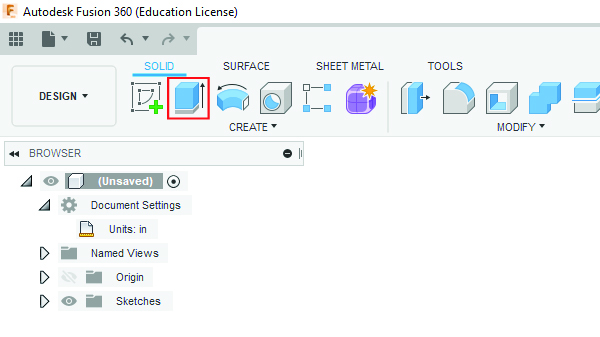
- After creating a 2D sketch, the next step is to use that sketch to create a 3D object. The Extrude tool will be used to create a 3D block. In the future, the Revolve or other tools can be used to create more advanced geometry. Select the Extrude tool from the Create section of the toolbar (Figure 11).
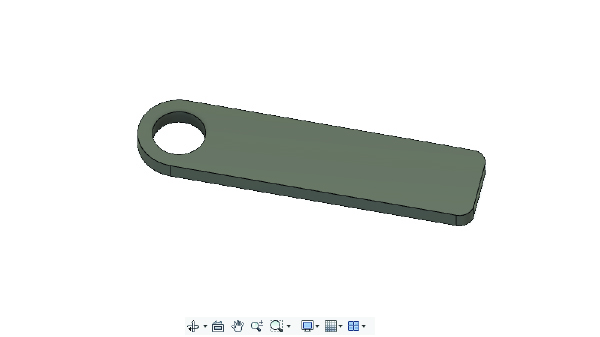
- The Extrude information dialog will pop-up on the right side of the window. First, select the profile of the object to be extruded, which is the sketch that was just created. The sketch will highlight blue if it was made correctly. Click and change the extrusion thickness to 0.15" and press the Enter key. Click OK in the Extrude information dialog. The model will look like Figure 12.
- The next step is to add the design to the keychain. A vector graphics file will be used in the DXF format provided by NYU. In the future, a logo can be designed using the sketch tool. Download the Tandon Logo DXF File (this logo was converted from the file provided on NYU's identity page).
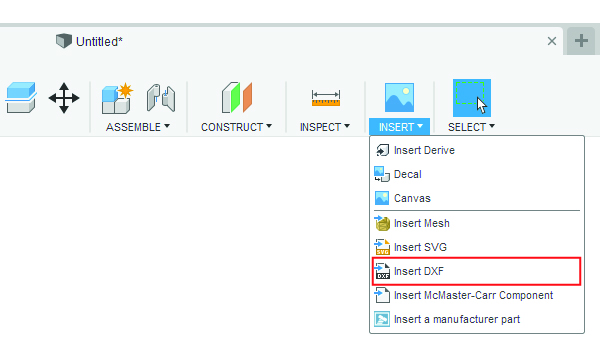
- The downloaded ZIP folder must first be extracted. Then, select Insert DXF under the Insert section of the toolbar (Figure 13).
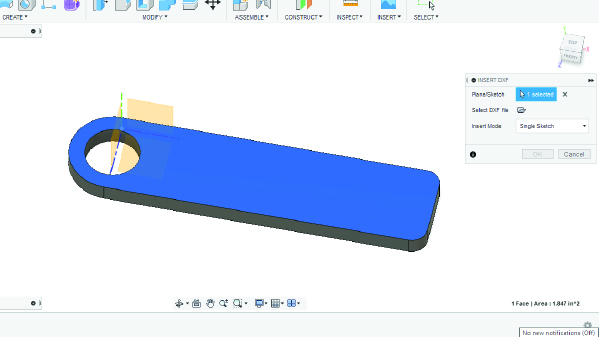
- The Insert DXF information dialog will appear on the right side of the window. For the Plane/Sketch, select the top surface of the keychain (Figure 14).
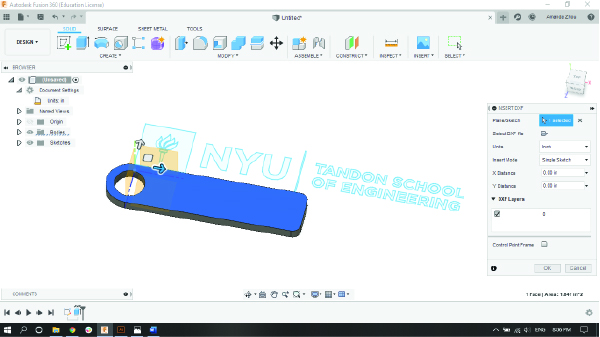
- Click the folder icon next to Select DXF file to upload the Tandon Logo DXF File. The logo should appear (Figure 15).
- Change the units to inches and click OK.
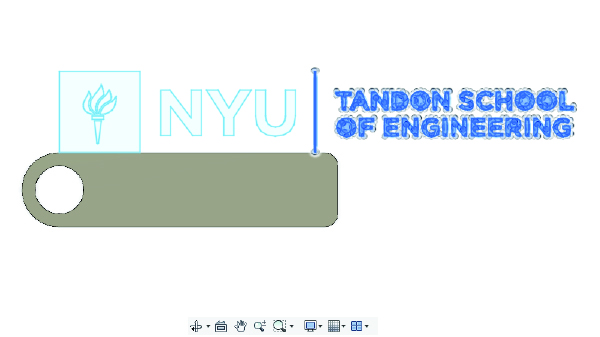
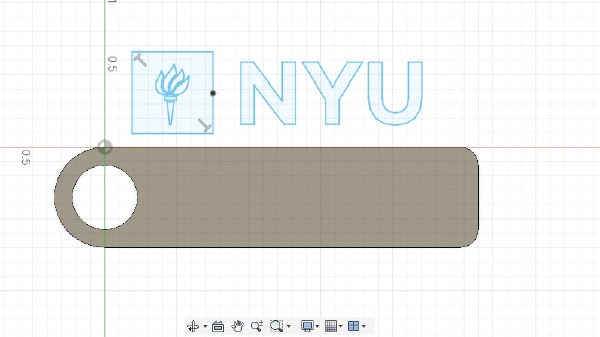
- The vertical bar and Tandon School of Engineering portions of the logo are not needed. Select the bar and text to the right by clicking and dragging (Figure 16).
- Delete this portion with the Delete key on the keyboard (not Backspace).
- The logo needs to be scaled to fit the keychain. A base point must be selected for which the sketch will be scaled to. The midpoint of the line on the right side of the box around the torch will be used as the base point, so a point must be placed there first.
- To place a point, the sketch must be in editing mode. A sketch is known to be in editing mode when the background turns into gridlines and Finish Sketch appears at the top right of the window. Enter the tandon_long_white sketch by double clicking on the sketch name in the Browser.
- Select the Point tool under the Create section of the toolbar. Place a point at the midpoint of the right side of the box around the torch (Figure 18).
- Select the Sketch Scale tool from the Modify section of the toolbar. The Sketch Scale information dialog will appear on the right side of the window. For the Entities, select the remaining lines of the box and torch of the logo by clicking and dragging. Make sure to not select the midpoint that was just placed on the right side of the box .
- If the midpoint was selected, clicking on the point again will unselect it
- Select the midpoint that was just placed as the Point for scaling.
- Enter a scaling factor of 0.75 and click OK. (Figure 19)
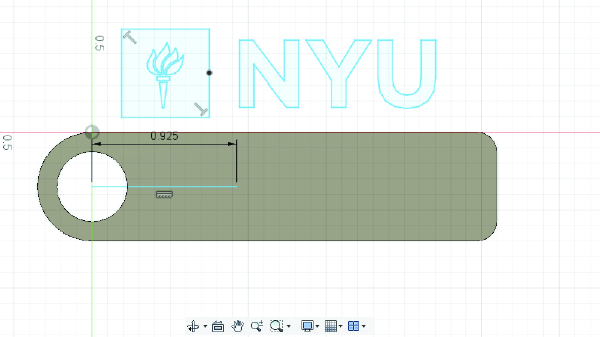
- The logo must now be positioned on the keychain. This will be done by drawing a line for alignment and moving the logo design to where the alignment line is located. Select the line tool and draw a 0.925" horizontal line from a point close to the center of the hole in the keychain base to the right (Figure 20).
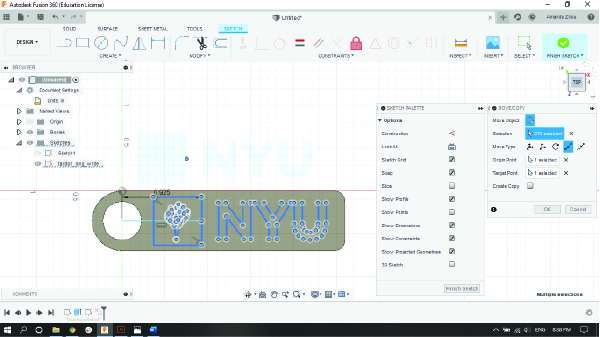
- Select the entire logo by clicking and dragging. Then select Move/Copy under the Modify section of the toolbar.
- The Move/Copy information dialog will appear on the right side of the window. The Selection should already be made (the NYU logo). Select Point to Point as the Move Type. For the Origin Point, select the midpoint from the side of the box around the torch. For the Target Point, select the right end of the alignment line that was previously drawn (Figure 21). Click OK.
- Delete the alignment line that was previously drawn.
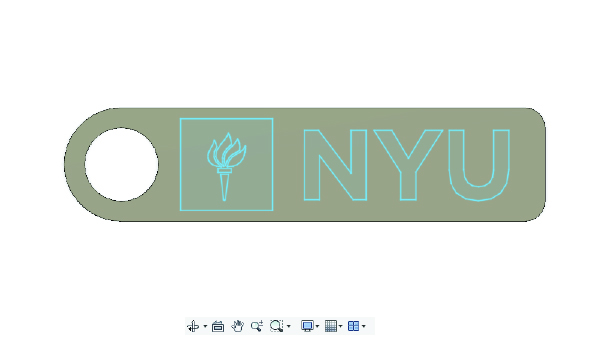
- Click Finish Sketch in the top right of the window to exit the sketch. The final sketch is shown in Figure 23.
- To finish this side of the keychain, the design must be cut into the base. To do this, the Extrude tool will be used.
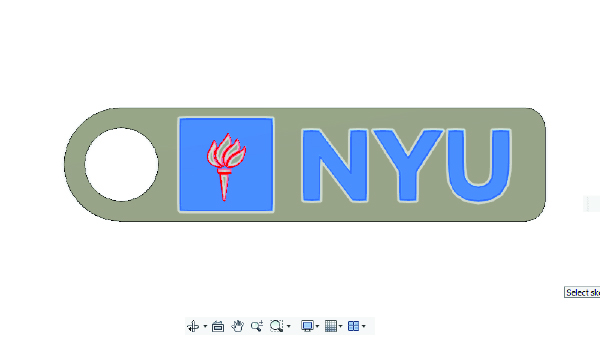
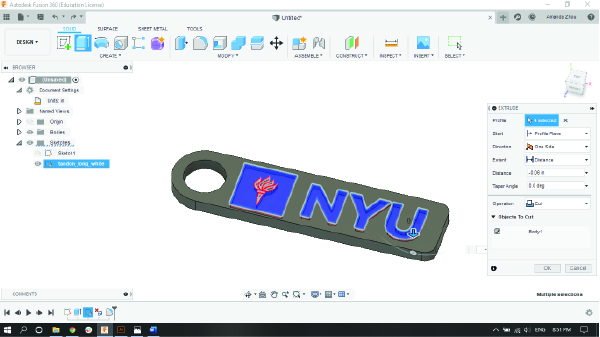
- To cut the design, select Extrude from the Create section of the toolbar. The Extrude information dialog will appear on the right side of the window. Select the Profile of the design to cut, which is the area around the torch and each of the letters (Figure 24).
- For the Operation, select Cut. Set the Distance to -0.06" (Figure 25). Click OK.
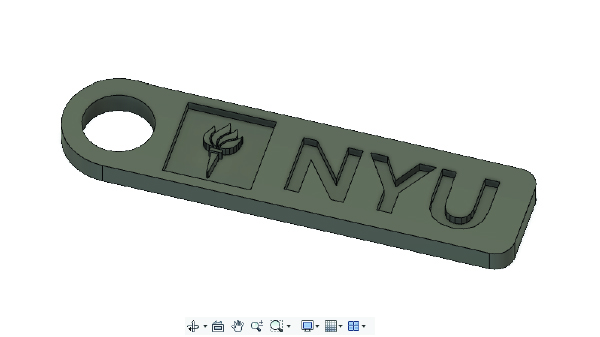
- The final model is shown in Figure 26.
3. Export for Printing
To 3D print the design, export the file as an STL. The 3D printing software, Cura, can also read 3MF and OBJ files.
- Cura only reads 3D files in millimeters, so your model must be converted to millimeters. In the Browser on the left side of the window, go under Document Settings and change the units to millimeters. Do not set millimeters as the default (default units should be inches).
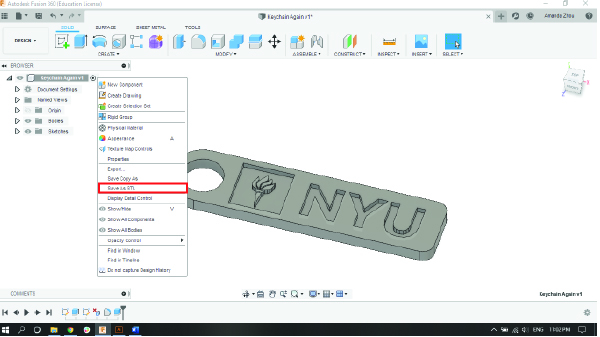
- Right click the Activate Component icon (white circle with a black dot) in the Browser and select Save as STL (Figure 27).
- The Save As STL information dialog will appear on the right side of the window. Click OK - no need to change any of the settings.
- Save the file to a location that is easily remembered.
4. Designing the Keychain Insert
The last step of the keychain design is to make the keychain insert that will fit in the center of the keychain base to make the NYU logo white.
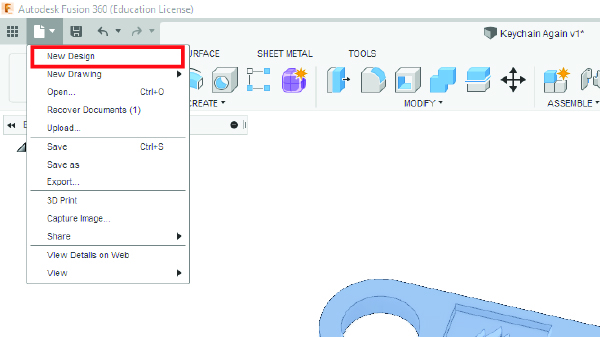
- Click File > New Design in the toolbar at the top of the screen (Figure 30).
- Make sure the document settings are in inches.
- Start a 2D sketch on the XZ plane and sketch a 2.2" × 0.65" rectangle at the origin. Exit the sketch.
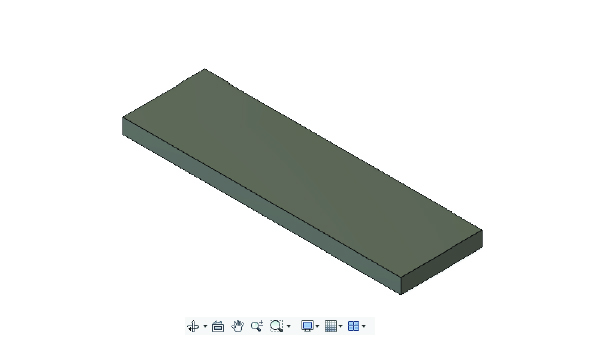
- Extrude the rectangle 0.12”.
- The final model is shown in Figure 31.
- Save and export the keychain insert as described in “3. Export for Printing.”
5. Prepare for Printing
Now that the logo design is complete, the next step is to prepare the design in the 3D printer slicing software. Cura will be used for orienting parts on the printer buildplate and selecting the color of each object. It also generates a code for the toolpath that the printer will read and follow to print the objects.
- Open Cura. If a menu pops up prompting for the printer, select the Ultimaker 3. If a menu does not pop up, make sure the printer currently selected is Ultimaker 3 at the top left corner.
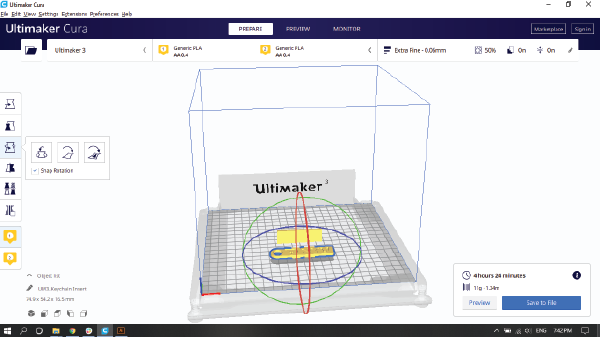
- To load the two files from above, select File > Open File(s) at the top left of the window and open the STL files containing the base of the keychain and the keychain insert (Figure 32).
- In Cura, right click and drag to pan around, middle click and drag to move your frame of view, and scroll up and down to zoom in and out.
- Select the keychain base and click the Rotate tool from the toolbar on the left side of the window. Use the red, blue, and green hoops to rotate the base so that the logo design is facing upward (Figure 33). Do the same for the keychain filler. Uncheck the Snap Rotation option for more precise rotation.
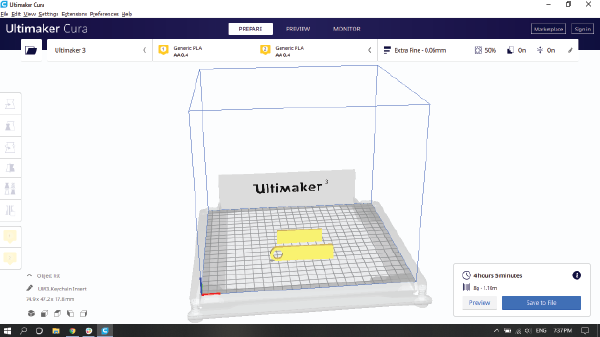
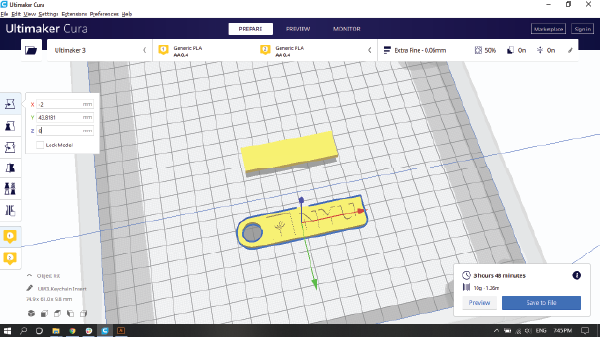
- Make sure both objects are lying flat on the build plate by using Rotate > Lay Flat. If the Lay Flat tool does not lay the object flat, go to the Move tool and type in 0 mm for the Z value (Figure 34).
- Select the rectangle insert, and using the Move tool on the left, enter 0.15 mm as the Z value to raise it vertically. If the insert does not move, go to Preferences >> Configure Cura and ensure the setting "automatically drop down to the build plate" is unchecked.
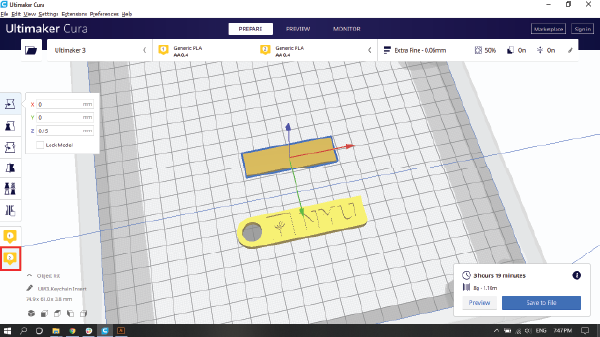
- Select the keychain insert and set it under Extruder 2 in the toolbar on the left (Figure 35). That piece will appear as slightly darker yellow. The insert must be set under a different extruder because it will be printed in a different color than the keychain base.
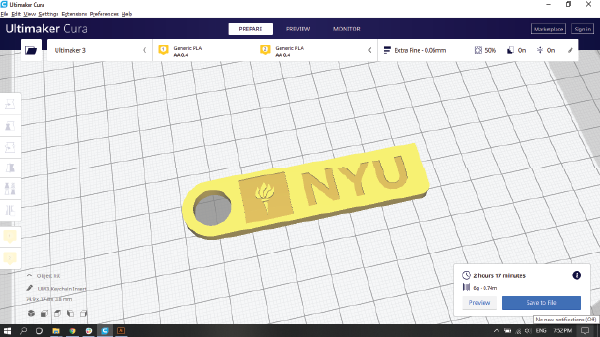
- Having the keychain insert selected, select the Move tool on the left-hand toolbar. Using the red and green arrows, drag the insert piece and align it in the keychain base (Figure 36). Make sure not to move the insert piece in the Z direction as this was previously set in Step 8.
- Click Slice, then click Save to File in the bottom right of the window. Save the file as a GCODE file. Upload it to the EG1003 website.
2. Revit
Specification
It is the year 2020 and your design firm has been contracted by New York City Mayor Bill de Blasio to solve a problem for many families. There are 1.8 million one and two-person households in the city, but there are only about one million studio and one-bedroom apartments. The task is to a create a 350-400 square foot apartment for residents/college students. This apartment should be furnished. It should have a bathroom with the appropriate furnishings, a kitchen with the appropriate furnishings, and a bedroom with a bed, a table, and a desk. It must have adequate lighting (at least one window) and space. Design an apartment layout with the following specifications.
- A 350-400 square foot floor plan layout of the entire apartment
- An electrical plan for the entire apartment
- Upon completion of the apartment design, groups have the choice to create a realistic rendering and 3D walkthrough of the apartment to receive extra credit
- To receive the extra credit, both the rendering and the walkthrough must be included in the Team PowerPoint Presentation
Design Consideration
- How well was space maximized in this very small apartment?
- Was the necessary storage added?
- Is the layout coherent and creative?
- Could a person comfortably live here?
Procedure
- Sketch a solution to the prompt and indicate the square footage. Have the sketch approved by a TA.
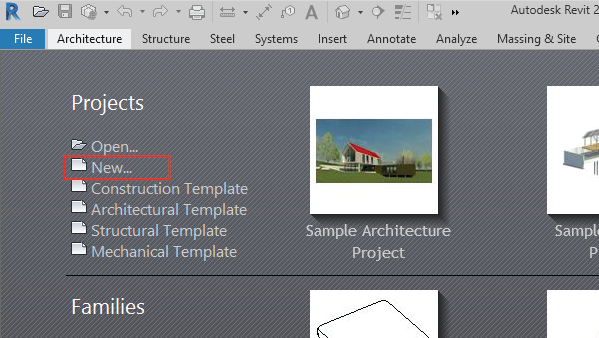
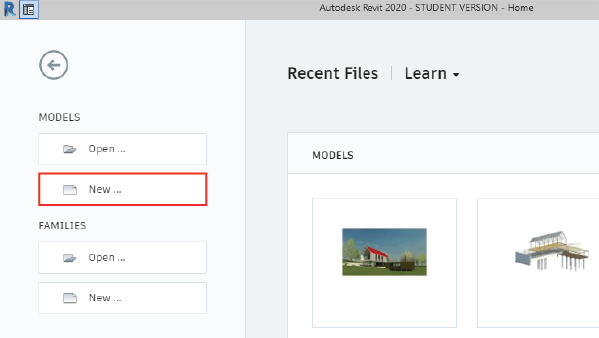
- Open Revit. Do NOT use Revit 2021 Select New > Architectural Template (Figure 25).
- There are four major sections used to create and modify the building in Revit. The Quick Access Toolbar is in red, the project ribbon in yellow, the Properties panel in green, and the Project Browser panel in blue (Figure 26). If any of the sections are accidentally removed from view, they can be reinserted by going to View > User Interface (rightmost icon) in the ribbon. File:Lab 4 Figure 24.PNGFigure 26: Revit Interface
- In the ribbon, go to the Manage tab and select Project Units (or type UN) under the Settings section (Figure 27). Click the Length value and select "Feet and fractional inches” with rounding to the nearest 1/32”. Click OK.
- Ensure the Properties panel is open by right clicking anywhere and clicking on Properties.
- Ensure the Level 1 floor plan is selected in the Project Browser on the left side of the window by double clicking on Level 1 under Floor Plans.
- Create the exterior walls by going to the Architecture tab in the ribbon and selecting Wall (Figure 28).
- Make sure the walls are 8” thick and 10’ high. The thickness and height of the walls can be changed in the Properties panel (Figure 29). File:Lab 4 Figure 27.PNGFigure 29: Wall Properties
- The Base Constraint changes where the bottom of the wall is placed in reference to the different levels.
- The Base Offset adjusts the height difference between the level and the base of the wall.
- The Top Constraint determines where the top of the wall is located. If the top constraint is selected to be Unconnected, then the Unconnected Height can be used to determine a numerical value for the height of the wall.
- Insert the interior walls (6” thick and 10’ high) for the bathroom and any other walls if desired. The type of wall (thickness) can be changed in the drop-down menu in the Properties panel (Figure 30). File:Lab 4 Figure 28.PNGFigure 30: Changing Wall Types
- Insert the floor by using the Floor tool in the Architecture tab of the ribbon and selecting the boundary where the floor will be placed. The boundary can be made by selecting the walls or by creating individual lines from the Draw section of the Modify | Create Floor Boundary tab in the ribbon (Figure 31). To complete the floor, click on the green check mark in the ribbon. File:Lab 4 Figure 29.PNGFigure 31: Create Floor Boundary
- Insert doors and windows in the apartment.
- Go to Insert > Load Family > Doors/Windows for a wide range of doors and windows (Figure 32). Doors should be 3’ wide and 7’ tall (No specifications for windows).
- File:Lab 4 Figure 30.PNGFigure 32: Load Family Tool
- Go back to the Architecture tab of the ribbon and select Door/Window (Figure 33) and select the loaded door/window from the Properties panel. They can then be placed by clicking in the floor plan.
- File:Lab 4 Figure 31.PNGFigure 33: Door and Window Tools
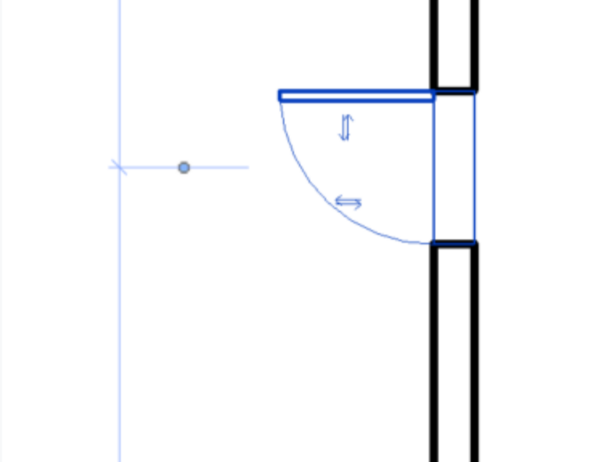
- Once placed, the direction of the doors and windows can be changed with the arrow couples (Figure 34).
- Go to Insert > Load Family > Doors/Windows for a wide range of doors and windows (Figure 32). Doors should be 3’ wide and 7’ tall (No specifications for windows).
- When loading furniture or appliances, go to the Architecture tab of the ribbon and select Component > Place a Component (or type CM).
- Furniture and appliances can be added with the Load Family tool like doors and windows. Only the furniture and appliances from the specifications must be in the floor plan including the entire bathroom. Table 2 shows the folder paths for all the files needed in this lab. In the dialog that appears, the material in the Override column should be changed.
Table 2: File Paths for Required Components Component File Path Sink US Imperial > Plumbing > MEP > Fixtures > Sinks Toilet US Imperial > Plumbing > MEP > Fixtures > Water Closets Shower US Imperial > Plumbing > MEP > Fixtures > Shower Bed US Imperial > Furniture > Beds Kitchenette US Imperial > Special Equipment > Domestic Table US Imperial > Furniture > Tables Desk US Imperial > Furniture > Tables Door US Imperial > Door > Residential
- Add furniture to the floor plan. The components can be rotated before being placed by pressing the space bar.
- Once the families are loaded, they can be placed by going to Component > Place a Component in the Architecture tab of the ribbon and by switching in the Properties tab (Figure 35). File:Lab 4 Figure 33.PNGFigure 35: Changing Component Families
- To insert a ceiling or ceiling appliances, the ceiling plan in the Project Browser must be selected. Go to Level 1 in the Ceiling Plans (Figure 36). File:Lab 4 Figure 34.PNGFigure 36: Ceiling Plans
- Use the Ceiling tool in the Architecture tab of the ribbon to create the ceiling (Figure 37). File:Lab 4 Figure 35.PNGFigure 37: Ceiling Tool
- The ceiling is created with the same method as the floor, by selecting a boundary where the ceiling will be placed. The individual walls can be selected to create the boundary by creating a Sketch Ceiling, or entire areas can be selected for the boundary using the Automatic Ceiling (Figure 38). Don’t forget to complete the ceiling by clicking the green check mark in the ribbon. File:Lab 4 Figure 36.PNGFigure 38: Sketch Ceiling and Automatic Ceiling Tools
- Navigate back to the Level 1 floor plan in the Project Browser. Insert the electrical appliances in the apartment with the Component tool in the Architecture tab of the ribbon and using the file paths provided in Table 3.
Table 3: File Paths for Required Electrical Components Component File Path Light Switch US Imperial > Electrical > MEP > Electric Power > Terminals > Lighting Switches Ceiling Light US Imperial > Lighting > MEP > Internal
- For ceiling lights, go back to the Level 1 ceiling plan in the Project Browser. Select the lights that are to be placed with the Component tool in the Architecture tab of the ribbon. Once the lighting fixture is selected, select Place on Face in the Placement section of the Modify | Place Component tab of the ribbon to freely place the lights on the ceiling (Figure 39). File:Lab 4 Figure 37.PNGFigure 39: Place on Face Tool
- Go back to the Level 1 floor plan in the Project Browser. Notice that the light fixtures on the ceiling cannot be seen in the floor plan. They must be made visible to create the electrical wiring.
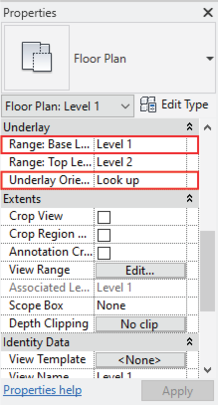
- In the Properties panel, go to the Underlay subtab and change the Range: Base Level to Level 1 and Underlay Orientation to Look up (Figure 40). This will allow the ability to “look up” at the ceiling and see the lighting fixtures on the ceiling in the floor plan.
- Connect the lights and switches with electrical wiring. Navigate to the Systems tab in the toolbar and select the Wire tool (Figure 41).
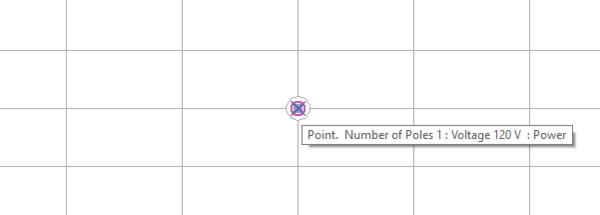
- Connect the lights to the switches. Make sure the lights and switches are properly connected to the wire by hovering over the fixture and seeing a pink circle with an X (Figure 42).
- In the Quick Access Toolbar, select Default 3D View (small house icon) to view the project in 3D (Figure 43). File:Lab 4 Figure 41.PNGFigure 43: Default 3D View Tool
- Save the file as an Autodesk Revit File (RVT) file. Take screenshots of the project and submit the RVT file on the EG1003 website by 11:59 PM the night before the next lab.
- To receive extra credit, make a 3D rendering and walkthrough video of your apartment design. Use Google, online Revit forums, and the Revit How-To to complete this. To receive the extra credit, the rendering and walkthrough video must be completed before the end of lab and also must be included in the team presentation.
Assignment
A GCODE file must be submitted to the EG1003 website by 11:59 PM the night before your next lab. There is no individual lab report or team presentation for this part of Lab 1.
| ||||||||
