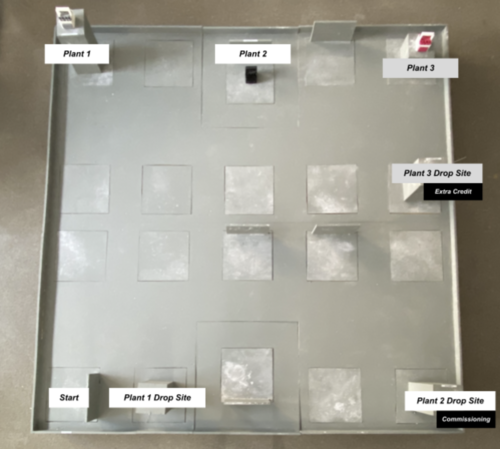
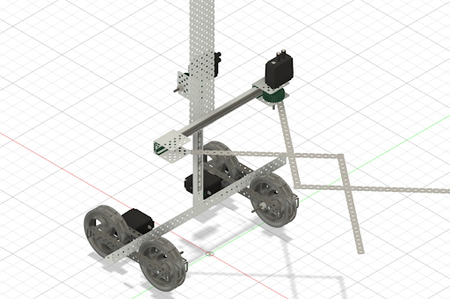
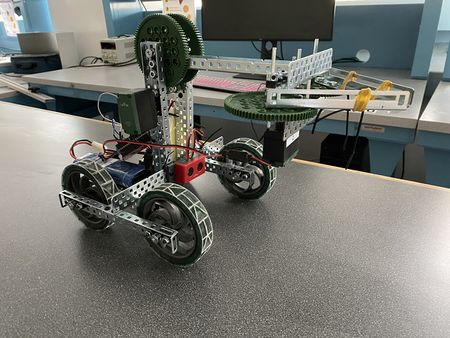
Lunar Agricultural Zone (LAZ)
Request for Proposal: Lunar Agricultural Zone (LAZ)
Introduction and Overview
In 2021, humanity faces the problem of feeding its growing population. Currently, half of the Earth’s habitable land (51 million km2) is used for agriculture, leaving little for much else. To combat this, the United States National Aeronautics and Space Administration (NASA) has turned to lunar agriculture. With a surface area of over 37 million km2, the moon has the potential to farm over 70% of the Earth’s current supply. Due to the slow period of rotation, stationary crops on the moon will be exposed to 27.3 days of continuous sunlight then darkness. In order to have greater control over the sunlight exposure of crops on the moon, NASA has issued an RFP (request for proposal) for a rover capable of traversing the Lunar Agricultural Zone, the newest solution to world hunger. This rover would traverse the unsmooth terrains of the moon, locate various crops, and determine if they should be moved depending on the levels of light exposure detected. By keeping rigorous control of the light exposure of the crops, NASA hopes to create an environment capable of sustaining plant life on the moon.
The objective of this mission is to locate and collect all plants in the Lunar Agricultural Zone overexposed to sunlight. To complete the given tasks, either the gyro, touch or ultrasonic sensor can be used to increase the accuracy of the rover movement. After the overexposed plants are obtained, they should be transported to an area of less exposure.
Specifications
Design a robot using Fusion 360 as your primary design tool. The robot must meet the following specifications:
- Size & Material Constraints
- The robot should fit within a 12 in x 12 in footprint. Larger robots are allowed, but discouraged.
- A cost estimate of the robot’s components must be created and all revisions to the same must be recorded and explained.
- Build Guidelines
- The mechanism used to pick up the samples must be designed and built by the team (the use of prebuilt VEX claws is prohibited).
- Projectile (catapult, slingshot) designs are not allowed.
- Sensor Requirement
- The design must incorporate a sensor of choice. This could be a gyro sensor, ultrasonic sensor, or touch sensor.
- Microcontroller Requirement
- The robot’s movements must be directed by an Arduino program. All revisions to the Arduino program must be recorded and explained.
- Autonomous Navigation
- The robot must be fully autonomous, and therefore cannot be touched by any person during testing. The Arduino program may not be altered or switched during any part of the mission.
Please refer to the course syllabus for all due dates.
This project reflects real life scenarios; the robot must be able to handle minor imperfections in the course. Please note that any attempt to physically step on the course will result in a point penalty in your final project grade due to safety precautions.
Course Layout
Microsoft Project
You must create a schedule to manage your time in Microsoft Project. You can learn Microsoft Project by doing the MS Project Skill Builder. This schedule must include all tasks related to the project from the start of the project to Submission. The MS Project schedule should include the following:
- Minimum of 20 tasks.
- Milestones should be clearly indicated on the project plan (duration of zero days).
- Each task must include the person responsible for completing the task (resource names).
- Use the "Copy Picture" function to include the project plan in the presentations. Do not take a screenshot.
- Gantt chart must be displayed alongside the tasks list (fit onto one slide).
- Gantt chart must clearly show a progress line.
- Clearly state during the presentation whether the project is on-time, behind schedule, or ahead of schedule.
For help in planning the project, review the manual page How to plan the schedule and calculate costs for a project.
Drawings
All drawings and sketches should be made using the Assembly tool in Fusion 360. It can be downloaded for free on a personal computer using an NYU email, or accessed from any computer during Open Lab.
Using Fusion 360, create four drawings of the robot: front, top, most detailed side, and a drawing of the gear train(s). Sensors, motors, and gears must be included in each drawing. Smaller pieces such as nuts, bolts, and axles may be omitted from the drawings. If the robot does not use any gears, make sure to explicitly state that in your presentations.
Each revision of the design must be documented and all changes must be presented during Milestone presentations.
Model
You must build a scale model (1:1) of your design. The following materials will be provided:
- VEX steel pieces and claw
- Basic electronics prototyping kit (Reference VEX wiring guide)
- Sensors
- Motors
The finished robot must not exceed a footprint of 12 in × 12 in. There is no height limitation. Additional materials can be supplied by your TA.
Cost Estimate
Once a robot design is complete, a cost estimate must be generated that specifies the cost of all the materials and labor required for the construction of the design. Tabulate this cost information clearly in an Excel spreadsheet, using the materials cost list provided. Help in calculating the cost is available by reviewing how to plan the schedule and calculate costs for a project. The costs for the parts can be found on the price list for VEX parts for robot projects. The cost estimate should include the following:
- Labor cost breakdown with hours and rates
- Consolidate low-cost pieces: axles, beams, bricks, bushings, connectors, gears, plates
- Consolidate electrical components: microcontroller, breadboard, wires, battery, motor shield, etc
- Itemize high-cost pieces: sensors and motors
- No decimal places; this is an estimate after all. Round appropriately
- Total cost must be shown in the bottom right corner
Engineering Notebook
While working on your project, you are expected to keep a record of all work done, as well as future plans and goals. In order to complete a Benchmark assessment, show your Engineering Notebook to the Open Lab TA completing your assessment. For Final Submission you must have it approved by an Open Lab TA in a Word Document (DOC or DOCX) format. A guide to writing the notebook, as well as a basic overview of its expectations and frequency at which you should log in your notebook, can be found on the Keeping an Engineering Notebook page.
Milestones, Benchmarks, and Deliverables
As you work on your project, you will be required to present periodic reports on your progress. We call these Milestones. All the items assigned in each Milestone are called deliverables. These deliverables often consist of a combination of written submissions, presentations, and demonstrations.
Preliminary Design Investigation
The Preliminary Design investigation (PDI) is extremely important, as it lays the groundwork for your project. You will be outlining your project idea, inspiration, and goals.
The PDI must include:
- Cover Page
- Project Overview
- Goals & Objectives
- Design & Approach
- Cost Estimate
- Project Schedule
- Relevant Pictures
An example PDI template can be found here. The PDI is due by Benchmark A. Do not forget to include the items listed above. Use this link to access the VEX PDI Rubric.
Milestone 1
See How To Give a Milestone Presentation for the format of a Milestone presentation.
Milestone 1 should act as a presentation of your Preliminary Design Investigation. Without simply replicating your report in presentation format, take the key points to present in a concise and clear manner. The section formatting should be similar to that of the report. It is important that you outline your project goals and show that your project is realizable. This includes:
- Project description
- Design approach
- Mission statement
- Preliminary CAD drawing of robot
- Cost estimate
- Microsoft Project schedule
- Click here to access the guide on how to transfer a file
- Progress update: current state of the project
Look Ahead: What tasks are planned between now and Milestone 2?
Benchmark Assessment A
Benchmark assessments evaluate the progress of the project. Benchmark Assessment A is due at the end of Model Shop Session II. There are penalties for not completing on time. Refer to the EG1003 Grading Policy for more information.
To pass, the design must complete all of the following:
- Robot travels to Plant 1 and successfully lifts Plant 1
- Robot must have a fully functioning claw. For help with claw designs, refer to the VEX lift & Claw Guide
- Preliminary Design Investigation
- Submit an .STL and a .gcode file of the team logo or extra credit print through the 3D Printing Submission portal on the EG website
- The 3D Printing and Logo Guide contains information on the 3D printing requirements and guidelines
- The protolab schedule is available on the 3D Printing and Logo Guide
- Updated Engineering Notebook
Milestone 2
See How To Give a Milestone Presentation for the format of a Milestone presentation.
Milestone 2 will be a project progress update. You must explain all changes and developments made thus far, particularly in regards to Benchmark A. Include whether or not you were able to complete your Benchmark A requirements, and if not, explain why. Also, highlight any changes you plan on making to your design or project, in general. Your Milestone 2 presentation must include:
- Project description
- Design approach
- Design changes since Milestone 1
- Mission statement
- CAD drawings: top, front, most detailed side, isometric, gear train
- Flowchart of Code
- Circuit Diagram
- Cost estimate (previous and current). What changes were made?
- Microsoft Project schedule (previous and current). What changes were made?
- Click here to access the guide on how to transfer a file
- Progress update: current state of the project (time, budget, etc.)
Look Ahead: What tasks are planned between now and Milestone 3?
Benchmark Assessment B
Benchmark Assessment B is due at the end of Model Shop Session III. There are penalties for not completing on time. Refer to the EG1003 Grading Policy for more information.
To pass, the design must complete all of the following:
- After retrieving Plant 1 in Benchmark A, the robot delivers Plant 1 to the Plant 1 Drop Site and travels to Plant 2
- The robot must touch Plant 2
- Have an .STL and a .gcode file of the team logo or extra credit print approved through the 3D Printing Submission portal on the EG website
- The 3D Printing and Logo Guide contains information on the 3D printing requirements and guidelines
- The protolab schedule is available on the 3D Printing and Logo Guide
- Updated Engineering Notebook
Milestone 3
See How To Give a Milestone Presentation for the format of a Milestone presentation.
Milestone 3 will be the last project progress update. You must explain all changes and developments made thus far, particularly in regards to Benchmark B. Include whether or not you were able to complete your Benchmark B requirements, and if not, explain why. Also, highlight any changes you plan on making to your design or project, in general. Your Milestone 3 presentation must include:
- Project description
- Design approach
- Design changes since Milestone 2
- Mission statement
- CAD drawings: top, front, most detailed side, isometric, gear train
- Flowchart of Code
- Circuit and Schematic Diagrams
- Cost estimate (previous and current). What changes were made?
- Microsoft Project schedule (previous and current). What changes were made?
- Click here to access the guide on how to transfer a file
- Progress update: current state of the project (time, budget, etc.)
Look ahead: What tasks are planned between now and the completion of the project?
Commissioning
Refer to the syllabus for the commissioning deadline. There are penalties for not completing on time. Refer to the EG1003 Grading Policy for more information.
To pass, the design must complete all of the following:
- After traveling to Plant 2, the robot delievers Plant 2 to the Plant 2 drop site
- Robot meets all specifications
- Have an .STL file of the team logo or extra credit print printed through the 3D Printing Submission portal on the EG website
- The 3D Printing and Logo Guide contains information on the 3D printing requirements and guidelines
- The protolab schedule is available on the 3D Printing and Logo Guide
- All 3D prints must be approved by a Protolab TA
- Updated Engineering Notebook
Extra Credit
LAZ Groups have multiple opportunities for extra credit. These include:
- Retrieving Plant 3 and delivering it to the Plant 3 Drop Site.
- Completing Benchmark A or Benchmark B in reverse
- Robot retrieves Plant 1 from Drop Site and returns it to its original position
- Robot retrieves Plant 2 from Drop Site and returns it to its original position
- Completing Benchmark A, Benchmark B, or Submission early, or
- Completing your respective SLDP's 3D printing extra credit task as described in the 3D Printing and Logo Guide.
Refer to the EG1003 Grading Policy for exact point values. Creativity and innovation are always rewarded. Original designs will receive extra credit.
Final Design Report
The Final Design Report (FDR) provides a comprehensive overview of your project process and developments from initial brainstorm to finished proof of concept. All project expectations and outcomes must be clearly detailed in the document. This report will also provide you with documentation experience useful for completing your Senior Design final report and other projects.
The Final Design Report must include the following documentation:
- CAD drawings
- Wiring Diagrams
- Commented code
- Project schedule
- Cost estimate
Use this Final Design Report template with the following outline:
- Introduction
- Purpose of Project
- Background
- Requirements
- Physical Components
- Software Components
- Procedures
- Physical Construction
- Software Setup
- Software Troubleshooting
- Milestone and Final Product Requirements
- Benchmark A Requirements
- Benchmark B Requirements
- Final Submission Requirements
- Human Resources and Training (e.g. TA expertise utilized, etc.)
- Results
- Benchmark A Results
- Benchmark B Results
- Difficulties Experienced
- Conclusion
- Results of Project
- Future Improvements
The FDR is due at the time of submission.
Final Presentation
The final presentation will be a technical briefing, similar to the milestones, but also serves as a sales presentation explaining why your company should be selected instead of the competition. Please include the following:
- Problem statement
- Solution overview
- Company description and qualifications
- CAD Drawings
- Flowchart of Code
- Circuit and Schematic Diagrams
- Cost estimate
- Microsoft Project schedule
- Video demonstration
- Why should your company be awarded this contract?
Submission
All SLDPs must submit online. Please visit https://eg.poly.edu/finalSLDP.php for login information and the link to the Project Submission form.
Students must be logged into the account provided at https://eg.poly.edu/finalSLDP.php. Submitting with your NYU account or any other account will generate an error.
Submissions may be edited at any time before the deadline. Please note that submission times are based on the last submission. Submissions that qualify for Early Submission will lose the Early Submission Extra Credit if the submission is edited after the Early Submission deadline.
Please note the deliverables for this project are as follows. If any of the following items are omitted, you will be penalized. Be sure to click SUBMIT at the bottom of the form.
- Submission deliverables:
- Final presentation
- Final Arduino program
- Final Circuit Diagrams
- Initial sketch
- All the drawings of your design (initial through final)
- Video
- Final MS Project Schedule
- Final cost estimate
- Resume(s) (No fictitious resumes will be accepted.)
- Final Engineering Notebook
- Final Design Report
Early Submission
If you submit your project one week early, you are eligible for a bonus that will be added to your final semester-long project grade. You must submit all deliverables one week before the submission deadline (see syllabus for exact date). The deliverables received early are the ones you will use in your presentation. No adjustments to the deliverables submitted will be accepted.
Late Submission
Late submission is not allowed. If you do not commission or partial commission by the deadline set forth in the syllabus, you will not be allowed to submit and will receive a 0 for the project grade. In order to receive partial commissioning, two TAs must analyze the project and determine its level of completeness in terms of commissioning requirements. Please refer to the EG1003 Grading Policy for more information.
Frequently Asked Questions
Q: Can we step onto the course as it is hard to reach the middle due to its size?
A: No. If needed, you can have a TA assist you.
Q: Can we bump the course if the robot gets stuck?
A: No. You can't bump the Moon, so bumping the course is not an option.
Q: Can we use rubber bands on the wheels for more traction?
A: Yes! This is highly encouraged, especially when dealing with slopes, bumps, or anything with a degree of friction.
Q: All the VEX parts are really big. Is there a size constraint?
A: There is a soft size-limitation of 12 in x 12 in. If you slightly exceed this constraint, it is ok, but you will have difficulties due to the sizing of the course.


