Difference between revisions of "Bomb Disarming Robot (BDR)"
| Line 134: | Line 134: | ||
<p>Your team must create a time management plan using Microsoft Project (MS Project). | <p>Your team must create a time management plan using Microsoft Project (MS Project). | ||
This plan must include all tasks related to the project. Each task must be named, assigned | You can learn Microsoft Project by doing the [[MS Project Skill Builder]] contained elsewhere in | ||
a duration, assigned to a specific person, (or people) and ranked in importance relative to | this manual. This plan must include all tasks related to the project. Each task must be named, | ||
assigned a duration, assigned to a specific person, (or people) and ranked in importance relative to | |||
the other tasks you have identified. You must begin your work by creating an MS Project plan. | the other tasks you have identified. You must begin your work by creating an MS Project plan. | ||
Follow your project plan throughout the semester. If the team falls behind schedule, explain | Follow your project plan throughout the semester. If the team falls behind schedule, explain | ||
the reasons for the delays when you present your progress reports, list the steps being taken | the reasons for the delays when you present your progress reports, list the steps being taken | ||
to get the project back on track, and create a revised MS Project plan.</p> | to get the project back on track, and create a revised MS Project plan.</p> | ||
<p>For help in planning your project, review the page called | |||
[[How to plan the schedule and calculate costs for a project]] in the section called <i>Material | |||
to help you with the project</i> elsewhere in this manual.</p> | |||
<p>There should be at least twenty tasks/subtasks and three Milestones. Milestones should be | <p>There should be at least twenty tasks/subtasks and three Milestones. Milestones should be | ||
| Line 182: | Line 188: | ||
a cost estimate must be generated that specifies the cost of all the materials | a cost estimate must be generated that specifies the cost of all the materials | ||
and labor required for the construction of your design. Tabulate this cost information | and labor required for the construction of your design. Tabulate this cost information | ||
clearly in an Excel spreadsheet, using the materials cost list provided.</p> | clearly in an Excel spreadsheet, using the materials cost list provided. You can get help in calculating | ||
the cost by reviewing the page called [[How to plan the schedule and calculate costs for a project]] in | |||
the section called <i>Material to help you with the project</i> elsewhere in this manual. The costs for | |||
the parts can be found on the page [[Price list for Lego parts for robot projects]] in the <i>Material to | |||
help you with the prject</i> section elsewhere in this manual.</p> | |||
<p>Have all the materials and parts used categorized in different groups instead of including | <p>Have all the materials and parts used categorized in different groups instead of including | ||
individual parts. Make sure to include the units of each part used in a group and total them up | individual parts. Make sure to include the units of each part used in a group and total them up | ||
for that individual group. Moreover, the cost of labor should be included. You can get help on | for that individual group. Moreover, the cost of labor should be included. You can get help on | ||
the labor cost by reading the page | the labor cost by reading the page [[How to plan the schedule and calculate costs for a project]] in | ||
the section called <i>Material to help you with the project</i> elsewhere in this manual.</p> | |||
=== <h3>MILESTONES</h3> === | === <h3>MILESTONES</h3> === | ||
Revision as of 18:20, 1 June 2006
RFP*: BDR (Bomb Disarming Robot)
* RFP is an acronym for Request For Proposal. Internationally, RFPs are called ITTs, an acronym for Invitation To Tender. Companies and governmental agencies use RFPs to solicit new business.
INTRODUCTION AND OVERVIEW
The United States Department of Homeland Security, was established in 2002 by an executive order issued by President George W. Bush. The department is an amalgamation of 22 federal agencies all dedicated in various ways to the protection of our country. The Department has three primary missions:
- To prevent terrorist attacks within the United States,
- To reduce America's vulnerability to terrorism, and
- To minimize the damage from potential attacks and natural disasters.
Among its many directives, the Department considers it a top priority to reduce the threat imposed by explosive devices to both our citizens and our first responders. As recent events have made clear, the potential danger to innocents is real and is one we must contend with. A strategic component of the Department's 10-point plan to deal with explosives that threaten the citizenry is a fully autonomous robot designed to navigate to an explosive device and disarm it. Such a machine would not only reduce the threat to bystanders, but would protect the brave men and women who have dedicated their lives to our safety.
This bomb disarming robot, code-named BDR, should be nimble and effective. Your design must be reliable and cost-effective, as the Department envisions the deployment of a large number of BDRs throughout the country. The winning proposal must demonstrate the dependability of your design.
Innovation in your approach to the problem will be rewarded. Please give details about your company and its lead employees and give at least one example of a similar project completed by your firm. Please refer to the specifications that follow as you prepare your proposal cover letter. The format outlined in the Technical Communication section of this manual is the one you should use.
SPECIFICATIONS
Design a robot using MLCAD as your primary design tool. Your team must build a model of your design using the materials provided. A RoboLAB program that will direct the robot's movements must be created. A cost estimate of the robot's components must be provided. All revisions to the original design must be recorded and explained. This includes technical design drawings, as well as cost estimates. All revisions to the RoboLAB program must be recorded and explained.
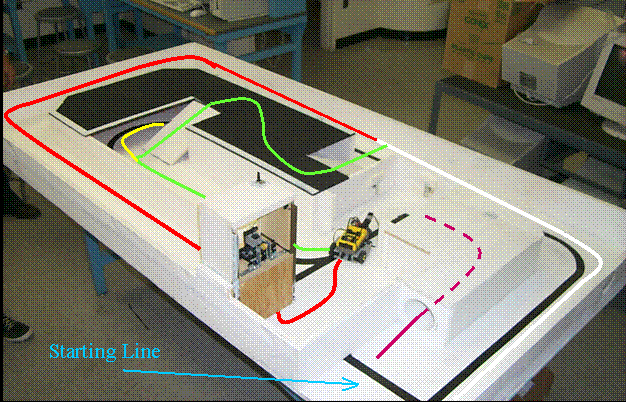
The BDR must be able to move autonomously over a pre-selected route, disarm the center bomb, avoiding two decoy bombs, and, for extra credit, pick up the explosive device and return it to the start point. In addition, there is a second device in another location, and retrieving this device as well will earn additional extra credit. The robot must fit in the dimension box, and begin behind the starting line (see Figure 1). These specifications must be met for final commissioning.
The robot program may not be altered or switched during any part of the mission. Likewise, the robot must be fully autonomous, and therefore cannot be touched by any person during testing. Please refer to the course syllabus for all due dates.
ROUTE CHOICES
Figure 1: BDR navigation field with the 4 main routes highlighted
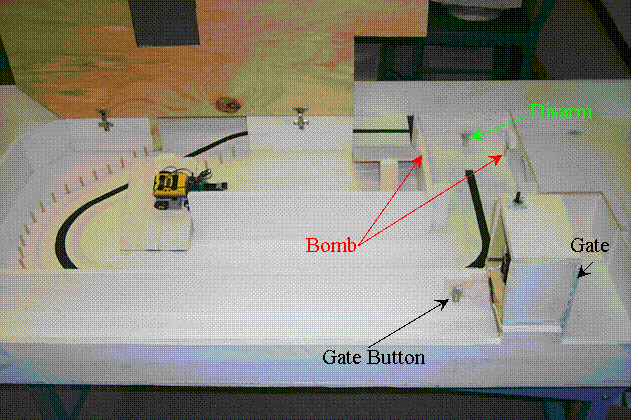
Figure 2: Alternate view of BDR navigation field.
Note: Testing must be performed with the hatch down, as in Figure 1
Route 1: The robot must follow the black line, disarm the bomb, and return to base (see Figures 1 and 2 Black route ).
Route 2: The robot must navigate the perimeter of the course, open a gate in its path by depressing a button, proceed to the bomb's location, and disarm it (see Figure 1 white/red route).
Route 3: The robot must navigate along the black line around the perimeter of the course until it reaches the ramp. It must travel up the ramp, navigate to a second ramp and travel back down to the black line. Next, it must proceed to the bomb's location and disarm the bomb (see Figure 1 white/green route).
Route 4: The robot must navigate through the tunnel and disarm the bomb (see Figure 1 purple route).
Please Note:
Projectile (catapult, slingshot) designs are not allowed.
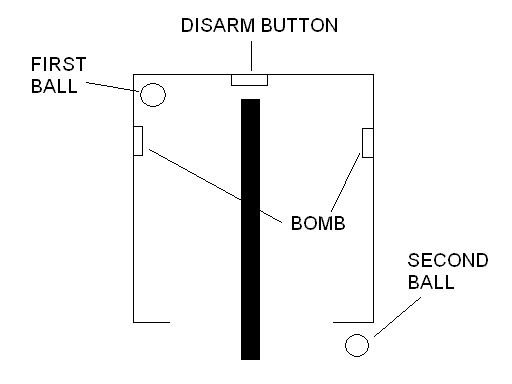
For extra credit, the robot can retrieve a piece of the bomb (ping pong ball) and return it to base. The first ping pong ball is located on the left side of the disarm button. Returning the bomb to the starting point is worth an additional 3 points on your Final Proposal Cover Letter grade. For additional extra credit, there is another piece of the bomb located in a different location that the robot can also retrieve. The second ball is located outside the perimeter of the bombs. It is on the right side. Returning this piece to the starting point is worth an additional 5 points of extra credit. Therefore, if both pieces of the bomb are retrieved, a total of 8 extra credit points will be awarded to your Final Proposal Cover Letter. You must retrieve the first ball in order to be eligible for credit for the second ball. A diagram of the placement of the bombs is shown below in Figiure 3:
Figure 3: BDR bomb placement
For extra credit, the robot can retrieve a piece of the bomb (ping pong ball) and return it to base. Returning the bomb to the starting point is worth an additional 3 points on your Final Proposal Cover Letter grade. For additional extra credit, there is another piece of the bomb located in a different location that the robot can also retrieve. Returning this piece to the starting point is worth an additional 5 points of extra credit. Therefore, if both pieces of the bomb are retrieved, a total of 8 extra credit points will be awarded to your Final Proposal Cover Letter. You must retrieve the first ball in order to be eligible for credit for the second ball.
If you would like to design your own route, you may ask your instructor for permission.
Creativity and innovation are always rewarded. Original designs will receive extra credit.
MICROSOFT PROJECT
Your team must create a time management plan using Microsoft Project (MS Project). You can learn Microsoft Project by doing the MS Project Skill Builder contained elsewhere in this manual. This plan must include all tasks related to the project. Each task must be named, assigned a duration, assigned to a specific person, (or people) and ranked in importance relative to the other tasks you have identified. You must begin your work by creating an MS Project plan. Follow your project plan throughout the semester. If the team falls behind schedule, explain the reasons for the delays when you present your progress reports, list the steps being taken to get the project back on track, and create a revised MS Project plan.
For help in planning your project, review the page called How to plan the schedule and calculate costs for a project in the section called Material to help you with the project elsewhere in this manual.
There should be at least twenty tasks/subtasks and three Milestones. Milestones should be noted with the duration of "0day". Moreover, the copy picture function included in MS Project Software should be used instead of the print screen function of the computer.
DRAWINGS
A command of MLCAD is necessary for you to complete the drawings required for this project. Use MLCAD to create four drawings of your robot: front, top, most detailed side, and a drawing of your gear trains. Sensors, motors, and gears must be included in each drawing. All parts used in the robot must be referred to using the part number found in the price list.
Each revision of your design must be documented. This is done by saving the old side view drawing, and assigning a revision number to the new drawing.
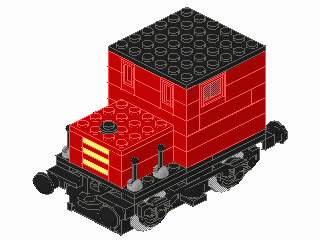
Figure 4: Sample isometric image from MLCAD (without part numbers)
MODEL
You must build a scale model (1:1) of your design. The following materials will be provided:
- RoboLAB kit
- One RCX
- Sensors
- Motors
Additional materials can be supplied by your TA.
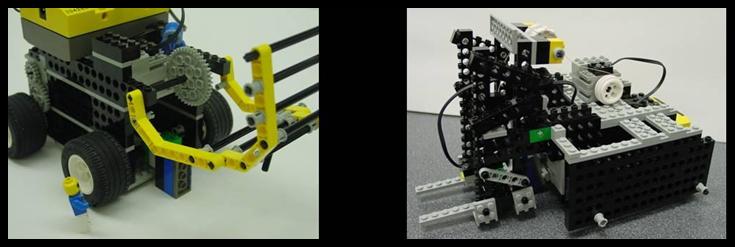
Figure 5: Photographs of some past robot models constructed from provided materials
COST ESTIMATE
Once a robot design is complete, a cost estimate must be generated that specifies the cost of all the materials and labor required for the construction of your design. Tabulate this cost information clearly in an Excel spreadsheet, using the materials cost list provided. You can get help in calculating the cost by reviewing the page called How to plan the schedule and calculate costs for a project in the section called Material to help you with the project elsewhere in this manual. The costs for the parts can be found on the page Price list for Lego parts for robot projects in the Material to help you with the prject section elsewhere in this manual.
Have all the materials and parts used categorized in different groups instead of including individual parts. Make sure to include the units of each part used in a group and total them up for that individual group. Moreover, the cost of labor should be included. You can get help on the labor cost by reading the page How to plan the schedule and calculate costs for a project in the section called Material to help you with the project elsewhere in this manual.
MILESTONES
As you work on your project, you will be required to present periodic reports on your progress. We call these Milestones. All the items assigned in each Milestone are called deliverables. These deliverables often consist of a combination of written submissions, presentations, and demonstrations.
Milestone 1
Prepare a preliminary sketch of your design, a cost estimate, and an MS Project plan.
Look Ahead: What tasks do you plan between now and Milestone 2?
Milestone 1 Deliverables: Apresentation. Include the preliminary sketch, cost estimate, and MS Project plan. Include a brief description of the robot and any special features and benefits of your design.
Note: Whenever you revise your drawing(s), your cost estimate, or your MS Project plan, you must include the initial drawing, the initial cost estimate, or the initial MS Project plan, in addition to the revision.
Milestone 2
Using MLCad, prepare four views of your latest design: front, top, most detailed side, and an isometric drawing. Create an MLCad drawing of your gear trains. Complete your latest RoboLAB program and your latest MS Project plan reflecting any schedule changes. Finally, calculate a revised cost estimate. A signed Component Testing Form must be submitted to your Recitation TA.
Look Ahead: What tasks do you plan between now and Milestone 3?
Milestone 2 Deliverables: A copy of your presentation slides that includes four views of your design using MLCad: front, top, most detailed side, and an isometric drawing; an MLCad drawing of your gear trains; your RoboLab program; a revised cost estimate; your revised MS Project plan; and your signed Component Testing Form.
Note: Whenever you revise your drawing(s), your cost estimate, or your MS Project plan, you must include the initial drawing, the initial cost estimate, or the initial MS Project plan, in addition to the revision.
Milestone 3
Using MLCad, prepare four views of your latest design: front, top, most detailed side, and an isometric drawing. Create an MLCad drawing of your gear trains. Complete your latest RoboLAB program and your latest MS Project plan reflecting any schedule changes. Finally, calculate a revised cost estimate.
Look ahead: What tasks do you plan between now and the completion of the project?
Milestone 3 Deliverables: A copy of your presentation slides that includes four views of your design using MLCad: front, top, most detailed side, and an isometric drawing; an MLCad drawing of your gear trains; your RoboLab program; a revised cost estimate; and your revised MS Project plan.
Note: Whenever you revise your drawing(s), your cost estimate, or your MS Project plan, you must include the initial drawing, the initial cost estimate, or the initial MS Project plan, in addition to the revision.
FINAL PRESENTATION
The exact specifications for your final presentation will be provided by your instructor. Some of these requirements will be: the features and benefits of your design, project specifications, all drawings, RoboLAB programs, cost estimates, and your completed MS Project. After you deliver your final presentation, you will proceed to the Model Shop to have your work commissioned (tested). A signed Commissioning Statement must be included with your final presentation materials.
Final Proposal Cover Letter: Refer to the Technical Communication section of this manual for specifics on the preparation of your cover letter. This document is the final written report describing your design project. Remember that proposals must be persuasive in tone.
The Appendix must include your initial sketch, all the drawings of your final design, the final RoboLAB program, the final MS Project, and the final cost estimate. Be sure to include photographs your final model.
EARLY ACCEPTANCE
If you complete your project one week early, you are eligible for a bonus that will be added to your final semester-long project grade. You must submit all deliverables by 5PM one week before your section is scheduled to present (see syllabus for exact date). To commission early, all required information on the form titled Early Acceptance of Semester Project, found on the EG web site, must be approved, accepted, and signed by a TA. The deliverables received early are the ones you will use in your presentation. No adjustments to the deliverables commissioned will be accepted.
LIQUIDATED DAMAGES
If you do not complete all your deliverables and do not commission during the Final Presentation, you will incur liquidated damages for the next five business days. From business day 6 to day 10 you will incur increased liquidated damages. If your project is 10 business days late, or beyond the date of the EG1004 Final Exam, you will lose all of the credit for your semester project.
