Coding Robotics with Arduino
Objectives
This guide will provide you a brief introduction to the sensors and coding that you will working with on your VEX robotic project.
Arduino Overview
Microcontrollers
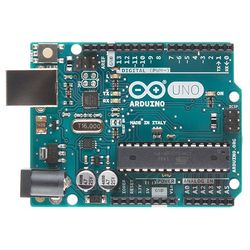
A microcontroller is a cheap, programmable computer without any of the peripherals such as a mouse, keyboard, or screen. Microcontroller boards have direct access to the input and output pins of its processing chip so that the user can directly read from sensors and perform actions. Microcontrollers are present in many electrical appliances like microwaves. Arduino boards were designed to be easily programmed and assembled into larger projects. These boards come in many shapes and sizes and some contain additional features such as WiFi or Bluetooth connectivity. Different boards can also have different features such as processing speed and memory size.
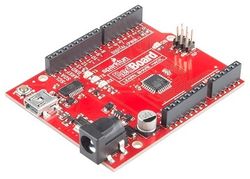
This lab will be using an Arduino UNO board created by SparkFun called a RedBoard.
Arduino Hardware
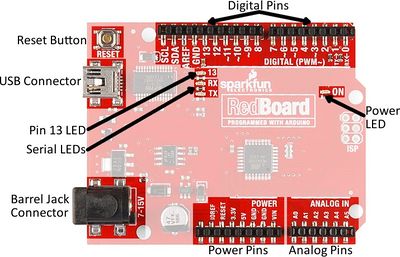
Reset Button: Restarts the Board
USB Connector: Provides power and connects it to the computer
Pin 13 LED: Usable LED without making an LED circuit
Serial LEDS: Shows if the Arduino is transmitting or receiving data from pins 0, 1 or the USB connection
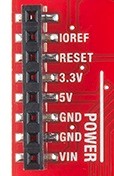
3.3V: Usually used to power low-voltage sensors
5V: Most common power pin used to power circuits
GND: Ground pin which is 0V
VIN: Voltage-In can be used to power the board using a battery
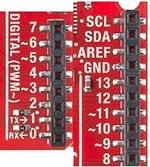
A0-A5: Identical analog pins that can be used to read sensors or control analog devices. Pins A0-A3 are more stable than A4-A5.
Pins 0-1: Transmit and Receive pins, don’t use these pins for this lab
Pins 2-12: Digital pins that can be switched between HIGH states and LOW states
Pin 13: Connected to the on-board LED, use it only as an input pin
The Arduino IDE
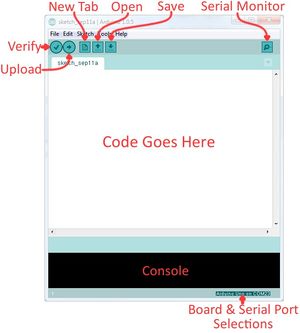
The Arduino IDE is a program that can be used to edit, compile, and upload code to a supported microcontroller. Figure 6 is a screenshot of the program:
Verify: checks code for errors and points to where the errors occurred after it finishes. Upload: verifies code and then uploads it to the Arduino board if there are no errors.
Console: shows any errors the software found in hardware.
Serial Monitor: a tool used to see how a program is running. It’s like a multimeter for the program.
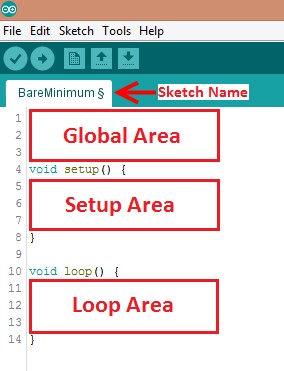
Programs written in Arduino are called sketches. A basic sketch can be broken up into 3 different areas: global, setup and loop; these areas are pictured below.
Global: constants and imported libraries go here.
Setup: activate the pins and sensors used. This code only runs once.
Loop: the code that runs continuously such as reading sensors and turning pins HIGH or LOW.
Arduino Programming
The Arduino programming language is based on C/C++, but it is designed to be simpler and easier to learn. The most intuitive way to think about programming is like building with LEGO blocks: certain rules must be followed and different building blocks can be used to build bigger parts. General
- Every line must either end with a semicolon ‘;’ unless it’s a conditional, loop, or function
- Comments start with a //
- Comments are text that the program ignores
- Used to label and explain code
Datatypes Datatypes are the different kinds of data values that can be used, manipulated and stored using C++. The table below includes the most basic and widely used datatypes.
| Datatype | What it stores (examples) | Default value | Notes |
|---|---|---|---|
| Boolean | A true value (1, TRUE, HIGH) or a false value (0, FALSE, LOW) |
0, FALSE, LOW | - |
| int | An integer number (-5, 15, 1047, etc.) | 0 | Can be positive or negative |
| double | A decimal number (-0.5, 123.77, etc.) | 0 | Can be positive or negative |
| char | A single character (‘c’, ‘A’, ‘5’, ‘?’, etc.) | Indeterminate | Must be enclosed in single quotes |
| string | A sequence of characters (“Hello World!”, “10”, “157+5”, etc.) |
Empty (“”) | Must be enclosed in double quotes |
Operators Operators perform operations on variables and constants. The results of these operations are usually stored in a variable. The table below includes common operators.
| Operator | What it does | Notes |
|---|---|---|
| = | Assigns a value to a variable | |
| + | Adds two or more values | |
| - | Subtracts two or more values | |
| * | Multiplies two or more values | |
| / | Divides two or more values | |
| ++ | Increment by 1 | Usually used in loops |
| -- | Decrement by 1 | Usually used in loops |
| == | Checks if two value are equal | Usually used in conditionals |
| != | Checks if two value are not equal | Usually used in conditionals |
| > or < | Less than/Greater than comparison | Usually used in conditionals |
| <= or >= | Less than/greater than or equal to comparison | Usually used in conditionals |
| && or || | Boolean AND or Boolean OR Used to cascade multiple Boolean operations | Usually used in conditionals |
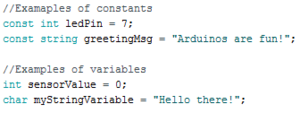
Constants and Variables Constants and variables hold data according to their datatype. They need to be given a name so they can be referred to later. Constants hold data that will NOT change while a program is running. Constants usually contain pin numbers or sensor threshold values. Variables contain data that WILL change while a program is running. Variables usually contain sensor values and other values that need to have mathematical operations done on them. Below is an example of how to create different constants and variables.
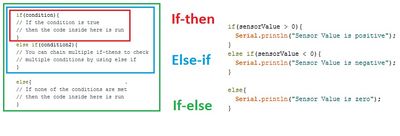
Conditional Statements Conditional statements run code enclosed by their curly brackets when a condition is met.
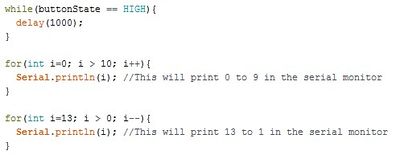
Loops Loops run the code enclosed by their curly brackets a specific amount of times or until a condition is met. While-loop While-loops are used to perform a task until a condition is met For-loop For-loops are used when you want something to run a specific number of times. Although they seem complicated at first, the structure of most for-loops is the same. In the parenthesis, the first part sets a variable (usually ‘i’ for ‘index’) to a value used to begin a count, the middle is the condition when the loop stops, and the third part is where you increment or decrement the counting variable.
Commonly Used Arduino Functions
| Function | What it does |
|---|---|
| pinMode(pin,mode) | Sets a pin as an input or output |
| digitalWrite(pin, value) | Sets a digital output pin to HIGH or LOW |
| digitalRead(pin) | Reads an digital input pin as HIGH or LOW |
| analogWrite(pin, value) | Sets an analog output pin to a value 0-1023 |
| analogRead(pin) | Reads an analog output pin as a value 0-1023 |
| delay(milliseconds) | Pauses the program for a certain amount of time |
| Serial.print(value) | Prints the value (variable) to the Serial Monitor. |
