Difference between revisions of "Microsoft Project Skill Builder"
| Line 4: | Line 4: | ||
== Objectives == | == Objectives == | ||
To create a Microsoft (MS) Project schedule for your semester-long design project by performing the instructions that follow and using Figure 1 as a sample. | To create a Microsoft (MS) Project schedule for your semester-long design project by performing the instructions that follow and using Figure 1 as a sample. | ||
[[Image:SB1.gif|frame| | :[[Image:SB1.gif|frame|left|Figure 1: A Typical Project Plan]]<br clear="both" /> | ||
Note that tasks are ordered chronologically and an estimate of the amount of time it takes to perform each task is specified. | Note that tasks are ordered chronologically and an estimate of the amount of time it takes to perform each task is specified. | ||
| Line 14: | Line 14: | ||
== Procedure == | == Procedure == | ||
=== Start a New Project Plan == | === Start a New Project Plan === | ||
# | # Launch MS Project. Open the ''Start Menu''. Expand the ''All Programs'' group, then the ''Microsoft Office'' group. Click on ''Microsoft Project 2010''. The screen shown in Figure 2 appears. | ||
[[Image:Msproj2.png|thumb| | #: ''Alternatively, you can type "project" into the search field of the Start Menu and click on '''Microsoft Project 2010'''.'' | ||
#: [[Image:Msproj2.png|thumb|650px|left|Figure 2: Project Startup Screen (partial image)]]<br clear="both" /> | |||
#: One of the more notable new features of '''MS Project 2010''' is the '''Ribbon''', the main navigation bar that allows easy access to commonly used tools. The '''Ribbon''' contains several tabs that feature tools and commands grouped by their function. Under the '''Ribbon''' the window is divided into two sides: the task list on the left and the time view of the project on the right. The default time view is known as the ''Gantt Chart''. | #: One of the more notable new features of '''MS Project 2010''' is the '''Ribbon''', the main navigation bar that allows easy access to commonly used tools. The '''Ribbon''' contains several tabs that feature tools and commands grouped by their function. Under the '''Ribbon''' the window is divided into two sides: the task list on the left and the time view of the project on the right. The default time view is known as the ''Gantt Chart''. | ||
# Customize your project plan. Project opens with a blank project, so all we need to do is customize it. Select the ''Project'' tab on the Ribbon, then select ''Project Information''. In the dialog box that appears, click on the arrow next to the box labeled ''Schedule From''. From the dropdown menu that appears, select ''Project Finish Date''. Note that the ''Finish Date'' box above is no longer gray, and you can enter a date into it (and the ''Project Start'' box is now gray instead). You can only schedule a project from one place, and you've now selected the end date when your project is due. Enter the date you expect to finish here or click the dropdown arrow to open a virtual calendar to select the due date. Click ''OK''. | |||
#: '''Note:''' Make sure that the current date is correct and that the calendar is set to ''Standard''. | |||
#: '''Note:''' If you want, you can use the start date for your project, but make sure that the overall schedule completes by the due date. | |||
# Click on the ''View'' tab on the Ribbon, and then select ''Gantt Chart'' if it's not selected already. The Gantt Chart is the most widely used form of schedule in the industry, and shows time flowing from left to right. Other views might be used in some circumstances, but we don't need them for EG1003. | |||
#: Let's stop and examine the screen more carefully. The blank Gantt chart fills most of the screen, and consists of two parts. The left side is the list of tasks in the schedule, and consists of a number of columns. The right side is a calendar that goes from left to right. We'll work on each side of the screen separately, but MS Project will make sure they are consistent with each other. | |||
#: We'll now review the list of tasks. The list looks similar to an Excel spreadsheet, so it will be easy to learn how to use it — the interface is the same. The row numbers are blank in the gray column on the left side. This is because you haven't created any tasks yet. As you do, the numbers will fill in automatically. This column of numbers is called the ''Task ID''. The next column has a letter "i" inside a blue circle. This is the ''Indicators'' column. Most of the time it will be blank when a task is not completed yet, and will contain a check mark when it is. The next column, called ''Task Mode'', is used to either allow you to schedule the task manually or let MS Project automatically schedule the task's ''Duration'', ''Start'' time, and ''Finish'' time for you based on certain factors such as dependencies, constraints, calendars, etc. The next column is the ''Task Name'', which you enter. You can choose any text you want for a task name, but it should be clear to anybody looking at the schedule what the task is. The next three columns are the ''Duration'', ''Start'' time, and ''Finish'' time of the task. When you first enter a task, these three columns are left blank. You can estimate two of three pieces of information and enter them into their respective columns. We'll discuss this more later. | |||
#: <!-------------------------------------------------------------------------------------------> Tasks in a project frequently interact. Typically, one task determines how the other task is scheduled. The task that sets the schedule is called the '''''predecessor task''''', and the one that has its schedule set by the predecessor task is called the '''''successor task'''''. | |||
#: The next column is the '''''Start''''' date of the task. Since you've chosen an end date for the project, the last task to be completed will be set to end at that date, and all the predecessor tasks will be adjusted to make everything match automatically. Therefore, leave this date blank and let Project fill it in as you create the schedule. The next column is the '''''Finish''''' date of the task, and is also automatically computed by Project. The next column is '''''Predecessors''''', which are the tasks you identify that control how this task is scheduled. The last column is '''''Resource Names''''', which we'll discuss later. | |||
#: Sometimes you won't see all these columns because the calendar is hiding them. This is easy to fix. Between the task list and the calendar is a thick bar. Put your mouse over the bar, hold down the left mouse button, and "drag" the bar to where you want it. Dragging the bar to the right will show the other columns in the task list. | |||
# Add your tasks. To do this, move your cursor to the first box below '''''Task Name''''' and click on the box so we can enter text there. Type in a descriptive name for the task. Repeat this process for all the tasks needed for your project. You might not know all the tasks required, but enter as many as you can. We can always add more tasks later. | |||
# When these tasks interact, there are four ways they can interact. The second task must start when the first one ends (called '''Finish-to-Start''' in Project), the second task must end when the first one starts (called '''Start-to-Finish'''), the second task must start when the first task starts (called '''Start-to-Start'''), or the second task must end at the same time as the first one (called '''Finish-to-Finish'''). These interactions are called '''dependencies'''. Microsoft Project uses the '''Finish-to-Start''' dependency by default. To designate one of the other dependencies, type SF, SS, or FF next to the task number in the predecessors box, as described below. For EG1003, we will use the '''Finish-to-Start''' relationship. | |||
#: Frequently, you have a list of tasks, where each successor's start should be the predecessor's finish. Project has a way to do this quickly. Select the first task, hold down CTRL and select the next task. Repeat this process until all the tasks you want to connect are highlighted. The '''''Link icon''''' is located on the main toolbar, and looks like a piece of chain. Click on the Link icon, and the tasks will arrange themselves properly. Also, note that a connecting arrow from the finish of each predecessor task is connected to the start of each successor task, showing their relationship graphically. As an alternative, you can set the predecessors for each task manually. Start by dragging the bar between the task list and the calendar so that you can see the Predecessors column. Put the Task ID of the predecessor tasks in the cell. If you don't show the dependency type, Project will choose Finish-to-Start by default. If you want a different choice, use the proper two letter abbreviation. The following are some examples of how to show predecessors. For each one, what you'd type is shown in italics, and its meaning follows: | |||
#* ''1'' This makes task 1 the predecessor for this task. Finish-to-Start is chosen by default. | |||
#* ''1FS'' This is the same as the preceding item, except we showed the relationship to help clarity. | |||
#* ''1SS'' This says that this task must start at the same time as task 1 | |||
#* ''1FF'' This says this task must end at the same time as task 1 | |||
#* ''2SF'' This says that this task must end when ask 2 starts. | |||
#* ''1FS, 2FS'' This says that this task should start when '''both''' task 1 and task 2 are finished. Whichever of these tasks finishes last determines the start of this task. Project will figure this out automatically. | |||
#: '''Note:''' You can change the relationship of the linked tasks later. Either you can reenter or edit the information in the task list cell by clicking on it and changing it the same way you would in Excel. You can also double click on the connecting arrow from the right side of the predecessor task to the top of the successor task. A window will appear showing the task dependency. You can click on the arrow next to the existing type and choose a different type, with the same meanings described earlier. | |||
#: You can also choose the amount of lag time between tasks. Sometimes you need to introduce lag time. For example, after concrete has been poured, tasks that depend on the concrete need to be delayed until the concrete has hardened. You can account for this with a "Concrete hardens" task of the proper duration, but that clutters the schedule. Instead, we can introduce a delay between the end of the predecessor task and the successor task, called lag time. If you're entering information into the task list cell, just add the lag time you want by putting a plus sign and the lag time. If you're using the Task Dependency window, you can enter the lag time on the right side of the window. Project chooses a default of no lag time to allow the project to be done in the minimum time, but now you can override it if you want. The following are some examples of how to show predecessors with lag time. For each one, what you'd type is shown in italics, and its meaning follows: | |||
#* ''1+1d'' This makes task 1 the predecessor with Finish-to-Start by default, and one day of lag time. | |||
#* ''1FS+1d'' This is the same as the preceding item, except we showed the relationship to help clarity. | |||
#* ''1SS+1w '' This says that this task must start one week later than the start of task 1 | |||
#* ''1FF'' This says this task must end at the same time as task 1 | |||
#* ''1FS+3d, 2FS+1d'' This says that this task should start when '''both''' task 1 has been finished for 3 days and task 2 has been finished for one day. Whichever condition is later determines the start of this task. Project will figure this out automatically. | |||
=== Change the Timescale === | |||
'''Note:''' ''The Microsoft Project default setting for the Gantt Chart is a daily schedule. You will need to change this timescale for your independent project in order to show all data.'' | |||
the | |||
# On the main menu, click on '''''Format''''', and on the pull down menu that appears, select '''''Timescale'''''. As an alternative, right click on the dates at the top of the calendar, and on the pull down menu that appears, select '''''Timescale'''''. | |||
# In the window that appears, under Middle Tier Formatting, click on the arrow next to the '''''Units''''' field and choose '''''Months'''''. | |||
# Click on the '''''Bottom Tier''''' tab at the top of the window. Click on the arrow next to the '''''Units''''' field and choose '''''Weeks''''' from the pull down menu. | |||
# Click OK. | |||
=== Set Task Duration === | |||
In the Duration column highlight the box for the task you would like to adjust and enter the desired duration. | |||
To designate a duration, use: | |||
* '''m''' for minute | |||
* '''h''' for hour | |||
* '''d''' for day (this is working days, not calendar days - weekends are skipped) | |||
* '''w''' for week | |||
* '''mon''' for month | |||
* '''ed''' for elapsed days | |||
=== Name Resources === | |||
A project may need many different types of resources. For your project, and for most other activities, one obvious set of resources is the people involved on the project. Special equipment would be another resource. For example, if you needed a backhoe for a week and had to rent it, the use of the backhoe should be included in your schedule so you don't forget to order it, and also to include its cost. We'll now consider how to include resources on your schedule: | |||
On the main menu, click on '''''View'''''. On the pull down menu that appears, click on '''''Resource Sheet'''''. Your schedule will be replaced by another spreadsheet where you can show resources. For your EG1003 project, you need to enter the names of the people on your project team as the resource names. However, since your project also requires a cost estimate, we can add other items. For example, one part of your estimated cost is the labor of your team. The rate to use is shown elsewhere in this manual, but you can enter this rate for each person in the '''''Std. Rate''''' column. We'll ignore the other columns, but professionals usually make heavy use of this information and fill in everything. When you're done, you can return to your schedule by clicking '''''View''''' on the top menu and selecting '''''Gantt Chart'''''. This will return you to the view you had earlier. | |||
is | |||
When you | |||
=== Assign Resources === | |||
the | You can now assign resources to tasks. First, click on the task name that you want to assign resources to. Then, on the main toolbar, click on the icon that looks like two people, which is the '''''Assign Resources''''' icon. Hovering the cursor over the icon will also identify it for you. When you click on the icon, the Assign Resources popup window will appear. Like the task list, this looks like a spreadsheet where you will identify your resources. The first column is the '''''Resource Name'''''. Type in the name of the person responsible for the task, in EXACTLY the same form as you used on the resource sheet. The '''''Units''''' column is used to indicate the level of commitment of the resource. In industry, a person is usually available 100% of the time for the project, so the Units would be 100%. For shared resources the percentage would be less. For your project, it would be reasonable to assume you'll be spending about 10% of your time on the project. The labor rate is copied over automatically from your resource sheet. After you've entered the information for your resources, click OK. Do this for all the tasks in the project. | ||
'''Tip:''' ''To assign a task to more than one person, type both names in the highlighted box, separated by a comma. By default, Microsoft Project will evenly distribute the task. To change this distribution, manually enter the percentages in the command line.'' | |||
Project | |||
=== To Format the Gantt Chart === | |||
# On the main menu, click on '''''Format''''', and on the pull down menu that appears, click on '''''Gantt Chart Wizard'''''. A popup window will appear introducing the wizard. Click on Next. | |||
# When the next window appears, select the '''''Standard''''' radio button (if it is not selected already), and click Next. | |||
the | # When the next window appears, click on the '''''Custom Task Information''''' radio button, and click Next. | ||
# There are three fields in the window that appears: | |||
#* For the '''''Left:''''' box, click on the arrow on the right and on the pull down menu, select '''''Name'''''. | |||
#* For the '''''Right:''''' box, click on the arrow on the right and on the pull down menu, select '''''Resource Names'''''. | |||
#* For the '''''Left:''''' box, click on the arrow on the right and on the pull down menu, select '''''% Work Complete'''''. | |||
#* Click Next. | |||
#: '''Note: '''''There are three Milestones and a Final Presentation in EG1003. This information should be included in your Gantt Chart. Placing the Milestones here will help keep your project on track. The directions for doing this appear here later.'' | |||
# Click Next on the three screens that follow. | |||
# Then click Format It. | |||
# Exit the wizard. | |||
'''Note: '''''Once you become familiar with the program, you can modify and label your schedule to better fit your project.'' | |||
=== Insert New Tasks === | |||
Sometimes we realize that we've forgotten something and need to add it. Also, the project itself changes, so we need to add things. | |||
# Select the Task Name of the task just below where you want to insert the new task. | |||
# On the main menu, click on '''''Insert'''''. On the pull down menu that appears, select '''''New Task'''''. | |||
'''Important:''' ''Be sure to update the '''task information''' for this new task so that it has the proper place in the Gantt Chart.'' | |||
that | |||
=== Add Subtasks === | |||
For a small schedule, what we've done so far is adequate. However, most schedules are much more complex. When we're working on more complex tasks, we use a "divide and conquer" approach, where we split the overall job into a group of high level tasks, then take each of these tasks and divide them into smaller tasks, and keep doing this until we have a low level of detail. This allows us to be sure that we haven't forgotten anything, and also allow us to track the project at a high level. The lowest level tasks, which we've been doing, are called '''''detail tasks''''', and they are collected into '''''summary tasks'''''. This section will show you how to take advantage of this approach. | |||
# Enter the tasks. The first task should be the summary task, followed by the detail tasks. For the detail tasks, enter the duration and other information as we've discussed earlier. | |||
# In the Task Name field, select the tasks you would like to designate as subtasks and click the Indent button on the toolbar. The indent button is a green arrow pointing to the right in the middle of the toolbar. Notice how the summary tasks now becomes a black line over the detail tasks, and its duration is set automatically by the detail tasks. Also, notice that a new box appeared to the left of the summary task name, and the box has a minus sign inside. For a complex project, showing the entire schedule can be overwhelming. If you click on the minus sign, the detail tasks disappear, and only the summary task is shown, making a large schedule easier to read. To make your subtasks reappear, click on the + sign that replaced the minus sign. | |||
#: [[Image:SB2.gif|frame|left|Figure 3: Tasks and subtasks.]]<br clear="both" /> | |||
This completes your schedule. Be sure to save your work. | |||
=== Include Your Project Plan in Your PowerPoint Presentations === | |||
Although you need a schedule in order to control and keep track of a project, frequently you have to present your progress to others as well, typically using PowerPoint. This section will tell you how to make an effective schedule to show in your presentation. | |||
# For a presentation, you want to show an overview without a lot of detail. Therefore, we'll hide the columns on the left side except for the task name. To do this, note that there's a bar between the task list and the Gantt Chart. If you hover your mouse over the bar, you'll see two arrows appear pointing left and right. This means you can move the bar. Hold down the left mouse button and drag the bar over to just behind the Task Name list. This gives your Gantt Char more room and allows you to see more of the schedule. | |||
# Select the camera icon (Copy Picture) in the middle of the toolbar. | |||
# A window will appear. Under '''''Render Image''''', click on the radio button next to '''''For Screen.''''' | |||
# Under '''''Copy''''', click on the radio button next to '''''Selected Rows'''''. | |||
# Under '''''Timescale''''', click on the radio button next to '''''From:''''' and in the text boxes enter the start and finish date of your project. | |||
#: '''Note:''' ''This step is very important. Failure to do this causes more space than you need to be copied and your picture will be too large.'' | |||
# Go to Microsoft PowerPoint and paste (CTRL+V) the picture into your slide. | |||
=== Update Your Schedule === | |||
After we've completed the schedule, we need to show progress on the tasks we've defined so we can see if we're on schedule. | |||
# Click on the Task Name of the task you want to update the progress. | |||
# In the main menu, click on '''''Tools'''''. On the pull down menu that appears, select '''''Tracking'''''. On the next menu that appears, select '''''Update Tasks'''''. | |||
the | # In the popup window that appears, you'll see the task name. You can update the boxes that are white. The one you'll use most often is the '''''% Complete:'''''. Enter the percentage in the box next to it. A task that hasn't started yet would be zero, and a task that's completed would be 100%. As an alternative, you can see the task duration from the schedule in the gray box in the top right corner of the window. Below it, you can enter how much time is needed to complete the task and Project will calculate the percentage for you. When you're done, click OK. | ||
'''Important:''''' You should modify you project schedule each week.'' | |||
=== Update the Project === | |||
If we have many tasks, it can be tedious to update all of them when we're updating the schedule, especially since almost all of them are probably on time. This feature will allow us to update all the tasks to the date we choose, and have project calculate the percent complete for each task to match this date. Then we can change just the tasks that are ahead or behind schedule individually. | |||
of | |||
# On the main menu, click on '''''Tools''''', and on the pull down menu select '''''Tracking'''''. On the next pull down menu, select '''''Update Project'''''. | |||
# In the popup window that appears, enter the date you want to use in the box in the top right corner of the window. Then click OK. | |||
=== Add Milestones === | |||
In a project, some tasks are '''''Milestones'''''. As the name implies, a milestone is an event that has either happened or hasn't. Typical milestones are the start of the project, its completion, various reviews, completion of major systems, etc. | |||
Enter the name of the task that you want to make a milestone, or insert it if you're adding the milestone later. For the duration, enter zero. A diamond bullet will appear to indicate a milestone. See Figure 4. | |||
: [[Image:SB3.gif|frame|left|Figure 4: Milestones on Gantt Chart]]<br clear="both" /> | |||
=== Add a Progress Line === | |||
# On the main menu, click on '''''Tools'''''. On the pull down menu that appears, click on '''''Tracking'''''. On the next pull down menu, click on '''''Progress Lines'''''. | |||
# Click the Dates and Intervals tab. Click the top check box that says "Always display current progress line", and click OK. | |||
#: [[Image:SB4.gif|frame|left|Figure 5: Gantt Chart with Progress Line]]<br clear="both" /> | |||
'''Important:''' ''A graph on the Gantt Chart with peaks pointing to the left for work that is behind schedule and peaks pointing to the right for work that is ahead of schedule.'' | |||
=== Project Float === | |||
The float of a project defines the amount of days that a project is early or late in meeting the final deadline. A float of +5 days (the progress line is to the right) means that the project will be completed 5 days ahead of schedule. A float of –5 days (the progress line is to the left) means that the project will be completed 5 days behind schedule. A float of 0 days means that a project will finish on the final date. A positive float is the result of tasks being completed ahead of anticipated finish dates. A negative float is the result of tasks taking longer to complete than originally scheduled. | |||
For the independent projects, teams are to have a float of 0 days (on time) or better (early) in order to complete the project by the final presentation day. | |||
In any event, accurate MS Project schedules are to be presented in all progress reports. In the event that a team has a negative float at the time of a progress report, the MS Project Schedule with the negative float '''must''' be presented. You should be prepared to explain how you will get your project back on schedule, and have an adjusted schedule with a float of 0 days by the time specified by your faculty member, or the next Milestone presentation at the latest. If you modify your schedule, you should present both the new and old schedules at the next scheduled Milestone presentation. | |||
a | |||
project | |||
Your work is now complete. Please clean up your workstation. | |||
[[Main_Page | Return to Table of Contents]] | [[Main_Page | Return to Table of Contents]] | ||
Revision as of 03:15, 13 September 2010
The version of this Skill Builder being used for the Fall 2010 semester is here.
| This page is currently being edited and reorganized to improve clarity. No content is being added or removed, and the edits will not affect the procedure performed during the lab. While the page is being reorganized, figure numbers may not match up correctly and may repeat as well. If this happens, and you become confused as to which figures are being referred to, please ask your TA for assistance and/or clarification. |
Objectives
To create a Microsoft (MS) Project schedule for your semester-long design project by performing the instructions that follow and using Figure 1 as a sample.
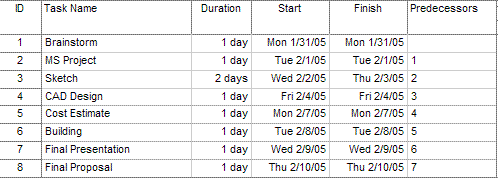 Figure 1: A Typical Project Plan

Note that tasks are ordered chronologically and an estimate of the amount of time it takes to perform each task is specified.
Your Assignment
Your TA will show you how to use MS Project to create the elements you will need to complete this assignment. MS Project 2010 has introduced several new features to the application. This exercise will familiarize you with MS Project's features, whether you have used previous versions or not. This assignment will not be graded or submitted, but finishing this exercise should equip you with the necessary skills needed to successfully plan for your semester-long design project and to prepare a project schedule representation.
Procedure
Start a New Project Plan
- Launch MS Project. Open the Start Menu. Expand the All Programs group, then the Microsoft Office group. Click on Microsoft Project 2010. The screen shown in Figure 2 appears.
- Alternatively, you can type "project" into the search field of the Start Menu and click on Microsoft Project 2010.
- One of the more notable new features of MS Project 2010 is the Ribbon, the main navigation bar that allows easy access to commonly used tools. The Ribbon contains several tabs that feature tools and commands grouped by their function. Under the Ribbon the window is divided into two sides: the task list on the left and the time view of the project on the right. The default time view is known as the Gantt Chart.
- Customize your project plan. Project opens with a blank project, so all we need to do is customize it. Select the Project tab on the Ribbon, then select Project Information. In the dialog box that appears, click on the arrow next to the box labeled Schedule From. From the dropdown menu that appears, select Project Finish Date. Note that the Finish Date box above is no longer gray, and you can enter a date into it (and the Project Start box is now gray instead). You can only schedule a project from one place, and you've now selected the end date when your project is due. Enter the date you expect to finish here or click the dropdown arrow to open a virtual calendar to select the due date. Click OK.
- Note: Make sure that the current date is correct and that the calendar is set to Standard.
- Note: If you want, you can use the start date for your project, but make sure that the overall schedule completes by the due date.
- Click on the View tab on the Ribbon, and then select Gantt Chart if it's not selected already. The Gantt Chart is the most widely used form of schedule in the industry, and shows time flowing from left to right. Other views might be used in some circumstances, but we don't need them for EG1003.
- Let's stop and examine the screen more carefully. The blank Gantt chart fills most of the screen, and consists of two parts. The left side is the list of tasks in the schedule, and consists of a number of columns. The right side is a calendar that goes from left to right. We'll work on each side of the screen separately, but MS Project will make sure they are consistent with each other.
- We'll now review the list of tasks. The list looks similar to an Excel spreadsheet, so it will be easy to learn how to use it — the interface is the same. The row numbers are blank in the gray column on the left side. This is because you haven't created any tasks yet. As you do, the numbers will fill in automatically. This column of numbers is called the Task ID. The next column has a letter "i" inside a blue circle. This is the Indicators column. Most of the time it will be blank when a task is not completed yet, and will contain a check mark when it is. The next column, called Task Mode, is used to either allow you to schedule the task manually or let MS Project automatically schedule the task's Duration, Start time, and Finish time for you based on certain factors such as dependencies, constraints, calendars, etc. The next column is the Task Name, which you enter. You can choose any text you want for a task name, but it should be clear to anybody looking at the schedule what the task is. The next three columns are the Duration, Start time, and Finish time of the task. When you first enter a task, these three columns are left blank. You can estimate two of three pieces of information and enter them into their respective columns. We'll discuss this more later.
- Tasks in a project frequently interact. Typically, one task determines how the other task is scheduled. The task that sets the schedule is called the predecessor task, and the one that has its schedule set by the predecessor task is called the successor task.
- The next column is the Start date of the task. Since you've chosen an end date for the project, the last task to be completed will be set to end at that date, and all the predecessor tasks will be adjusted to make everything match automatically. Therefore, leave this date blank and let Project fill it in as you create the schedule. The next column is the Finish date of the task, and is also automatically computed by Project. The next column is Predecessors, which are the tasks you identify that control how this task is scheduled. The last column is Resource Names, which we'll discuss later.
- Sometimes you won't see all these columns because the calendar is hiding them. This is easy to fix. Between the task list and the calendar is a thick bar. Put your mouse over the bar, hold down the left mouse button, and "drag" the bar to where you want it. Dragging the bar to the right will show the other columns in the task list.
- Add your tasks. To do this, move your cursor to the first box below Task Name and click on the box so we can enter text there. Type in a descriptive name for the task. Repeat this process for all the tasks needed for your project. You might not know all the tasks required, but enter as many as you can. We can always add more tasks later.
- When these tasks interact, there are four ways they can interact. The second task must start when the first one ends (called Finish-to-Start in Project), the second task must end when the first one starts (called Start-to-Finish), the second task must start when the first task starts (called Start-to-Start), or the second task must end at the same time as the first one (called Finish-to-Finish). These interactions are called dependencies. Microsoft Project uses the Finish-to-Start dependency by default. To designate one of the other dependencies, type SF, SS, or FF next to the task number in the predecessors box, as described below. For EG1003, we will use the Finish-to-Start relationship.
- Frequently, you have a list of tasks, where each successor's start should be the predecessor's finish. Project has a way to do this quickly. Select the first task, hold down CTRL and select the next task. Repeat this process until all the tasks you want to connect are highlighted. The Link icon is located on the main toolbar, and looks like a piece of chain. Click on the Link icon, and the tasks will arrange themselves properly. Also, note that a connecting arrow from the finish of each predecessor task is connected to the start of each successor task, showing their relationship graphically. As an alternative, you can set the predecessors for each task manually. Start by dragging the bar between the task list and the calendar so that you can see the Predecessors column. Put the Task ID of the predecessor tasks in the cell. If you don't show the dependency type, Project will choose Finish-to-Start by default. If you want a different choice, use the proper two letter abbreviation. The following are some examples of how to show predecessors. For each one, what you'd type is shown in italics, and its meaning follows:
- 1 This makes task 1 the predecessor for this task. Finish-to-Start is chosen by default.
- 1FS This is the same as the preceding item, except we showed the relationship to help clarity.
- 1SS This says that this task must start at the same time as task 1
- 1FF This says this task must end at the same time as task 1
- 2SF This says that this task must end when ask 2 starts.
- 1FS, 2FS This says that this task should start when both task 1 and task 2 are finished. Whichever of these tasks finishes last determines the start of this task. Project will figure this out automatically.
- Note: You can change the relationship of the linked tasks later. Either you can reenter or edit the information in the task list cell by clicking on it and changing it the same way you would in Excel. You can also double click on the connecting arrow from the right side of the predecessor task to the top of the successor task. A window will appear showing the task dependency. You can click on the arrow next to the existing type and choose a different type, with the same meanings described earlier.
- You can also choose the amount of lag time between tasks. Sometimes you need to introduce lag time. For example, after concrete has been poured, tasks that depend on the concrete need to be delayed until the concrete has hardened. You can account for this with a "Concrete hardens" task of the proper duration, but that clutters the schedule. Instead, we can introduce a delay between the end of the predecessor task and the successor task, called lag time. If you're entering information into the task list cell, just add the lag time you want by putting a plus sign and the lag time. If you're using the Task Dependency window, you can enter the lag time on the right side of the window. Project chooses a default of no lag time to allow the project to be done in the minimum time, but now you can override it if you want. The following are some examples of how to show predecessors with lag time. For each one, what you'd type is shown in italics, and its meaning follows:
- 1+1d This makes task 1 the predecessor with Finish-to-Start by default, and one day of lag time.
- 1FS+1d This is the same as the preceding item, except we showed the relationship to help clarity.
- 1SS+1w This says that this task must start one week later than the start of task 1
- 1FF This says this task must end at the same time as task 1
- 1FS+3d, 2FS+1d This says that this task should start when both task 1 has been finished for 3 days and task 2 has been finished for one day. Whichever condition is later determines the start of this task. Project will figure this out automatically.

Change the Timescale
Note: The Microsoft Project default setting for the Gantt Chart is a daily schedule. You will need to change this timescale for your independent project in order to show all data.
- On the main menu, click on Format, and on the pull down menu that appears, select Timescale. As an alternative, right click on the dates at the top of the calendar, and on the pull down menu that appears, select Timescale.
- In the window that appears, under Middle Tier Formatting, click on the arrow next to the Units field and choose Months.
- Click on the Bottom Tier tab at the top of the window. Click on the arrow next to the Units field and choose Weeks from the pull down menu.
- Click OK.
Set Task Duration
In the Duration column highlight the box for the task you would like to adjust and enter the desired duration.
To designate a duration, use:
- m for minute
- h for hour
- d for day (this is working days, not calendar days - weekends are skipped)
- w for week
- mon for month
- ed for elapsed days
Name Resources
A project may need many different types of resources. For your project, and for most other activities, one obvious set of resources is the people involved on the project. Special equipment would be another resource. For example, if you needed a backhoe for a week and had to rent it, the use of the backhoe should be included in your schedule so you don't forget to order it, and also to include its cost. We'll now consider how to include resources on your schedule:
On the main menu, click on View. On the pull down menu that appears, click on Resource Sheet. Your schedule will be replaced by another spreadsheet where you can show resources. For your EG1003 project, you need to enter the names of the people on your project team as the resource names. However, since your project also requires a cost estimate, we can add other items. For example, one part of your estimated cost is the labor of your team. The rate to use is shown elsewhere in this manual, but you can enter this rate for each person in the Std. Rate column. We'll ignore the other columns, but professionals usually make heavy use of this information and fill in everything. When you're done, you can return to your schedule by clicking View on the top menu and selecting Gantt Chart. This will return you to the view you had earlier.
Assign Resources
You can now assign resources to tasks. First, click on the task name that you want to assign resources to. Then, on the main toolbar, click on the icon that looks like two people, which is the Assign Resources icon. Hovering the cursor over the icon will also identify it for you. When you click on the icon, the Assign Resources popup window will appear. Like the task list, this looks like a spreadsheet where you will identify your resources. The first column is the Resource Name. Type in the name of the person responsible for the task, in EXACTLY the same form as you used on the resource sheet. The Units column is used to indicate the level of commitment of the resource. In industry, a person is usually available 100% of the time for the project, so the Units would be 100%. For shared resources the percentage would be less. For your project, it would be reasonable to assume you'll be spending about 10% of your time on the project. The labor rate is copied over automatically from your resource sheet. After you've entered the information for your resources, click OK. Do this for all the tasks in the project.
Tip: To assign a task to more than one person, type both names in the highlighted box, separated by a comma. By default, Microsoft Project will evenly distribute the task. To change this distribution, manually enter the percentages in the command line.
To Format the Gantt Chart
- On the main menu, click on Format, and on the pull down menu that appears, click on Gantt Chart Wizard. A popup window will appear introducing the wizard. Click on Next.
- When the next window appears, select the Standard radio button (if it is not selected already), and click Next.
- When the next window appears, click on the Custom Task Information radio button, and click Next.
- There are three fields in the window that appears:
- For the Left: box, click on the arrow on the right and on the pull down menu, select Name.
- For the Right: box, click on the arrow on the right and on the pull down menu, select Resource Names.
- For the Left: box, click on the arrow on the right and on the pull down menu, select % Work Complete.
- Click Next.
- Note: There are three Milestones and a Final Presentation in EG1003. This information should be included in your Gantt Chart. Placing the Milestones here will help keep your project on track. The directions for doing this appear here later.
- Click Next on the three screens that follow.
- Then click Format It.
- Exit the wizard.
Note: Once you become familiar with the program, you can modify and label your schedule to better fit your project.
Insert New Tasks
Sometimes we realize that we've forgotten something and need to add it. Also, the project itself changes, so we need to add things.
- Select the Task Name of the task just below where you want to insert the new task.
- On the main menu, click on Insert. On the pull down menu that appears, select New Task.
Important: Be sure to update the task information for this new task so that it has the proper place in the Gantt Chart.
Add Subtasks
For a small schedule, what we've done so far is adequate. However, most schedules are much more complex. When we're working on more complex tasks, we use a "divide and conquer" approach, where we split the overall job into a group of high level tasks, then take each of these tasks and divide them into smaller tasks, and keep doing this until we have a low level of detail. This allows us to be sure that we haven't forgotten anything, and also allow us to track the project at a high level. The lowest level tasks, which we've been doing, are called detail tasks, and they are collected into summary tasks. This section will show you how to take advantage of this approach.
- Enter the tasks. The first task should be the summary task, followed by the detail tasks. For the detail tasks, enter the duration and other information as we've discussed earlier.
- In the Task Name field, select the tasks you would like to designate as subtasks and click the Indent button on the toolbar. The indent button is a green arrow pointing to the right in the middle of the toolbar. Notice how the summary tasks now becomes a black line over the detail tasks, and its duration is set automatically by the detail tasks. Also, notice that a new box appeared to the left of the summary task name, and the box has a minus sign inside. For a complex project, showing the entire schedule can be overwhelming. If you click on the minus sign, the detail tasks disappear, and only the summary task is shown, making a large schedule easier to read. To make your subtasks reappear, click on the + sign that replaced the minus sign.
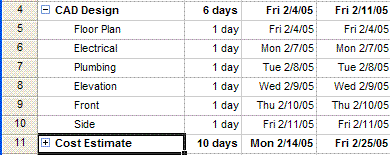 Figure 3: Tasks and subtasks.

This completes your schedule. Be sure to save your work.
Include Your Project Plan in Your PowerPoint Presentations
Although you need a schedule in order to control and keep track of a project, frequently you have to present your progress to others as well, typically using PowerPoint. This section will tell you how to make an effective schedule to show in your presentation.
- For a presentation, you want to show an overview without a lot of detail. Therefore, we'll hide the columns on the left side except for the task name. To do this, note that there's a bar between the task list and the Gantt Chart. If you hover your mouse over the bar, you'll see two arrows appear pointing left and right. This means you can move the bar. Hold down the left mouse button and drag the bar over to just behind the Task Name list. This gives your Gantt Char more room and allows you to see more of the schedule.
- Select the camera icon (Copy Picture) in the middle of the toolbar.
- A window will appear. Under Render Image, click on the radio button next to For Screen.
- Under Copy, click on the radio button next to Selected Rows.
- Under Timescale, click on the radio button next to From: and in the text boxes enter the start and finish date of your project.
- Note: This step is very important. Failure to do this causes more space than you need to be copied and your picture will be too large.
- Go to Microsoft PowerPoint and paste (CTRL+V) the picture into your slide.
Update Your Schedule
After we've completed the schedule, we need to show progress on the tasks we've defined so we can see if we're on schedule.
- Click on the Task Name of the task you want to update the progress.
- In the main menu, click on Tools. On the pull down menu that appears, select Tracking. On the next menu that appears, select Update Tasks.
- In the popup window that appears, you'll see the task name. You can update the boxes that are white. The one you'll use most often is the % Complete:. Enter the percentage in the box next to it. A task that hasn't started yet would be zero, and a task that's completed would be 100%. As an alternative, you can see the task duration from the schedule in the gray box in the top right corner of the window. Below it, you can enter how much time is needed to complete the task and Project will calculate the percentage for you. When you're done, click OK.
Important: You should modify you project schedule each week.
Update the Project
If we have many tasks, it can be tedious to update all of them when we're updating the schedule, especially since almost all of them are probably on time. This feature will allow us to update all the tasks to the date we choose, and have project calculate the percent complete for each task to match this date. Then we can change just the tasks that are ahead or behind schedule individually.
- On the main menu, click on Tools, and on the pull down menu select Tracking. On the next pull down menu, select Update Project.
- In the popup window that appears, enter the date you want to use in the box in the top right corner of the window. Then click OK.
Add Milestones
In a project, some tasks are Milestones. As the name implies, a milestone is an event that has either happened or hasn't. Typical milestones are the start of the project, its completion, various reviews, completion of major systems, etc.
Enter the name of the task that you want to make a milestone, or insert it if you're adding the milestone later. For the duration, enter zero. A diamond bullet will appear to indicate a milestone. See Figure 4.
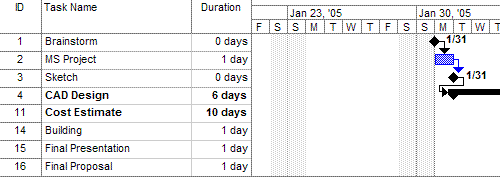 Figure 4: Milestones on Gantt Chart

Add a Progress Line
- On the main menu, click on Tools. On the pull down menu that appears, click on Tracking. On the next pull down menu, click on Progress Lines.
- Click the Dates and Intervals tab. Click the top check box that says "Always display current progress line", and click OK.
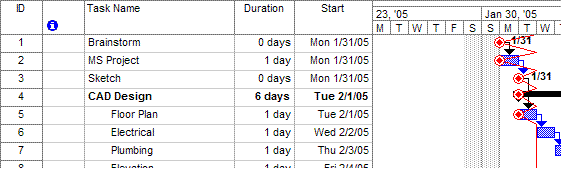 Figure 5: Gantt Chart with Progress Line

Important: A graph on the Gantt Chart with peaks pointing to the left for work that is behind schedule and peaks pointing to the right for work that is ahead of schedule.
Project Float
The float of a project defines the amount of days that a project is early or late in meeting the final deadline. A float of +5 days (the progress line is to the right) means that the project will be completed 5 days ahead of schedule. A float of –5 days (the progress line is to the left) means that the project will be completed 5 days behind schedule. A float of 0 days means that a project will finish on the final date. A positive float is the result of tasks being completed ahead of anticipated finish dates. A negative float is the result of tasks taking longer to complete than originally scheduled.
For the independent projects, teams are to have a float of 0 days (on time) or better (early) in order to complete the project by the final presentation day.
In any event, accurate MS Project schedules are to be presented in all progress reports. In the event that a team has a negative float at the time of a progress report, the MS Project Schedule with the negative float must be presented. You should be prepared to explain how you will get your project back on schedule, and have an adjusted schedule with a float of 0 days by the time specified by your faculty member, or the next Milestone presentation at the latest. If you modify your schedule, you should present both the new and old schedules at the next scheduled Milestone presentation.
Your work is now complete. Please clean up your workstation.