Difference between revisions of "How to Compress Your Files"
m (15 revisions) |
(1003 --> 1004) |
||
| Line 56: | Line 56: | ||
but they are beyond the scope of this document.</p> | but they are beyond the scope of this document.</p> | ||
<p>In | <p>In EG1004, when we want you to process compressed files, we use the ZIP | ||
format due to its wide use.</p> | format due to its wide use.</p> | ||
| Line 63: | Line 63: | ||
<p>As we mentioned earlier, Windows/XP is capable of compressing and decompressing | <p>As we mentioned earlier, Windows/XP is capable of compressing and decompressing | ||
ZIP files. However, its facilities are not as comprehensive as other packages, but is | ZIP files. However, its facilities are not as comprehensive as other packages, but is | ||
adequate for | adequate for EG1004.</p> | ||
<p>The most popular compression programs are available on the Web, so this is | <p>The most popular compression programs are available on the Web, so this is | ||
Latest revision as of 03:21, 18 August 2022
How to Compress Your Files
When we produce data and store it, we typically use whatever format the software requires or produces on our behalf. Sometimes these files can be very large, which creates several problems:
- These files take up a considerable amount of disk space
- If we transmit these files to another computer, it can take a long time because of all the data that needs to be transmitted
- We can exceed disk quotas, preventing us from storing more data
Because of this, sometimes we'd be willing to sacrifice some convenience to achieve a reduction in the file size by compressing the file. Compression programs process the file so that it takes less space, and changes the format of the file to one that they use to achieve this compression. This means we have to process the file twice; first, to compress it into this special form and second, to decompress it back to its original form.
Compression is a very common practice in computer technology. There are two forms of compression:
- Lossy compression, which causes some of the precision of the data to be lost. This is typically used for computer images, where the loss is hard to see, but the image can be stored in much less space
- Lossless compression, where all the original data can be recovered
For files like word processing documents and spreadsheets, any loss of data is unacceptable, so for the rest of this document we'll only be discussing lossless compression.
In addition to compression, many of these programs will also allow you to combine multiple documents into a single compressed file. This way, related files can travel together as a group, and then be recovered individually. This type of file is typically called an archive.
Compression File Types
There are several file types in use today for compressed files. The first is called a ZIP file, and is one of the oldest compression formats. It is probably the format in widest use, and does an excellent job of compressing files without losing information. The second is called a RAR file, and is a newer format. This format may compress the file more, still with no loss of information, but is not as widely used as ZIP files.
Windows XP is capable of compressing and decompressing ZIP files since they are such a widely used file format.
There are a number of other compression formats in use, such as tar and gz, but they are beyond the scope of this document.
In EG1004, when we want you to process compressed files, we use the ZIP format due to its wide use.
Compression Programs
As we mentioned earlier, Windows/XP is capable of compressing and decompressing ZIP files. However, its facilities are not as comprehensive as other packages, but is adequate for EG1004.
The most popular compression programs are available on the Web, so this is the easiest way to obtain them. They all use the same business model, where you can download an evaluation copy of the software that will run for some period of time. After that period has expired, you should buy a copy of the software if you plan to continue to use it, or delete it from your system. Usually purchasing the software just requires buying the software through the same Web site that you got the evaluation copy, and they supply the means to turn your evaluation software into a licensed copy that you can then use indefinitely. In some cases, in order to force this decision, the software will automatically disable itself after the evaluation period. Other software will continue to run, but will inform you that the evaluation period is over and that you should buy it if you intend to continue to use it. In this case, you should know that continuing to use the software without buying it will work, but doing so is illegal (and unethical).
The original compression program was called ZIP, which is where the file type originated, and was implemented for MS-DOS in the 1980s. Its most recent version is called WinZIP, and is available online at http://www.winzip.com/. It has an evaluation version that's good for 45 days. After that you should purchase the software if you plan to use it.
A more recent compression program is called WinRAR, and is available at http://www.rarlab.com/. WinRAR can produce ZIP files, and can also produce an additional RAR format as well. The site has an evaluation version that's good for 40 days. After that you should purchase the software if you plan to use it.
Typical Usage
Windows/XP
The facilities provided with Windows/XP are not the most elegant, but they'll get the job done with a little work.
Compressing a single file
Compressing a single file is easy. Under "My Computer" navigate to the place where the file to be compressed is. Figure 1 shows a typical screen image.
When you see the icon of the file, right click on the icon. This will bring up a popup menu. One of the items in the menu will be "Send to". Click this menu item and another pulldown menu will appear (this will also happen if you "hover" over the menu item). On this pulldown, select "Compressed (zipped) folder". Selecting this menu item will create the equivalent zipped file, with the same filename, but a .zip file extension. The original file will be present as well.
Compressing Multiple Files
It's almost as easy to compress multiple files into a single zipped file:
Select all the files you want to put into a single zip file by selecting the first file. Then, hold down the "Ctrl" key and select the other files you want to be in the zipped file. As you select each file, it should be highlighted. When you're done, right click on any file. This will bring up a popup menu. One of the items in the menu will be "Send to". Click this menu item and another pulldown menu will appear (this will also happen if you "hover" over the menu item). On this pulldown, select "Compressed (zipped) folder". Selecting this menu item will create the equivalent zipped file, with the same filename as the first filename selected, but a .zip file extension. The original files will be present as well. This zip file may not have the name you want. In that case, click on the filename twice slowly (essentially two single clicks) and the filename will be highlighted inside a box, indicating it can be changed. Type in the filename you want to use fo the zip file, and when you're done, click somewhere else on the screen.
Windows Vista
The facilities provided with Windows Vista are essentially identical to Windows/XP so they are not the most elegant, but they'll get the job done with a little work.
Compressing a single file
Compressing a single file is easy. Click on the Start button and click on the Computer item on the menu on the right side. On the popup window that appears, navigate to the place where the file to be compressed is. Figure 1 shows a typical screen image.
When you see the icon of the file, right click on the icon. This will bring up a popup menu. One of the items in the menu will be "Send to". Click this menu item and another pulldown menu will appear (this will also happen if you "hover" over the menu item). On this pulldown, select "Compressed (zipped) folder". Selecting this menu item will create the equivalent zipped file, with the same filename, but a .zip file extension. The original file will be present as well.
Compressing Multiple Files
It's almost as easy to compress multiple files into a single zipped file:
Select all the files you want to put into a single zip file by selecting the first file. Then, hold down the "Ctrl" key and select the other files you want to be in the zipped file. As you select each file, it should be highlighted. When you're done, right click on any file. This will bring up a popup menu. One of the items in the menu will be "Send to". Click this menu item and another pulldown menu will appear (this will also happen if you "hover" over the menu item). On this pulldown, select "Compressed (zipped) folder". Selecting this menu item will create the equivalent zipped file, with the same filename as the first filename selected, but a .zip file extension. The original files will be present as well. This zip file may not have the name you want. In that case, click on the filename twice slowly (essntially two single clicks) and the filename will be highlighted inside a box, indicating it can be changed. Type in the filename you want to use fo the zip file, and when you're done, click somewhere else on the screen.
WinRAR
In the text that follows, we'll use WinRAR as the typical way these programs work.
First, install the program from the seller's Web site just by following their instructions. Since they're trying to sell you their software, they make it very easy to do the installation.
Compressing a single file
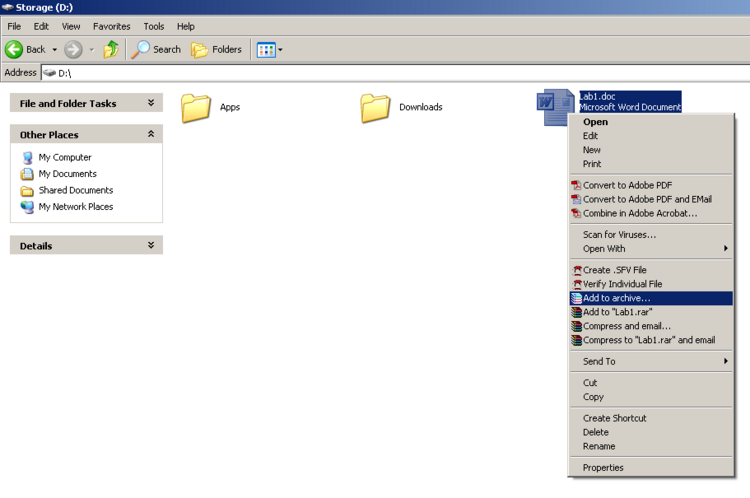
Compressing a single file is easy. Under "My Computer" navigate to the place where the file to be compressed is. Figure 2 shows a typical screen image.
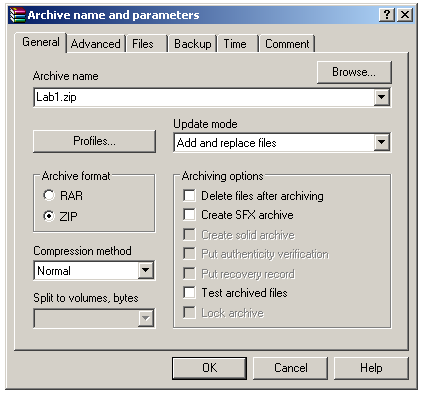
When you see the icon of the file, right click on the icon. This will bring up a popup menu. One of the items in the menu will be "Add to Archive". Click this menu item and a popup window menu will appear. Figure 3 shows what this window looks like.
At the top of the window will be the name of the file you selected, but with an extension of "rar". Below it you'll see a list called "Archive format" with two items: RAR and ZIP, with RAR selected. Click on the "radio button" next to ZIP. Note that the filename at the top of the window has now changed to the filename with an extension of "zip". Leave all of the option boxes unchecked. Click OK, and the archive compressed file will be produced. Figure 4 shows the new icon that will appear in the "My Computer" file listing.
It's that easy!
Compressing Multiple Files
It's almost as easy to compress multiple files into a single archive. There are two ways to do this, with the second way probably being the easiest:
- Add the files to an archive one file at a time by following the instructions in the preceding section, with one difference. When you archive the first file, enter a filename for the Archive Name that you can remember, change the type to "ZIP" and hit OK. For the other files, click "Add to Archive" like you did before, and keep typing in the filename and changing the type to "ZIP" each time. This will keep adding files to the archive compressed file one file at a time. Keep doing this until you've add all the files you want.
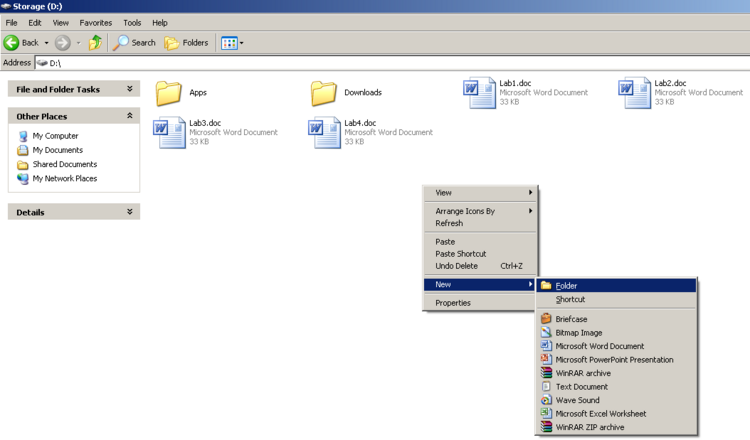
- Put all the files you want to compress as a group in their own directory. To make a new directory, click on "My Computer", then the drive you want to use. If you want to put these files in a subfolder, click on the folders until you get where you want to be. Right click on the window somewhere where there is not an icon, and a popup menu will appear. One of the menu options is "New". Click on it and another popup menu will appear. One of its options is "Folder". Click on this option. Figure 5 shows the menus that appear. A new folder will appear in the list, with a name of "New Folder". This name isn't too helpful, so we'll change it to a name we like. To do this, click on the "New Folder" name, and a box will appear around it with the "New Folder" highlighted. Press delete to erase the name, and then enter the name you want to use for the folder.
Next, copy the files you want to compress as a group into this folder. You typically do this by navigating where the files you want are, and then selecting the files. Note that if you hold down the "Ctrl" key while you click on files, you can select more than one at a time. Figure 5 shows this process. Now navigate back to your new folder and double click it. This will open the folder. Now right click on the area and select "Paste" and copies of the files you want to compress will appear. Continue doing this until you have all the files you want. Next, near the top of the window you'll see a folder with a green arrow pointing upward. Click on this icon and you'll go up one level and see your folder icon. Right click the icon, and on the popup menu that appears, select "Add to Archive". On the popup menu that appears, select ZIP instead of RAR and take a look at the filename – it's the same as the folder name, but has a "zip" extension. Select OK. The compressed group of files will be made, and you'll see the compressed archive file appear in the list of files. You're done!
WinZIP
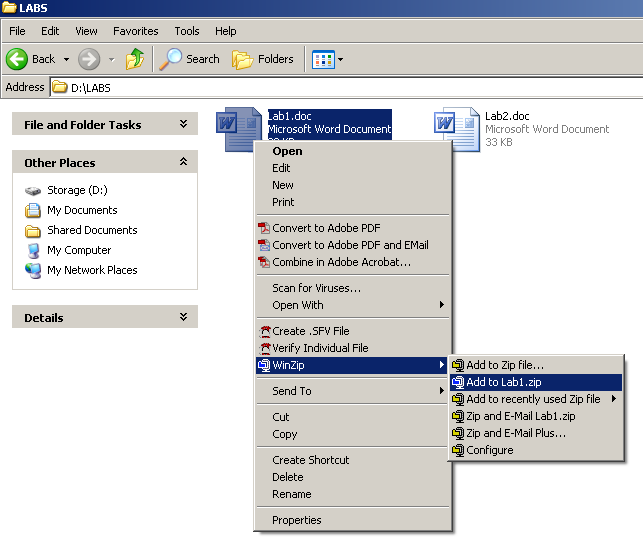
You can use WinZIP the same way as WinRAR but this time you the default extension is .zip. Just right click on the file you would like to ZIP up and then select "add to…".
And then you are done. Figure 8 shows the icon for the archive that was made.
For multiple files, the procedure is the same as for WinRAR, and is described above..


