Difference between revisions of "Revit-How-To Guide"
| Line 72: | Line 72: | ||
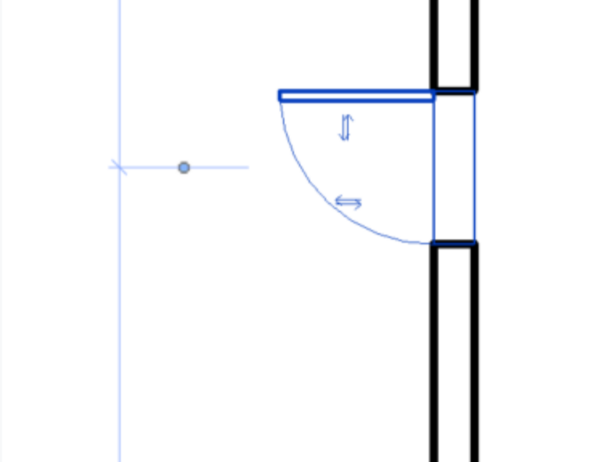
Doors and windows can be placed by selecting the respective option in the Architecture tab. They can be placed by clicking in the floor plan. Once placed, the direction of the doors and windows can be changed with the arrow couples (Figure 16). | Doors and windows can be placed by selecting the respective option in the Architecture tab. They can be placed by clicking in the floor plan. Once placed, the direction of the doors and windows can be changed with the arrow couples (Figure 16). | ||
[[File:Lab 4 Figure 32.PNG|600px|thumb|center|Figure 16: Door Direction Arrow Couples]] | |||
When loading furniture or appliances, go to the Architecture tab of the ribbon and select Component → Place a Component (or type CM). Furniture and appliances can be added with the Load Family tool. Some common appliances are provided in the table below. | |||
:: {| class="wikitable" | |||
|+ Table 1: File Paths for all Furniture and Appliances Tab | |||
|- | |||
! <b>Components</b> | |||
! <b> File Paths</b> | |||
|- | |||
| <center>Sink</center> | |||
| English → Plumbing → MEP → Fixtures → Sinks | |||
|- | |||
| <center>Toilet</center> | |||
| English → Plumbing → MEP → Fixtures → Water Closets | |||
|- | |||
| <center>Shower</center> | |||
| English → Plumbing → MEP → Fixtures → Shower | |||
|- | |||
| <center>Bed</center> | |||
| English → Furniture → Beds | |||
|- | |||
| <center>Kitchenette</center> | |||
| English → Specialty Equipment → Domestic | |||
|- | |||
| <center>Table</center> | |||
| English → Furniture → Tables | |||
|- | |||
| <center>Desk</center> | |||
| English → Furniture → Tables | |||
|- | |||
| <center>Door</center> | |||
| English → Door → Residential | |||
|- | |||
|} | |||
:: {| class="wikitable" | |||
|+ Table 2: File Paths for Architecture Tab | |||
|- | |||
! <b>Components</b> | |||
! <b> File Paths</b> | |||
|- | |||
| <center>Light Switch</center> | |||
| US Imperial → Electrical → MEP → Electric Power → Terminals → Lighting Switches | |||
|- | |||
| <center>Ceiling Light</center> | |||
| US Imperial → Lighting → MEP → Internal | |||
|- | |||
|} | |||
For ceiling lights, go back to the Level 1 Ceiling Plan in the Project Browser. Select the lights that are to be placed with the Component tool in the Architecture tab of the ribbon. Once the lighting fixture is selected, select Modify | Place Component → Placement → Place on Face tab of the ribbon to place the lights on the ceiling (Figure 17). | |||
Revision as of 02:41, 5 April 2022
Architectural
Setting up
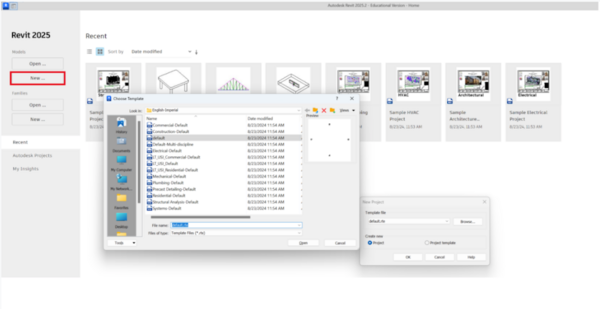
Open Revit. Select New, then select Architectural Template (Figure 1). Each template is used for a different type of design. For architectural designs, this template will be used.
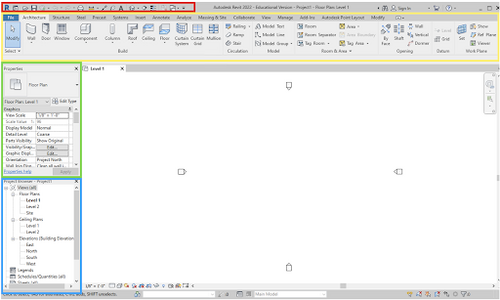
There are four major sections used to create and modify a design in Revit. The Quick Access Toolbar is highlighted in red, the Project Ribbon is highlighted in yellow, the Properties panel is highlighted in green, and the Project Browser panel is highlighted in blue (Figure 2). If any of the sections are accidentally removed from view, they can be reinserted by going to View → User Interface (rightmost icon) in the ribbon.
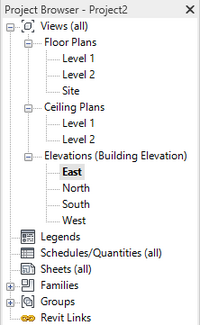
An important aspect of setting up your project is defining the levels (the story heights for the building). Navigate to one of the elevation views, in this case the East elevation, in the Project Browser by double clicking (Figure 3). Each plan view or elevation view will open in a new “tab” that you can toggle between.
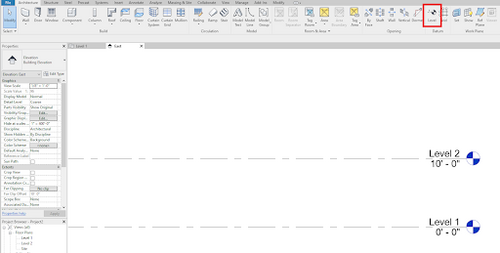
To add a new level, select Level in the Architecture tab (Figure 4). Click a point above the current top level, usually 10’, then move your cursor horizontally and click again to place the level. To delete a level, just click on it and press “Delete” on your keyboard.
To view your 3D model, go to the “View” tab in the toolbar, under the “Create” subtab, and click “3D View” (Figure 5).
Along the bottom of your window is a toolbar with various symbols. Hover over each symbol to figure out what each one does. The most important functions in this toolbar are the two symbols highlighted below (Figure 6). The first is the Visual Style for the model. The Wireframe view is the most useful style to work in because you can see through all your objects. If you would like to hide certain objects while you are drawing, right click on it and click “Hide in View”. Hiding an element means only hiding the object you selected. Hiding a category means hiding every object that is in the same category as the object you selected (ex: hiding all furniture). The Reveal Hidden Elements function (the lightbulb symbol), when clicked, shows everything that you have hidden in pink, along with your existing structure. These two functions are helpful when you want to build on the interior of your structure, but your walls are blocking your vantage point.
Building
In the Project Browser column, go back to Level 1 under “Floor Plans”. You should always be building from the ground up, so start at Level 1. To start, select the “Wall” function under “Build” in the “Architecture” tab of the toolbar (Figure 7). Build an Architectural Wall.
When you click on the function, a new tab called “Modify” should appear on the far right of the toolbar. This happens for any new structure you select under Build. Click what type of line or shape you would like to draw and draw it on your view (Figure 8).
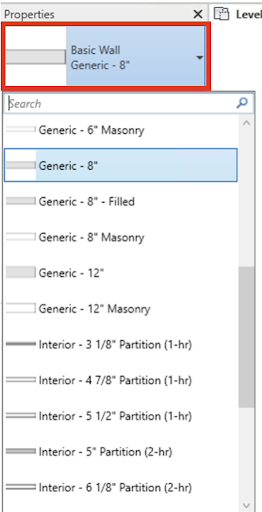
In general, your walls should be 10’ high, but this can be customized per your design. Exterior walls should be 8” thick while interior walls should be 6” thick. The thickness of the wall can be changed in the drop-down menu in the Properties panel (Figure 9).
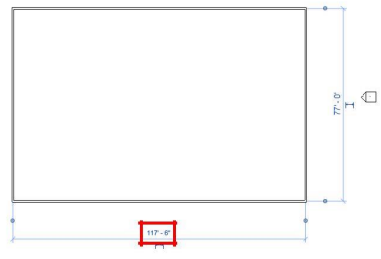
If you made a mistake in the length of your walls in your initial drawing, you can always double click on the dimension in blue and change it manually by typing in the correct value (Figure 10). Once you are done modifying the wall,or placing any component, press the “Esc” key to reset to the main screen.
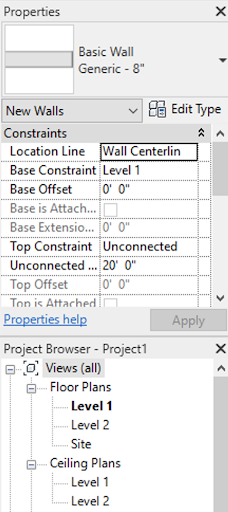
Figure 10. Modifying Wall Dimension There are other elements of the wall, or any component, that can be changed in the Properties pane (Figure 11). The Base Constraint changes where the bottom of the wall is placed in reference to the different levels. The Base Offset adjusts the height difference between the level and the base of the wall. The Top Constraint determines where the top of the wall is located. If the top constraint is unconnected, then the Unconnected Height can be used to determine a numerical value for the height of the wall.
After you have created walls for your structure (just on Level 1), you can add floors, ceilings, doors, and windows.
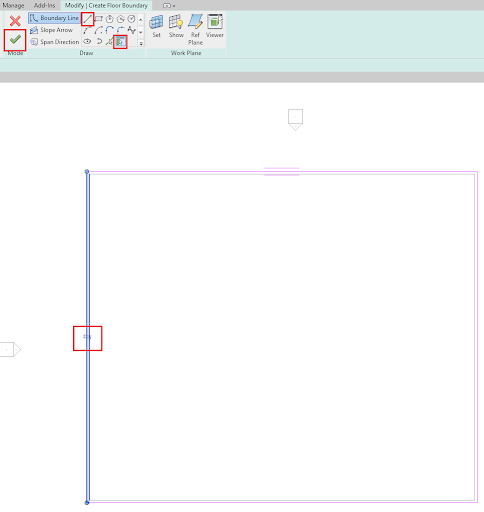
For floors and ceilings, you will need to provide a “boundary” that your floor or ceiling will follow. This boundary is the perimeter of your building that you created when you build your walls. Click “Floor”, and under the Modify tab, it will prompt you to pick a line type to draw your boundary with. “Boundary Line” should already be automatically selected. Simply click on your walls that you created, then click the green check mark. You can also create individual lines by selecting the Line tool. The arrows that appear when placing the floor allows you to toggle between the inside or the outside of your wall as the boundary (Figure 12).
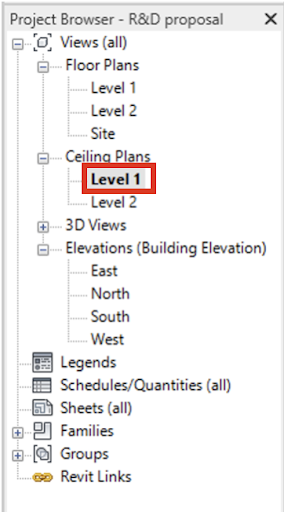
To insert a ceiling or ceiling appliance, select the Ceiling Plans in the Project Browser. Go to Level 1 in the Ceiling Plans (Figure 13).
The ceiling is created with the same method as the floor, by selecting a boundary where the ceiling will be placed. Use the Ceiling tool in the Architecture tab of the ribbon to create the ceiling. The individual walls can be selected to create the boundary by creating a Sketch Ceiling tool, or entire areas can be selected for the boundary using the Automatic Ceiling (Figure 14). Complete the ceiling by clicking the green check mark in the ribbon.
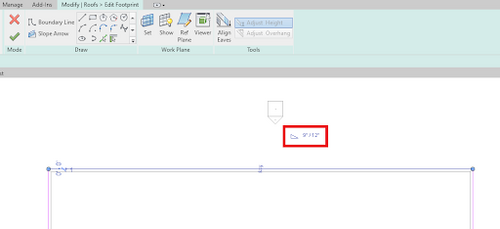
To create a roof, go to the highest level Floor Plan, and select Roof in the Architecture tab, and draw its footprints around the walls (same as a boundary). As you draw in the footprints, you can edit the slope of each portion to your liking (Figure 15). After drawing your roof footprint and clicking the green check mark, Revit will ask you if you would like to attach the highlighted walls to the roof.
Components
Doors and windows can be placed by selecting the respective option in the Architecture tab. They can be placed by clicking in the floor plan. Once placed, the direction of the doors and windows can be changed with the arrow couples (Figure 16).
When loading furniture or appliances, go to the Architecture tab of the ribbon and select Component → Place a Component (or type CM). Furniture and appliances can be added with the Load Family tool. Some common appliances are provided in the table below.
Table 1: File Paths for all Furniture and Appliances Tab Components File Paths Sink English → Plumbing → MEP → Fixtures → Sinks Toilet English → Plumbing → MEP → Fixtures → Water Closets Shower English → Plumbing → MEP → Fixtures → Shower Bed English → Furniture → Beds Kitchenette English → Specialty Equipment → Domestic Table English → Furniture → Tables Desk English → Furniture → Tables Door English → Door → Residential
Table 2: File Paths for Architecture Tab Components File Paths Light Switch US Imperial → Electrical → MEP → Electric Power → Terminals → Lighting Switches Ceiling Light US Imperial → Lighting → MEP → Internal
For ceiling lights, go back to the Level 1 Ceiling Plan in the Project Browser. Select the lights that are to be placed with the Component tool in the Architecture tab of the ribbon. Once the lighting fixture is selected, select Modify | Place Component → Placement → Place on Face tab of the ribbon to place the lights on the ceiling (Figure 17).
