Difference between revisions of "Cura Guide"
| (2 intermediate revisions by 2 users not shown) | |||
| Line 1: | Line 1: | ||
= Cura Guide = | = Cura Guide = | ||
CURA is a critical piece of software for our 3D Printers. STL files do not contain the instructions the printer needs to position the extruder; to do this Cura “Slices” the model. This process analyses the 3D models that have been imported and slices them into individual layers that the printer can lay down. The software also determines which extruder to use, which, in turn, | CURA is a critical piece of software for our 3D Printers. STL files do not contain the instructions the printer needs to position the extruder; to do this Cura “Slices” the model. This process analyses the 3D models that have been imported and slices them into individual layers that the printer can lay down. The software also determines which extruder to use, which, in turn, decides the color of the filament used. | ||
= Toolbar = | = Toolbar = | ||
| Line 14: | Line 14: | ||
*Move: Translate the model in the X, Y, and Z directions (in millimeters) | *Move: Translate the model in the X, Y, and Z directions (in millimeters) | ||
*Scale: Scale the model in the X, Y, and Z dimensions (in millimeters). Can also scale by a percentage. Uniform scaling will ensure that the object stays in the correct proportions. | *Scale: Scale the model in the X, Y, and Z dimensions (in millimeters). Can also scale by a percentage. Uniform scaling will ensure that the object stays in the correct proportions. Can reset the object to its original position (Reset). | ||
*Rotate: Rotate the model in the X, Y, and Z dimensions (in degrees) by dragging rings around the object. Can also automatically adjust to place the nearest flat edge onto the platform (Lay Flat). Can reset the object to its original position (Reset). | *Rotate: Rotate the model in the X, Y, and Z dimensions (in degrees) by dragging rings around the object.With ‘Snap Rotation’ selected the rotation will occur in 15 degree chunks. Can also automatically adjust to place the nearest flat edge onto the platform (Lay Flat). Can reset the object to its original position (Reset). | ||
*Mirror: Can mirror the object with respect to each axis. There are six arrowheads, two for every axis, and clicking on the arrow will mirror the object in the desired direction. | *Mirror: Can mirror the object with respect to each axis. There are six arrowheads, two for every axis, and clicking on the arrow will mirror the object in the desired direction. | ||
*Per Model Settings: Can allow specific settings to be applied to different models on the | *Per Model Settings: Can allow specific settings to be applied to different models on the build plate | ||
*Print Selected Model with Extruder 1/Extruder 2: With each option, select the desired extruder for each part of the model. | *Print Selected Model with Extruder 1/Extruder 2: With each option, select the desired extruder for each part of the model. | ||
| Line 27: | Line 27: | ||
**Solid: Selected by default and represents the model as it was digitally created | **Solid: Selected by default and represents the model as it was digitally created | ||
**X-ray: Allows to look through the model and detect any possible missing or erroneous internal geometry. | **X-ray: Allows to look through the model and detect any possible missing or erroneous internal geometry. | ||
**Layers: Represents the print moves of the nozzles | **Layers: Represents the print moves of the nozzles only available after the part has been sliced/prepared | ||
<b>Part placement onto the build plate is a crucial step in preparing a Cura print file. One of the most common reasons for print failure is a poorly oriented part. The key is to minimize the overhanging elements of the model.</b> | |||
<br style="clear: both;" /> | <br style="clear: both;" /> | ||
| Line 47: | Line 50: | ||
[[File:SelectColorCura.png|thumb|center|500px|alt=Home Screen.|]] | [[File:SelectColorCura.png|thumb|center|500px|alt=Home Screen.|]] | ||
Figure above shows how parts will appear as different colors when selected under the two extruders. | |||
| Line 62: | Line 65: | ||
*Extra Fine (0.06 mm): Prints with a very smooth surface quality. | *Extra Fine (0.06 mm): Prints with a very smooth surface quality. | ||
Most of the | Most of the time, the print will be completed with the Normal profile. | ||
Under “Print Setup,” there is a toggle for “Recommended” versus “Custom.” Custom settings | Under “Print Setup,” there is a toggle for “Recommended” versus “Custom.” Custom settings allow for more in depth adjustments, whereas recommended settings have the few necessary settings for overall adjustment. Below explains the settings more in depth: | ||
*Infill: the amount of infill wished to have in the print. The | *Infill: the amount of infill wished to have in the print. Avoid printing solid parts (100% infill) unless ABSOLUTELY necessary. The denser it is, the longer it will take. 20% is sufficient for most prints. | ||
*Generate Support: If there are any parts of the print that has overhanging parts, selecting this option will allow a support structure to be generated below it. This structure can be removed after the print is finished. | *Generate Support: If there are any parts of the print that has overhanging parts, selecting this option will allow a support structure to be generated below it. This structure can be removed after the print is finished. | ||
| Line 71: | Line 74: | ||
*Support Extruder: Choose the extruder that will print the support structure; usually it should be the same extruder as that part of the print. | *Support Extruder: Choose the extruder that will print the support structure; usually it should be the same extruder as that part of the print. | ||
*Build Plate Adhesion: This option adds a brim or raft around the base of the model to ensure that the print sticks to the build plate. | *Build Plate Adhesion: This option adds a brim or raft around the base of the model to ensure that the print sticks to the build plate. Especially important to have this feature active for smaller parts. | ||
After the model has been sliced (prepared for printing), selecting “Layers” under “View” will show a layer-by-layer preview of the print. On the lower right corner, you have the option to edit the name of your file, view the dimensions of your print, as well as the estimated print time and filament usage. If the print exceeds the required dimensions or material use, it should be rescaled or redesigned until it meets the requirements.) | After the model has been sliced (prepared for printing), selecting “Layers” under “View” will show a layer-by-layer preview of the print. On the lower right corner, you have the option to edit the name of your file, view the dimensions of your print, as well as the estimated print time and filament usage. If the print exceeds the required dimensions or material use, it should be rescaled or redesigned until it meets the requirements.) | ||
| Line 80: | Line 83: | ||
<br style="clear: both;" /> | <br style="clear: both;" /> | ||
Once the material usage has been confirmed and | Once the material usage has been confirmed and the correct settings have been chosen, click “Save to File” and a .gcode file will be generated for printing. If a USB is inserted this will read “Save to Removable Drive”. Note that once a print has been sliced and saved as a .gcode file, it cannot be changed and the settings can not be viewed. Settings can only be adjusted with a .stl file. If you wish to save the current settings, make sure to go to “File” > “Save Project.” | ||
<br style="clear: both;" /> | <br style="clear: both;" /> | ||
Latest revision as of 17:54, 20 August 2020
Cura Guide
CURA is a critical piece of software for our 3D Printers. STL files do not contain the instructions the printer needs to position the extruder; to do this Cura “Slices” the model. This process analyses the 3D models that have been imported and slices them into individual layers that the printer can lay down. The software also determines which extruder to use, which, in turn, decides the color of the filament used.
Toolbar
The toolbar on the left side of Cura allows files to be imported and some final adjustments on the object before slicing. There are 9 functions available:
- Open File: Loads the model onto the buildplate
- Move: Translate the model in the X, Y, and Z directions (in millimeters)
- Scale: Scale the model in the X, Y, and Z dimensions (in millimeters). Can also scale by a percentage. Uniform scaling will ensure that the object stays in the correct proportions. Can reset the object to its original position (Reset).
- Rotate: Rotate the model in the X, Y, and Z dimensions (in degrees) by dragging rings around the object.With ‘Snap Rotation’ selected the rotation will occur in 15 degree chunks. Can also automatically adjust to place the nearest flat edge onto the platform (Lay Flat). Can reset the object to its original position (Reset).
- Mirror: Can mirror the object with respect to each axis. There are six arrowheads, two for every axis, and clicking on the arrow will mirror the object in the desired direction.
- Per Model Settings: Can allow specific settings to be applied to different models on the build plate
- Print Selected Model with Extruder 1/Extruder 2: With each option, select the desired extruder for each part of the model.
- View Mode: There are three different viewing options - Solid, X-ray, and Layers
- Solid: Selected by default and represents the model as it was digitally created
- X-ray: Allows to look through the model and detect any possible missing or erroneous internal geometry.
- Layers: Represents the print moves of the nozzles only available after the part has been sliced/prepared
Part placement onto the build plate is a crucial step in preparing a Cura print file. One of the most common reasons for print failure is a poorly oriented part. The key is to minimize the overhanging elements of the model.
Importing Files
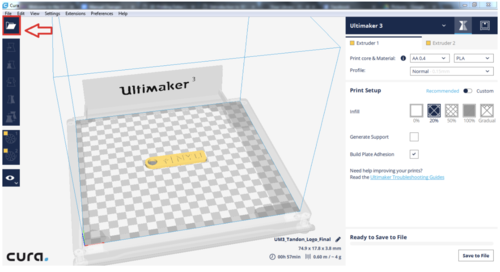
To create a multicolor print, at least two STL files must be imported, each file will use one extruder. To import the first file, click the “Open file” button on the top left.
Select one of the two files that is used in the design; it should load into the build-plate window. Next add the second file with the same method.
Selecting Colors
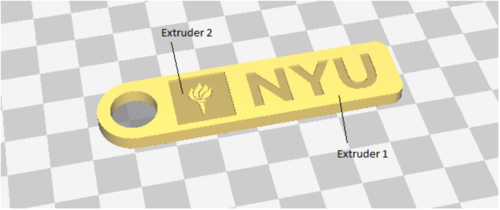
Because the Ultimaker 3 is a dual-extrusion printer, it allows prints to have two colors, but it is important to choose the correct corresponding extruder to allow the print to have the correct color on its parts. By default, parts with extruder 1 will appear as a light yellow color while printing with PLA, and extruder 2’s parts will appear as a darker yellow. To assign the extruder to a specific part of the print, first select the part, then choose extruder 1 or 2 on the left sidebar.
Figure above shows how parts will appear as different colors when selected under the two extruders.
Printing Settings
Once everything is placed correctly and extruders have been selected, it is then necessary to ensure the ideal print settings are chosen. On the right side, there is the settings panel where different settings can be chosen for each extruder. Since only PLA material will be used, make sure to choose both “AA 0.4” and “PLA” options under “Print core & Material.” Next, under “Profile” are a set of pre-created settings from CURA:
- Fast print (0.2 mm): Makes a quick print but with lower quality
- Normal (0.15 mm): Decent quality print with an acceptable print time. This profile is applicable to most prints.
- Fine (0.1 mm): Good quality print.
- Extra Fine (0.06 mm): Prints with a very smooth surface quality.
Most of the time, the print will be completed with the Normal profile. Under “Print Setup,” there is a toggle for “Recommended” versus “Custom.” Custom settings allow for more in depth adjustments, whereas recommended settings have the few necessary settings for overall adjustment. Below explains the settings more in depth:
- Infill: the amount of infill wished to have in the print. Avoid printing solid parts (100% infill) unless ABSOLUTELY necessary. The denser it is, the longer it will take. 20% is sufficient for most prints.
- Generate Support: If there are any parts of the print that has overhanging parts, selecting this option will allow a support structure to be generated below it. This structure can be removed after the print is finished.
- Support Extruder: Choose the extruder that will print the support structure; usually it should be the same extruder as that part of the print.
- Build Plate Adhesion: This option adds a brim or raft around the base of the model to ensure that the print sticks to the build plate. Especially important to have this feature active for smaller parts.
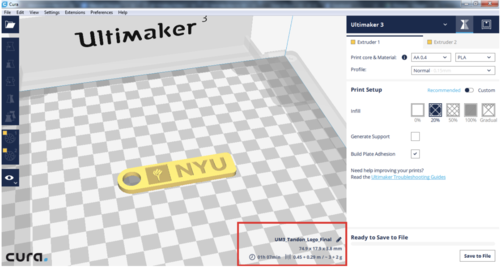
After the model has been sliced (prepared for printing), selecting “Layers” under “View” will show a layer-by-layer preview of the print. On the lower right corner, you have the option to edit the name of your file, view the dimensions of your print, as well as the estimated print time and filament usage. If the print exceeds the required dimensions or material use, it should be rescaled or redesigned until it meets the requirements.)
To view print time and material use
Once the material usage has been confirmed and the correct settings have been chosen, click “Save to File” and a .gcode file will be generated for printing. If a USB is inserted this will read “Save to Removable Drive”. Note that once a print has been sliced and saved as a .gcode file, it cannot be changed and the settings can not be viewed. Settings can only be adjusted with a .stl file. If you wish to save the current settings, make sure to go to “File” > “Save Project.”
Common Problems
If two parts cannot be merged or placed together-
- Cura, by default, drops the objects on to the build-plate and keeps objects apart. The following steps are needed to combine the filler rectangle within the keychain:
- Under “Preferences”, select “Configure Cura”
- Under “Viewport behavior,” make sure to deselect both “Ensure models are kept apart” and “Automatically drop models to the build plate” if they are not already deselected
- Save your preferences
- Return to the buildplate and make sure both objects are lying flat on the build-plate by using “Rotate” => “Lay Flat”
If Lay flat option places the object on an angle-
- It is very important to make sure that the print is flat on the build plate. However, sometimes due to the way that the model was built, the Lay Flat option won’t be able to correctly orient the object
- To fix this problem, you can:
- Adjust it by eye with the rotate tool
- Make sure the Z value is 0 mm under “Move”
- By holding down the right key on a mouse and dragging, you can access whether the print is flat on the build plate.


