Difference between revisions of "Arduino Coding Guide"
| (5 intermediate revisions by one other user not shown) | |||
| Line 1: | Line 1: | ||
The Arduino programming language is based on C/C++, but it is designed to be simpler and easier to learn. The most intuitive way to think about programming is like building with LEGO blocks: certain rules must be followed and different building blocks can be used to build bigger | == Arduino Integrated Development Environment == | ||
The Arduino programming language is based on C/C++, but it is designed to be simpler and easier to learn. The most intuitive way to think about programming is like building with LEGO blocks: certain rules must be followed and different building blocks can be used to build bigger blocks. The Integrated Development Environment (IDE) is the software used to write code for Arduino. | |||
=== General Syntax === | === General Syntax === | ||
* Every line must either end with a semicolon ‘;’ unless | * Every line must either end with a semicolon ‘;’ unless it is a conditional, loop, or function | ||
* Conditionals, loops, and functions are enclosed in curly | * Conditionals, loops, and functions are enclosed in curly brackets {} | ||
* Comments start with a // | * Comments start with a // | ||
** Comments are text that the program ignores | ** Comments are text that the program ignores | ||
| Line 14: | Line 14: | ||
=== Datatypes === | === Datatypes === | ||
Datatypes are the different kinds of data values that can be used, manipulated and stored using C++. | Datatypes are the different kinds of data values that can be used, manipulated and stored using C++. Table 1 below shows the most basic and widely used datatypes. | ||
{| class="wikitable" | |||
!Datatype!!What it stores (examples)!!Default value!!Notes | |||
|- | |||
|Boolean||style="text-align: center;"|A true value (1, TRUE, HIGH) or<br />a false value (0, FALSE, LOW)||style="text-align: center;"|0, FALSE, LOW||style="text-align: center;"|English Boolean values such as HIGH or LOW must be in all caps | |||
|- | |||
|int||style="text-align: center;"|An integer number (-5, 15, 1047, etc.)||style="text-align: center;"|0||style="text-align: center;"|Can be positive or negative | |||
|- | |||
|double||style="text-align: center;"|A decimal number (-0.5, 123.77, etc.)||style="text-align: center;"|0||style="text-align: center;"|Can be positive or negative | |||
|- | |||
|float||style="text-align: center;"|A decimal number (-0.5, 123.77, etc.)||style="text-align: center;"|0||style="text-align: center;"|Can be positive or negative | |||
|- | |||
|char||style="text-align: center;"|A single character (‘c’, ‘A’, ‘5’, ‘?’, etc.)||style="text-align: center;"|Indeterminate||style="text-align: center;"|Must be enclosed in single quotes | |||
|- | |||
|string||style="text-align: center;"|A sequence of characters (“Hello World!”,<br /> “10”, “157+5”, etc.)||style="text-align: center;"|Empty (“”)||style="text-align: center;"|Must be enclosed in double quotes | |||
|} | |||
=== Operators === | === Operators === | ||
Operators perform operations on variables and constants. The results of these operations are usually stored in a variable. | Operators perform operations on variables and constants. The results of these operations are usually stored in a variable. Table 2 shows the includes common operators in Arduino IDE. | ||
Table 2: Common Arduino IDE Operators | |||
{| class="wikitable" | |||
!Operator!!What it does!!Notes | |||
|- | |||
|style="text-align: center;"|=||style="text-align: center;"|Assigns a value to a variable||style="text-align: center;"| | |||
|- | |||
|style="text-align: center;"|+||style="text-align: center;"|Adds two or more values||style="text-align: center;"| | |||
|- | |||
|style="text-align: center;"|<nowiki>-</nowiki>||style="text-align: center;"|Subtracts two or more values||style="text-align: center;"| | |||
|- | |||
|style="text-align: center;"|*||style="text-align: center;"|Multiplies two or more values||style="text-align: center;"| | |||
|- | |||
|style="text-align: center;"|/||style="text-align: center;"|Divides two or more values||style="text-align: center;"| | |||
|- | |||
|style="text-align: center;"|++||style="text-align: center;"|Increment by 1||style="text-align: center;"|Usually used in loops | |||
|- | |||
|style="text-align: center;"|<nowiki>--</nowiki>||style="text-align: center;"|Decrement by 1||style="text-align: center;"|Usually used in loops | |||
|- | |||
|style="text-align: center;"|==||style="text-align: center;"|Checks if two value are equal||style="text-align: center;"|Usually used in conditionals | |||
|- | |||
|style="text-align: center;"|!=||style="text-align: center;"|Checks if two value are not equal||style="text-align: center;"|Usually used in conditionals | |||
|- | |||
|style="text-align: center;"|> or <||style="text-align: center;"|Less than/Greater than comparison||style="text-align: center;"|Usually used in conditionals | |||
|- | |||
|style="text-align: center;"|<= or >=||style="text-align: center;"|Less than/greater than or equal to comparison||style="text-align: center;"|Usually used in conditionals | |||
|- | |||
|style="text-align: center;"|&& or <nowiki>||</nowiki>||style="text-align: center;"|Boolean AND or Boolean OR Used to cascade multiple Boolean operations||style="text-align: center;"|Usually used in conditionals | |||
|- | |||
|} | |||
=== Constants and Variables === | === Constants and Variables === | ||
Constants and variables hold data according to their datatype. They need to be given a name so that they can be referred to later. Constants hold data that will | Constants and variables hold data according to their datatype. They need to be given a name so that they can be referred to later. Constants hold data that will not change while a program is running. Constants usually contain pin numbers or sensor threshold values. Variables contain data that WILL change while a program is running. Variables usually contain sensor values and other values that need to have mathematical operations done on them. Figure 1 is an example of how to create different constants and variables. | ||
[[File:Arduino_Coding_Guide_1.png|700px|thumb|center|Figure 1: Constants & Variables]] | [[File:Arduino_Coding_Guide_1.png|700px|thumb|center|Figure 1: Constants & Variables]] | ||
| Line 28: | Line 74: | ||
=== Conditional Statements === | === Conditional Statements === | ||
Conditional statements run code enclosed by their curly brackets when a condition is met. | Conditional statements run code enclosed by their curly brackets when a condition is met (Figure 2). | ||
[[File:Arduino_Coding_Guide_2.png|700px|thumb|center|Figure 2: Conditional statements]] | [[File:Arduino_Coding_Guide_2.png|700px|thumb|center|Figure 2: Conditional statements]] | ||
| Line 34: | Line 80: | ||
=== Loops === | === Loops === | ||
Loops run the code enclosed by their curly brackets a specific | Loops run the code enclosed by their curly brackets a specific number of times or until a condition is met. While-loops are used to perform a task until a condition is met For-loop. For-loops are used when you want something to run a specific number of times. Although they seem complicated at first, the structure of most for-loops is the same. In the parentheses, the first part sets a variable (usually ‘i’ for ‘index’) to a value used to begin a count, the middle is the condition when the loop stops, and the third part is increments or decrement the counting variable (Figure 3). | ||
[[File:Arduino_Coding_Guide_3.png|700px|thumb|center|Figure 3: While and for-loops]] | [[File:Arduino_Coding_Guide_3.png|700px|thumb|center|Figure 3: While and for-loops]] | ||
| Line 40: | Line 86: | ||
=== Functions === | === Functions === | ||
Functions are predefined sections of code that can be called multiple times to perform a defined task. These are typically used when a programmer needs to perform the same task multiple times. | Functions are predefined sections of code that can be called multiple times to perform a defined task. These are typically used when a programmer needs to perform the same task multiple times. | ||
Figure 4 shows the anatomy of a function. | |||
The header portion is the function declaration. This tells the code what the function will return (return type), what the name of the function is (function name), and any parameters needed.The return type can be any valid Arduino C data type. If the function will not return any values, the return type should be void. Parameters are optional when creating a function. Figure 4 shows the anatomy of a function. | |||
[[File:Arduino_Coding_Guide_4.png|700px|thumb|center|Figure 4: Function Prototype]] | [[File:Arduino_Coding_Guide_4.png|700px|thumb|center|Figure 4: Function Prototype]] | ||
| Line 46: | Line 93: | ||
The header portion is the function declaration. This tells the code what the function will return (return type), what the name of the function is (function name), and any parameters needed.The return type can be any valid Arduino C data type. If the function will not return any values, the return type should be void. Parameters are optional when creating a function. | The header portion is the function declaration. This tells the code what the function will return (return type), what the name of the function is (function name), and any parameters needed.The return type can be any valid Arduino C data type. If the function will not return any values, the return type should be void. Parameters are optional when creating a function. | ||
For example, the following function is called addOne. This function takes in an integer, and returns that integer value plus one. | For example, the following function is called addOne. This function takes in an integer, and returns that integer value plus one (Figure 5). | ||
[[File:Arduino_Coding_Guide_5.png|700px|thumb|center|Figure 5: addOne() Function]] | [[File:Arduino_Coding_Guide_5.png|700px|thumb|center|Figure 5: addOne() Function]] | ||
An example use of this function is below. After calling the function addOne(4), the value of the integer number would be 5. | An example use of this function is below. After calling the function addOne(4), the value of the integer number would be 5 (Figure 7). | ||
[[File:Arduino_Coding_Guide_6.png|700px|thumb|center|Figure 6: Using the addOne() function]] | [[File:Arduino_Coding_Guide_6.png|700px|thumb|center|Figure 6: Using the addOne() function]] | ||
| Line 57: | Line 104: | ||
=== Commonly Used Arduino Functions === | === Commonly Used Arduino Functions === | ||
These functions are included with Arduino | These functions are included with Arduino IDE to be used with the Arduino board (Table 3). | ||
Table 3: Common Arduino IDE Functions | |||
{| class="wikitable" | |||
!Function!!What it does | |||
|- | |||
|pinMode(pin,mode)||style="text-align: center;"|Sets a pin as an input or output | |||
|- | |||
|digitalWrite(pin, value)||style="text-align: center;"|Sets a digital output pin to HIGH or LOW | |||
|- | |||
|digitalRead(pin)||style="text-align: center;"|Reads a digital input pin as HIGH or LOW | |||
|- | |||
|analogWrite(pin, value)||style="text-align: center;"|Sets an analog output pin to a value 0-1023 | |||
|- | |||
|analogRead(pin)||style="text-align: center;"|Reads an analog output pin as a value 0-1023 | |||
|- | |||
|delay(milliseconds)||style="text-align: center;"|Pauses the program for a certain amount of time | |||
|- | |||
|Serial.begin(value)||style="text-align: center;"|Begins the Serial Monitor with a baud rate of <i>value</i> | |||
|- | |||
|Serial.print(value)||style="text-align: center;"|Prints the value (variable) to the Serial Monitor. | |||
|- | |||
|} | |||
=== Arduino Libraries === | === Arduino Libraries === | ||
Arduino Libraries are commonly used for robot movement and can be helpful with various sensors. Libraries are files that are already written | Arduino Libraries are commonly used for robot movement and can be helpful with various sensors. Libraries are files that are already written to provide a sketch, , which is the name for a program written in Arduino IDE, with extra functionality through various functions. | ||
To use an existing library in a sketch simply go to the Sketch menu, choose "Import Library", and pick from the libraries available. This will insert an #include statement at the top of the sketch for each header (.h) file in the library's folder. These statements make the public functions and constants defined by the library available to | To use an existing library in a sketch simply go to the Sketch menu, choose "Import Library", and pick from the libraries available. This will insert an #include statement at the top of the sketch for each header (.h) file in the library's folder. These statements make the public functions and constants defined by the library available to the sketch. They also signal the Arduino environment to link that library's code with the sketch when it is compiled or uploaded. | ||
To install a third party library download the libraries zip file to the Arduino folder of your computer. Extract the library to its own folder. Arduino must be restarted | To install a third party library, download the libraries zip file to the Arduino folder of your computer. Extract the library to its own folder. Arduino IDE must be restarted to use the library. | ||
=== Additional Resources === | === Additional Resources === | ||
These are some third party resources and tutorials with additional information on working with Arduino: | These are some third=party resources and tutorials with additional information on working with Arduino: | ||
* [https://docs.google.com/spreadsheets/d/1X-Sj3W7rKKYeUzUMY5eqmQMuMU6Gh1op5HMCAlGhO-I/edit?ts=5d76dbee#gid=682782030 Technical Online Library] | * [https://docs.google.com/spreadsheets/d/1X-Sj3W7rKKYeUzUMY5eqmQMuMU6Gh1op5HMCAlGhO-I/edit?ts=5d76dbee#gid=682782030 Technical Online Library] | ||
* [https://www.arduino.cc/reference/en/| Arduino Language Reference] | * [https://www.arduino.cc/reference/en/| Arduino Language Reference] | ||
Latest revision as of 19:41, 2 September 2024
Arduino Integrated Development Environment
The Arduino programming language is based on C/C++, but it is designed to be simpler and easier to learn. The most intuitive way to think about programming is like building with LEGO blocks: certain rules must be followed and different building blocks can be used to build bigger blocks. The Integrated Development Environment (IDE) is the software used to write code for Arduino.
General Syntax
- Every line must either end with a semicolon ‘;’ unless it is a conditional, loop, or function
- Conditionals, loops, and functions are enclosed in curly brackets {}
- Comments start with a //
- Comments are text that the program ignores
- Used to label and explain code
Datatypes
Datatypes are the different kinds of data values that can be used, manipulated and stored using C++. Table 1 below shows the most basic and widely used datatypes.
| Datatype | What it stores (examples) | Default value | Notes |
|---|---|---|---|
| Boolean | A true value (1, TRUE, HIGH) or a false value (0, FALSE, LOW) |
0, FALSE, LOW | English Boolean values such as HIGH or LOW must be in all caps |
| int | An integer number (-5, 15, 1047, etc.) | 0 | Can be positive or negative |
| double | A decimal number (-0.5, 123.77, etc.) | 0 | Can be positive or negative |
| float | A decimal number (-0.5, 123.77, etc.) | 0 | Can be positive or negative |
| char | A single character (‘c’, ‘A’, ‘5’, ‘?’, etc.) | Indeterminate | Must be enclosed in single quotes |
| string | A sequence of characters (“Hello World!”, “10”, “157+5”, etc.) |
Empty (“”) | Must be enclosed in double quotes |
Operators
Operators perform operations on variables and constants. The results of these operations are usually stored in a variable. Table 2 shows the includes common operators in Arduino IDE.
Table 2: Common Arduino IDE Operators
| Operator | What it does | Notes |
|---|---|---|
| = | Assigns a value to a variable | |
| + | Adds two or more values | |
| - | Subtracts two or more values | |
| * | Multiplies two or more values | |
| / | Divides two or more values | |
| ++ | Increment by 1 | Usually used in loops |
| -- | Decrement by 1 | Usually used in loops |
| == | Checks if two value are equal | Usually used in conditionals |
| != | Checks if two value are not equal | Usually used in conditionals |
| > or < | Less than/Greater than comparison | Usually used in conditionals |
| <= or >= | Less than/greater than or equal to comparison | Usually used in conditionals |
| && or || | Boolean AND or Boolean OR Used to cascade multiple Boolean operations | Usually used in conditionals |
Constants and Variables
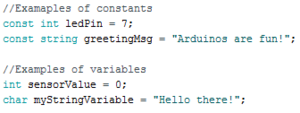
Constants and variables hold data according to their datatype. They need to be given a name so that they can be referred to later. Constants hold data that will not change while a program is running. Constants usually contain pin numbers or sensor threshold values. Variables contain data that WILL change while a program is running. Variables usually contain sensor values and other values that need to have mathematical operations done on them. Figure 1 is an example of how to create different constants and variables.
Conditional Statements
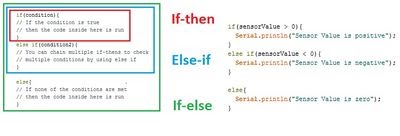
Conditional statements run code enclosed by their curly brackets when a condition is met (Figure 2).
Loops
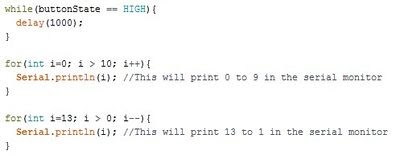
Loops run the code enclosed by their curly brackets a specific number of times or until a condition is met. While-loops are used to perform a task until a condition is met For-loop. For-loops are used when you want something to run a specific number of times. Although they seem complicated at first, the structure of most for-loops is the same. In the parentheses, the first part sets a variable (usually ‘i’ for ‘index’) to a value used to begin a count, the middle is the condition when the loop stops, and the third part is increments or decrement the counting variable (Figure 3).
Functions
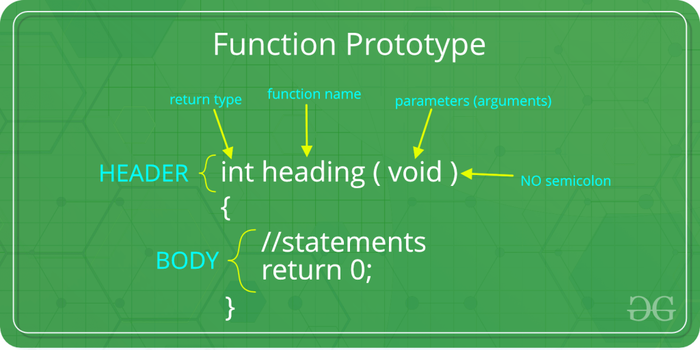
Functions are predefined sections of code that can be called multiple times to perform a defined task. These are typically used when a programmer needs to perform the same task multiple times.
The header portion is the function declaration. This tells the code what the function will return (return type), what the name of the function is (function name), and any parameters needed.The return type can be any valid Arduino C data type. If the function will not return any values, the return type should be void. Parameters are optional when creating a function. Figure 4 shows the anatomy of a function.
The header portion is the function declaration. This tells the code what the function will return (return type), what the name of the function is (function name), and any parameters needed.The return type can be any valid Arduino C data type. If the function will not return any values, the return type should be void. Parameters are optional when creating a function.
For example, the following function is called addOne. This function takes in an integer, and returns that integer value plus one (Figure 5).
An example use of this function is below. After calling the function addOne(4), the value of the integer number would be 5 (Figure 7).
Commonly Used Arduino Functions
These functions are included with Arduino IDE to be used with the Arduino board (Table 3).
Table 3: Common Arduino IDE Functions
| Function | What it does |
|---|---|
| pinMode(pin,mode) | Sets a pin as an input or output |
| digitalWrite(pin, value) | Sets a digital output pin to HIGH or LOW |
| digitalRead(pin) | Reads a digital input pin as HIGH or LOW |
| analogWrite(pin, value) | Sets an analog output pin to a value 0-1023 |
| analogRead(pin) | Reads an analog output pin as a value 0-1023 |
| delay(milliseconds) | Pauses the program for a certain amount of time |
| Serial.begin(value) | Begins the Serial Monitor with a baud rate of value |
| Serial.print(value) | Prints the value (variable) to the Serial Monitor. |
Arduino Libraries
Arduino Libraries are commonly used for robot movement and can be helpful with various sensors. Libraries are files that are already written to provide a sketch, , which is the name for a program written in Arduino IDE, with extra functionality through various functions.
To use an existing library in a sketch simply go to the Sketch menu, choose "Import Library", and pick from the libraries available. This will insert an #include statement at the top of the sketch for each header (.h) file in the library's folder. These statements make the public functions and constants defined by the library available to the sketch. They also signal the Arduino environment to link that library's code with the sketch when it is compiled or uploaded.
To install a third party library, download the libraries zip file to the Arduino folder of your computer. Extract the library to its own folder. Arduino IDE must be restarted to use the library.
Additional Resources
These are some third=party resources and tutorials with additional information on working with Arduino:


