Processes & Water Filters
Objective
The objective of this lab is to design and assemble a water filter and enter it in a competition. The filter will be evaluated with a competition equation that uses the filter’s cost, change in turbidity of the water, and the flow rate during filtering. The highest competition equation wins.
Overview
Access to safe drinking water is a privilege that is often taken for granted. According to the United Nations, water scarcity affects 2.20 billion people worldwide. It is estimated that by 2050, 2.30 billion people are expected to live in areas that experience severe water stress. One of the United Nations' 17 goals to sustainably transform the world includes available and sustainable management of water and sanitation for all.
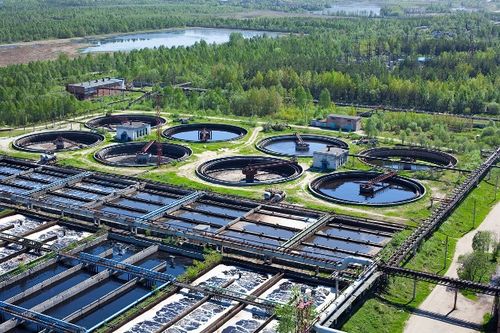
Engineers have experimented with different ways of making drinking water more accessible (Maclean et al., 2024). Currently, water is sourced from freshwater sources, such as surface water, which includes lakes, rivers, and streams. Non-conventional water sources, such as desalinated ocean water, treated wastewater, and agricultural drainage water, are also used. Regardless of how it is sourced, all water must go through a treatment process to be safe for human consumption. These typically take place at water treatment plants (Figure 1).
Water Treatment Methods
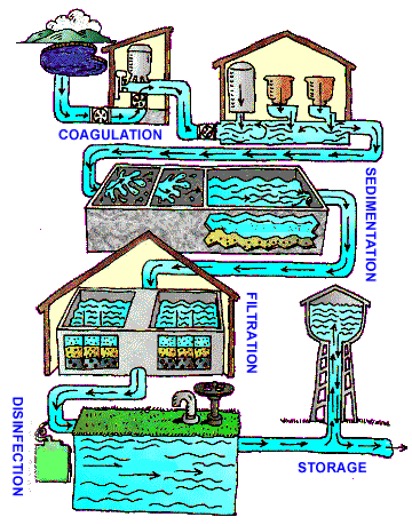
There are typically five steps in a water treatment process (Figure 2), but this lab will use just the first three steps: coagulation and flocculation, sedimentation, and filtration.
The first step, coagulation and flocculation, adds positively-charged chemicals called coagulants are added to the water to neutralize the negative charge of the contaminants in the water. The contaminants combine with the coagulants to form larger particles, known as flocculants or floc, which are easier to filter out. In this lab, aluminum sulfate, also known as alum, is used as the coagulant.
The second step is sedimentation. The difference in densities between the floc and the water causes the particles to settle to the bottom of the water supply.
The third step is filtration where floc is removed from the water. During filtration, the water on top of the floc goes through a series of filters that are made up of sandbeds, gravel, or other materials. The materials typically have different pore sizes to contain contaminants of different sizes. In this lab, sand, gravel, and activated carbon will be used to filter the water. At some water treatment plants, water also filters through a granulated carbon filter that removes any organic material and other particles.
The fourth step is disinfection. For human consumption, a disinfectant such as chlorine may be added to kill any remaining bacteria, viruses, or parasites during disinfection.
The final step is storage of the treated water in tanks for future use.
Water Acidity & Alkalinity
Before filtration, water must be neutralized to alter its acidity or alkalinity. If it is not neutralized, the water may be unsafe to drink and cause corrosion of pipes in the water treatment system. Water and water-based solutions are measured for acidity or alkalinity by their power of hydrogen or potential for hydrogen (pH). The pH scale is logarithmic based on the concentration of hydrogen ions (1).
(1)
The pH of an aqueous solution indicates the concentration of hydrogen ions (H) and hydroxide ions (OH) (Figure 3). pH is measured on a scale from 0.00 to 14.00. A pH of 7.00 signifies that the concentration of H and OH ions are equal. If the concentration of hydrogen ions increases in a solution, it becomes more acidic. A pH of 0.00 to 6.000 indicates an acidic sample. A pH of 8.00 to 14.00 indicates an alkaline sample.
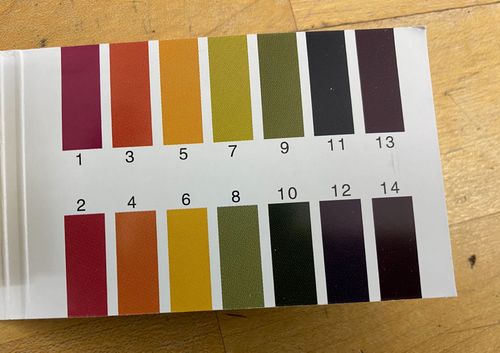
The pH of a solution can be measured using a pH strip, which is a piece of filter paper that has been soaked in various acid/base indicators. Once placed in a solution, the pH strip will change color based on the acidic or alkaline property of the liquid. The pH of the solution can be approximated based on the color change of the pH strip (Figure 4).
Water Turbidity
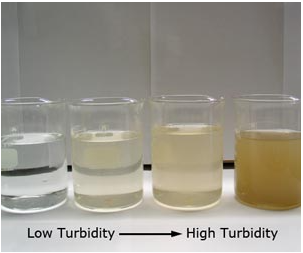
Turbidity, which is measured in nephelometric turbidity units (NTU), is the measure of the clarity of an aqueous solution. It is an optical characteristic of water and is found by measuring the amount of scattered light caused by materials in water. The turbidity of the water corresponds to the level of contaminants present in water. A turbidity sensor works by shining light into the water and reading how much light is reflected back to the sensor. The higher the turbidity, the higher the intensity of scattered light (Figure 5).
Qualifications for Clean Water
To protect the public, the United States Environmental Protection Agency (USEPA) sets legal limits of no more than 90 contaminants in drinking water. Secondary drinking water regulations that focus on the pH and turbidity are also set. Safe drinking water should have a pH between 6.5 and 8.5, and a standard turbidity of 1.0 NTU.
Mass Balance
To estimate the amount of water retained after filtration, engineers measure the mass or material balance of a system. Mass balance is a measure of the total mass flow in and out of a system during a chemical or physical process. The law of conservation of mass states that in a closed system, the mass of the system must remain constant over time.
This means that for all processes, the total mass that enters a system must equal the total mass exiting the same system (Figure 6). In Figure 6, 6.00 lb/s of material A and 12.00 lb/s of the material B enter the system. As a result, 18 lb/s, must leave the system per second to satisfy mass conservation.
Chemical processes are defined by their input, output, and the materials generated or consumed during the process. In (2), all the materials that are fed into the process unit are the input and all the product streams that flow out of the process unit are the output. When chemical reactions occur, generation and consumption also contribute to the mass balance. Generation is the amount of materials formed in a process unit and consumption is the amount of materials broken down in a process unit.
(2)
In this lab, the energy input and generation and consumption by chemical reactions will be neglected. Thus, the mass balance becomes
(3)
Process Flow Diagrams Example
Processes like water filtration can be modeled using the elements of the process, arranged to create a process flow diagram (PFD). In this lab, a PFD will track the movement and composition of water in the designed water filtration system. Drawing PFDs is an essential technique to properly and clearly relay key information about a process design. When drawing PFDs, several elements must be included in the diagram. These elements are:
- Process vessels and equipment
- Process and utility flow lines
- Full energy and material balance
- Composition of every stream
- Bypass and recycle streams
All processes in a PFD must abide by the law of conservation of mass and the law of conservation of energy. Energy conservation is beyond the scope of this lab and will not be considered in the PFDs.
PFD Elements
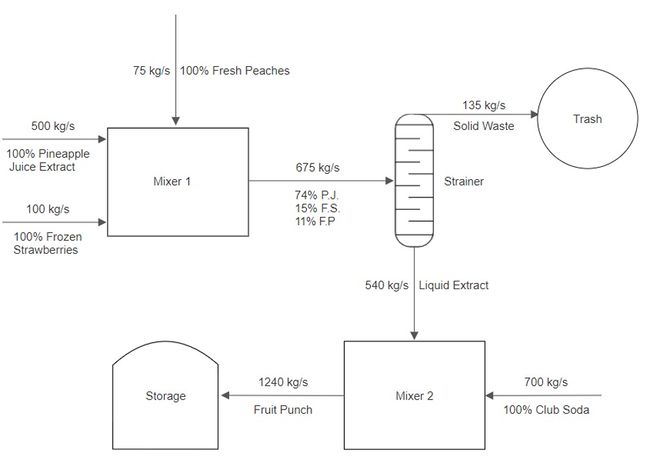
The following example will be used to explain these elements: Three streams of fruit material enter a mixer: a stream of pineapple juice extract at a rate of 500.00 kg/s, a stream of frozen strawberries at a rate of 100.00 kg/s, and a stream of fresh peaches at a rate of 75.00 kg/s. The fruit mixture product stream then leaves the first mixer and enters a strainer where 135.00 kg/s of solids exit and are thrown into the trash. The remaining 540.00 kg/s of liquid exits in one stream. The liquid stream enters a final mixer alongside a stream of club soda that enters at a rate of 700.00 kg/s. The resulting product stream enters a storage unit.
Process vessels and equipment are the units that the working stream passes through to change some of its physical properties, such as temperature, mass flow, or pressure. Some examples of process vessels and equipment are mixers, steamers, turbines, and reactors. In this PFD, the process vessels are Mixer 1, Mixer 2, Strainer, Trash, and Storage. They can be indicated by different closed form shapes (Figure 7).
The process and utility flow lines include the one-sided arrows in the PFD, although a process can involve two-sided arrows. The flow lines indicate the direction the materials flow and the composition of each stream.
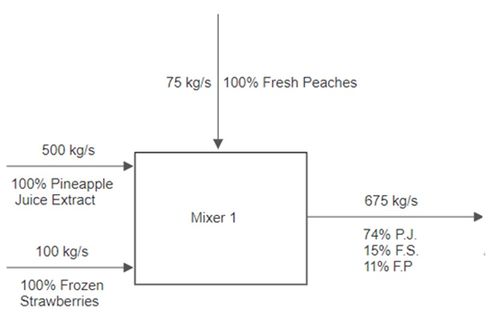
Full energy and material balance in a process involves carrying out the conservation of mass and energy in a process. At Mixer 1, 675.00 kg/s of total material enters the mixer (500.00 kg/s of pineapple juice, 100.00 kg/s of frozen strawberries, and 75.00 kg/s of fresh peaches), and 675.00 kg/s leaves the mixer. The mass and energy flow rates are usually listed above the process flow lines.
The composition of the streams is usually listed under the flow lines and indicates the percentage of the streams that each material comprises. For Mixer 1, the composition of the exit stream is indicated as 74.00% pineapple juice (P.J.), 15.00% frozen strawberries (F.S.), and 11.00% fresh peaches (F.P.).
Bypass and recycle streams are not considered in the PFDs in this lab, but they are also indicated by process flow lines. Bypass streams consist of streams of undesirable products, such as waste products, that usually flow to a disposal unit or the trash. Recycle streams consist of unprocessed materials that are fed back into the initial feed stream to be processed again, as most real process units are not 100% effective. In Figure 7, the flow line of 135.00 kg/s of solid waste that flows into the trash unit is a bypass stream.
The design of a PFD based on a problem statement will be walked through in detail. Three streams enter the mixer and one stream leaves. There are three inputs and one output, as shown in Figure 8.
Each stream should be labeled with the flow rate above the flow line and the composition of the stream below the flow line. Due to mass balance, the flow rate of the product stream is equal to the total flow rate of the input streams. The composition of the product stream can be calculated using (4). To find the percentage of the stream, multiply the result in (4) by 100%.
(4)
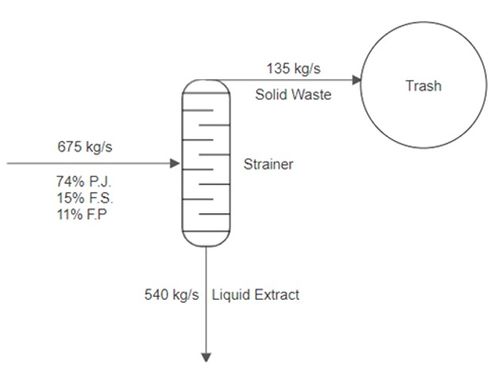
In the second part of the example, the combined product stream from Mixer 1 enters a strainer and 20.00% of the stream is separated into a solid stream and 80.00% of the stream is separated into a liquid stream. The solid stream is directed into the trash. The flow rate of the solid and liquid streams can be calculated by multiplying the percentages, 20% and 80%, by the input stream from Mixer 1, as shown in Figure 9. Due to the lack of information, the specific composition of each stream of fruit is unknown in the output and can be omitted in the PFD.
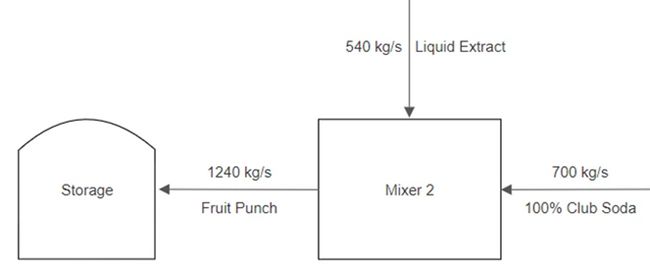
In the final part, the liquid stream from the strainer enters a mixer as an input with a 700.00 kg/s stream of club soda. These are the input streams for the final part of the process. The product stream then enters a storage unit. Similar to the first part, the flow rate of the product stream is the sum of the input streams, as shown in Figure 10.
Design Consideration
- Which aspects of the competition components are most advantageous?
- Which materials will best filter large sediments out of the contaminated water?
- Which materials will improve the water quality?
- What order of materials would create a winning design?
Materials and Equipment
- A computer with access to the internet
- pH strips
- Contaminated water
- Erlenmeyer flask
- Funnel
- Beaker
- Scale
- Alum
- Sodium bicarbonate
- Glass stirring rod
- Sand
- Activated carbon
- Gravel
- Gauze pads
- Turbidity sensor
Price List
Consider the materials and their order in the filter carefully (Table 1). Remember that cost is in the denominator of the ratio so its impact can be significant.
| Material | Unit (tsp) | Cost Per Unit ($) |
|---|---|---|
| Sand | 1.00 | 1.00 |
| Activated Carbon | 1.00 | 0.50 |
| Gravel | 1.00 | 0.25 |
Procedure
Note: Water filtered in this experiment cannot be consumed
1. Water Filter Design Analysis: Warm-Up Exercise
In this exercise, the relationship between % mass lost and the quantity of each material will be analyzed when the quantity of each material for the filter is varied while keeping the quantity of other two materials constant. The models are approximations and they are not accurate representations of the filter process. The following steps outline the procedure to create a scatter plot for the sand-varied filter dataset.
- Download the Lab 8 Data Sheet containing data for this exercise.
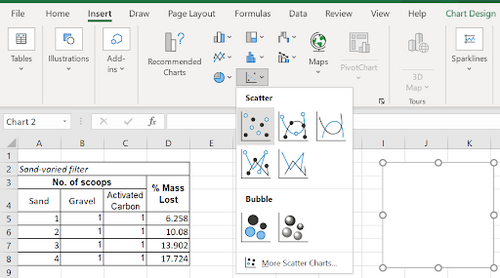
- On the Excel ribbon, click on the Insert tab. Navigate to the Insert Scatter option in the Charts groups and click Scatter. This will create a blank scatter plot, as shown in Figure 11.
- Right-click on the empty graph and click Select Data. The Select Data Source dialog box will appear.
- Click Add to add a new dataset to the graph. Enter the series name % Mass Lost vs Teaspoons of Sand.
- For Series X values, highlight the cells containing the number of teaspoons of sand from the sand-varied filter dataset (A9:A12). For Series Y values, highlight the % mass lost data for the sand-varied filter (D9:D12).
- Rename the axes and chart titles by clicking the Chart Design tab on the Excel ribbon, then navigating to Add Chart Element and selecting the Title option.
- To insert a trendline, select Add Chart Element, then navigate to the Trendline option and select Linear.
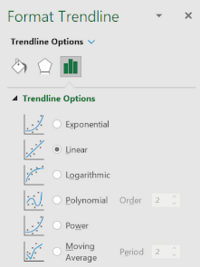
- Double click on the newly created trendline. A Format Trendline dialog box will appear on the right side of the Excel window.
- Click on the Trendline options category with the icon that looks like a column chart, as shown in Figure 12. Check off Display Equation on the chart.
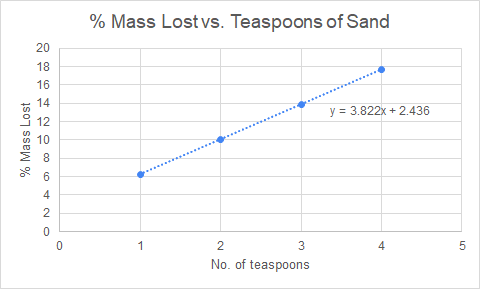
- The finished scatter plot should look like Figure 13.
- Repeat the steps to create a scatter plot for the gravel-varied and activated carbon-varied filters.
Pay attention to the linear relationship illustrated by the trendline equation in all three scatter plots. It can be deduced that a filter in which the quantity of all three materials is varied would be represented by a linear model of the form (4). In (4), d is the total percent mass lost, a is the teaspoons of sand, b is the teaspoons of gravel, c is the teaspoons of activated carbon, and the constants, X, Y, and Z, correspond to the slope of the trendline for the sand-varied, gravel-varied, and activated-carbon varied filters, respectively.
(4)
2. Initial Data
- Record all data observed in the lab in the Excel datasheet. Only the blank cells should be edited.
- Weigh the empty 500.00 mL beaker in grams using the scale. Make sure to zero the scale by hitting the tare button before weighing the beaker.
- After recording the weight of the beaker, the TA will add 200.00 g of the warm contaminated water to the beaker. Take note of the color, odor, and any visual observations.
- The TA will use a turbidity sensor and measure the initial turbidity of the water sample. Stir the water sample before giving it to the TA. Be sure to record the turbidity in the data sheet. Note that turbidity is being measured in volts.
- Reweigh the beaker and the contaminated water sample and calculate the weight of just the contaminated water. Record the weight in the datasheet. It should be around 200.00 g.
- Immerse one end of the pH strip into the contaminated water for a few seconds.
- Compare the color on the end of the strip to the pH color chart of this manual page and record the pH.
3. pH Neutralization
Measure the pH of the water before constructing the water filter.
- From the pH obtained in the initial data, determine if the contaminated water is acidic or alkaline.
- For acidic water, one method of increasing the pH is to add sodium bicarbonate, or baking soda, which has a pH of approximately 9.00. If the solution is acidic, add sodium bicarbonate.
- Place the beaker of contaminated water onto the scale. Tare the scale.
- Add in 0.30 g of baking soda to the contaminated water and mix well. From the mass displayed on the scale, record the amount of the baking soda added.
- Stir the water to make sure the baking soda dissolves and test the pH of the contaminated water again with a pH strip.
- Compare the color on the end of the strip to the pH color chart and record the final pH. If the pH is not in the range of 6.50 to 8.50, repeat the process.
4. Flocculation and Coagulation
- Place the beaker of neutralized water onto the scale and tare the scale. Add around 1.00 g of alum to the contaminated water. Record the mass of alum added in the datasheet.
- Mix the contaminated water well for 10.00 s.
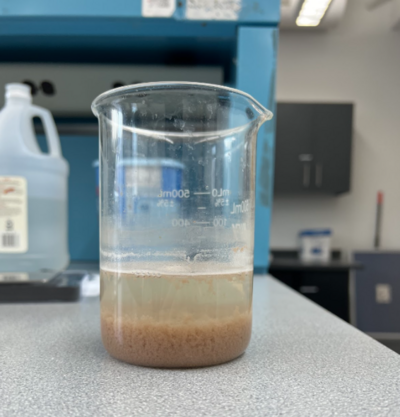
- Let the contaminated water rest for 10.00 min to 15.00 min to allow flocculation to occur. Note any changes observed in the mixture. The final coagulated and flocculated water sample should look similar to Figure 14.
5. Water Filter Design and Assembly
- Using the available materials and a funnel, design a water filter that will filter the physical sediments with the following limitations:
- Use a minimum of 3.00 tsp and a maximum of 6.00 tsp.
- Each material can only be used a maximum of three times.
- Record the following information in the lab notes:
- Materials used to design the filter.
- Order of adding each material.
- Quantity of each used material.
- Total cost.
- Have a TA approve the design.
- Record the materials used in the datasheet.
- Obtain the required materials and assemble the water filter. A gauze pad must be placed on the inside of the funnel to contain the filter materials.
- Record the weight of an empty Erlenmeyer flask on the scale.
- After waiting 10.00 min to 15.00 min for the flocculation process to complete, slowly pour the contaminated water through the filter. Do not stir before pouring. But before pouring, please read the following instructions:
- Measure the flow rate. Start a timer the second the water is poured into the filter. Stop the timer when the water in the Erlenmeyer flask reaches 100.00 mL. Record the time to calculate the flow rate. Do not stop filtering once 100 mL is reached. All of the contaminated water must be filtered.
- Do not overfill the filter. The water must be poured slowly to first filter out all of the clear water. Exclude the floc at the bottom.
- Once that filters through, pour in the rest of the contaminated water sample including the floc.
- Once the contaminated water has been completely filtered, wait a few minutes before removing the filter. Once no water is observed to be coming out of the filter, remove the assembled water filter from the Erlenmeyer flask and rest the filter on the now empty beaker.
- Record the filtration time in the datasheet.
- Weigh the filtered water and subtract the weight of the empty Erlenmeyer flask. Record the difference in the datasheet.
- Have a TA measure the turbidity of the filtered water. Record the new turbidity reading in the datasheet.
- The competition judges the filters using a competition equation uses the change in the turbidityin volts, the flow rate in cubic centimeters per second), and the cost in dollars. These values should appear at the bottom of the datasheet. The filter with the highest competition equation result wins (6).
(6)
Sample calculation of the Competition Equation:
Change in turbidity: 2.0 V
Flow rate = 1.1 g/s
Cost = $2
(7)
Share the results with a TA. The TA will record the results in the competition spreadsheet.
6. Process Flow Diagram
- Design a simplified industrial water treatment system PFD based on the experiment in this lab. EG1004 recommends Diagrams.net for creating the PFD. Include the following processes:
- pH Neutralization
- Coagulation and flocculation
- Sedimentation
- Filtration
- The PFD will assume that the initial flow of contaminated water is the flow rate found in this lab. The contaminated water will flow through the following process units:
- pH Neutralizer
- Mixer
- Filter
- Storage
- Based on the numerical data and the given initial mass flow rate, be sure to add the following:
- Amount of contaminated water entering the system.
- Mass flow rate of baking soda into the pH neutralizer.
(8)
- Mass flow rate of alum added to the system.
(9)
- Calculate the mass flow rate of physical sediment removed from the system.
(10)
- Calculate the mass flow rate of filtered water leaving the system.
(11)
Keep in mind the order of filtration and any other process units needed to logically complete the process flow (for example a mixer after adding the alum). See the PFD example in the Overview section for reference.
Assignment
Team Presentation
Please refer to the slide deck Recitation 10: Research Posters for guidance on the poster presentation and outline of content to include for Lab 10.
Maclean et al., 2024. “Investigation of flow rate in symmetric four-channel redox flow desalination system.” Cell Reports Physical Science. Accessed 28 June 2024. https://www.cell.com/cell-reports-physical-science/pdf/S2666-3864(23)00606-9.pdf
2018 Edition of the Drinking Water Standards and Health Advisories Tables (2018, March). Retrieved from https://www.epa.gov/sites/production/files/2018-03/documents/dwtable2018.pdf
FAO's Global Water Information System. 2014. Prepared by AQUASTAT, Food and Agriculture Organization of the United Nations, www.fao.org/3/I9253EN/i9253en.pdf.
Guppy, L., Anderson, K., 2017. Water Crisis Report. United Nations University Institute for Water, Environment and Health, Hamilton, Canada.
Healthy Water. (2022, March 23). Retrieved 2 July 2020. 02, 2020, from https://www.cdc.gov/healthywater
Water Treatment. (2015, January 20). Retrieved July 02, 2020, from https://www.cdc.gov/healthywater/drinking/public/water_treatment.html
![{\displaystyle pH=-log[H^{+}]}](https://wikimedia.org/api/rest_v1/media/math/render/png/085bcfa09edd2b2d817ee499761dc0a43e62817f)
 ) and hydroxide ions (OH
 ) (Figure 3). pH is measured on a scale from 0.00 to 14.00. A pH of 7.00 signifies that the concentration of H
 /s of material A and 12.00 lb


![{\displaystyle Consumption\ of\ Pineapple\ Juice\ Extract={\frac {500\left[{\text{kg/s}}\right]}{675\left[{\text{kg/s}}\right]}}=0.74}](https://wikimedia.org/api/rest_v1/media/math/render/png/b4abdcdde50b0b1e2be3532e4b982d3e22635768)

![{\displaystyle Competition\ Equation={\frac {(\Delta \ Turbidity\ [V])^{3}\times Flow\ Rate{\frac {g}{s}}}{Cost\ [\$]}}}](https://wikimedia.org/api/rest_v1/media/math/render/png/10514534c95a4269b1589f98145ac796d57542f0)


