DNA Extraction and Gel Analysis
Objectives
The objectives of this experiment are to extract DNA from a fruit sample, test the moisture of a soil sample, and perform blood typing and gel electrophoresis. The DNA will be extracted using the basic biochemical techniques for isolating, purifying, and digesting DNA molecules. The moisture test will be completed using an Arduino moisture sensor. A blood typing kit will be used for the blood tests. While these tests are performed, the gel electrophoresis will be run simultaneously.
Overview
Cellular Biology and Location of DNA
DNA is the blueprint of life and is found in almost all living organisms. These organisms can be as simple as a single-celled bacteria or as complex as a multi-celled human: the human body contains approximately 50 trillion cells. There are two different types of cells: prokaryotes and eukaryotes. An example of prokaryotic organism is bacteria. Prokaryotic cells do not contain a nuclear membrane and so do not have a distinct nucleus. Only eukaryotic cells, which make up plants and animals, will be considered in this lab. Eukaryotic cells have a distinct, membrane-bound nucleus that isolates the DNA from the rest of the cell. The structure of plant cells is different from those of animal cells in structure and cellular contents. Only plant cells will be used in this experiment.
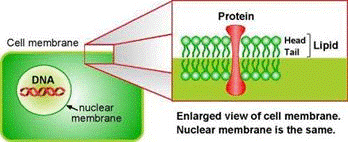
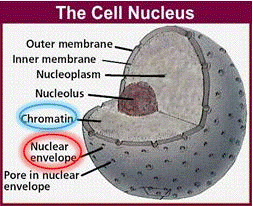
Plant cells are surrounded by a cell wall. It has high mechanical strength and protects the cell. Directly beneath the cell wall lies the plasma membrane (Figure 1), which contains the cytosol. The various cell organelles, including the nucleus, are found within the cytosol. The nucleus houses the DNA in the form of chromatin.
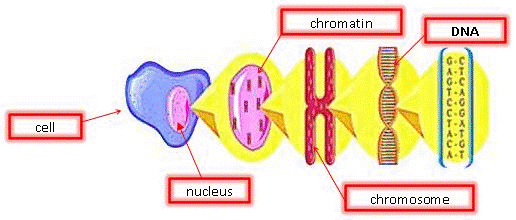
Chromatin is the active form of DNA in the cell when it is not preparing for cell division. It is comprised of DNA wrapped around protein particles called histones.
DNA Extraction Technique
In this experiment, a goal is to extract the DNA from a fruit sample. Some knowledge of the scientific background behind DNA extraction is needed to do this.
The DNA extraction process is a fairly simple biochemical procedure that can be divided into three major steps: breaking open the cell (lysis), destroying membranes within the cell, and precipitating the DNA out of the solution.
The following sections describe how each step relates to the physical and biochemical properties of DNA.
Cell Lysis (Breaking Open the Cell Wall and Membranes)
Plant cells have a very rigid external structure — the cell wall — which protects it. To get to the DNA, the very first step would be to break open that wall.
The cell wall is the first barrier in that must be broken to extract the DNA molecule inside the cell. It is very rigid and acts as a protector and filter. It is made of cellulose, and is responsible for making wood hard and durable. To destroy the cell wall, a mechanical method is used to break apart the cellulose molecules. In this experiment, the fruit sample is mashed manually.
Destroying Membranes Within the Cell
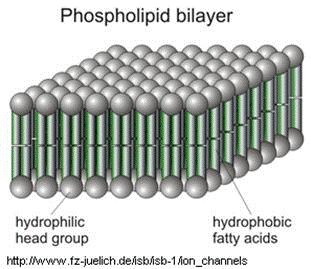
The cell's plasma membrane is made of phospholipid bilayers; they are made of fat. To disrupt them, that mesh of fat molecules is broken up with soap. The structure of soap is very similar to that of fat and grease.
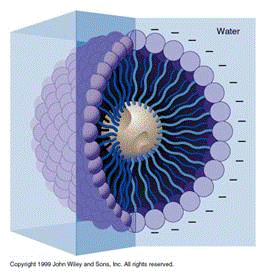
A soap molecule has two parts: a head and a tail. The head is polar and is attracted to water while the tail is non-polar and is attracted to oil and fat. When soap molecules are in water, they group themselves into micelles — a roughly spherical structure in which all the polar heads point outwards (in contact with water) and all the non-polar tails point inwards at the center of the sphere (away from the water). They can effectively trap the fat molecule inside the micelle and dissolve the cell membranes. How does this micelle break down the phospholipid bilayer? The molecules in the phospholipid bilayer (Figure 5) also contain molecules that are made up of a hydrophobic head and a hydrophilic tail. The soap molecules orient themselves so that their head associates with the tail of the phospholipid bilayer. In this way, the soap is able to break up the bilayer molecule by molecule.
Precipitating the DNA
When the membrane is successfully disrupted, the DNA is released from the cells into the solution along with protein molecules and other cellular miscellanea.
The DNA molecule is a double-helical polymer consisting of a sugar-phosphate backbone with nitrogenous bases running perpendicular to the backbone. These bases, often represented by letters — A (adenine), G (guanine), C (cytosine), and T (thymine) — are the elementary components making up the coded genetic information (Figure 7). The base sequence acts as the instruction manual of the cell, directing it on how to make proteins and other important molecules that an organism needs to survive and function.
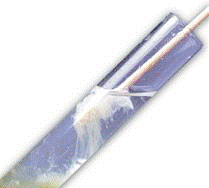
With the cell's contents mixed into a solution, the DNA is separated from the rest; this process is called precipitation. Salt is used because it disrupts the structure of the proteins and carbohydrates found in the solution. Also, the salt provides a favorable environment to extract the DNA by contributing positively charged sodium ions that neutralize the negative charge of DNA. After the addition of salt and soap, the manner by which the DNA is being extracted out of the solution cannot be seen as it is too small to distinguish from the rest of the solution. To aid in precipitating the DNA, alcohol is added since it cannot dissolve DNA. A translucent white substance will begin to form at the top; this is DNA. Once it is thick enough, it can be spooled out. This simple procedure is a rough extraction process that needs further purification before it can be successfully run on a gel for analysis.
Restriction
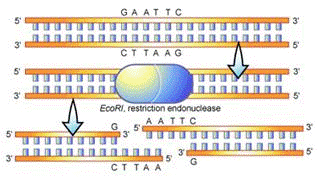
Often times, larger fragments of DNA are cut, or restricted, to extract a particular fragment. This is made possible by the action of restriction enzymes, which are used by bacteria to cut up foreign or enemy DNA. Restriction enzymes are catalytic proteins that recognize specific palindromic DNA sequences and cut the double-stranded DNA at particular sites. The sites that the restriction enzymes recognize are called restriction sites. There are many different types of restriction enzymes. Each type recognizes a different restriction site. In this lab, Lambda DNA, which is a commercially available DNA normally found in a virus called Phage Lambda, will be restricted with the restriction enzyme BamH1.
| Enzyme | Source | Recognition Sequence | Cut | |
|---|---|---|---|---|
| BamH1 | Bacillus amyloliquefaciens | 5'GGATCC 3'CCTAGG |
5'-----G -------CCTAG |
GATCC------ G-----5' |
| EcoRI | Escherichia coli | 5'GGATCC 3'CCTAGG |
5'-----G -------CCTAG |
GATCC------ G-----5' |
| HindIII | Haemophilus influenzae | 5'AAGCTT 3'TTCGAA |
5'---A 3'---TTCGA |
AGCTT---3' A---5' |
Gel Electrophoresis
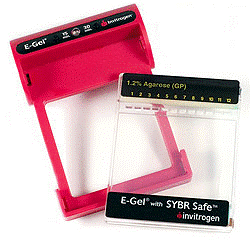
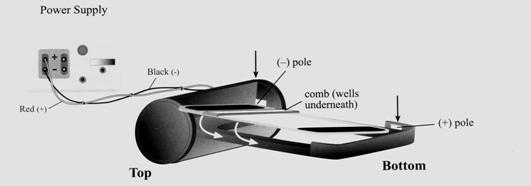
The technique of DNA electrophoresis (Figure 10), will be performed on uncut and cut Lambda DNA, a commercially available DNA on an agarose gel, to visualize the characteristic banding patterns that differentiate between different DNA fragments. Gel electrophoresis is a technique used for separating molecules based on their charge and molecular weight. The sample is loaded in a gel matrix and an electric field is applied across it. The electric field enables the DNA, which is negatively charged to migrate to the end, which is positively charged. Opposites attract and so the negatively charged DNA is attracted to the positive end of the gel. Lighter molecules will migrate to the opposite end of the gel faster than heavier molecules.
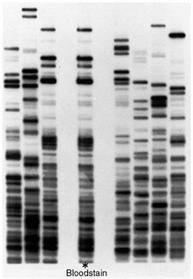
The following is a gel after the samples have been run. Each column is referred to as a lane, representing one sample each. The individual bands (Figure 11) contain fragments of DNA that are identical in weight.
Materials and Equipment
- Fruit sample
- Non-iodized table salt (NaCl)
- Hand soap (clear, unscented)
- 95% isopropyl alcohol (0 °C)
- Distilled water
- Strainer
- Plastic cups
- Ziploc bag
- Lambda DNA
- Dye
- Variable micropipette and tips
- Incubator
- Microcentrifuge tube
- Precast agarose gel
- Electrophoresis system
- Bioimaging system
- DNA sample containers
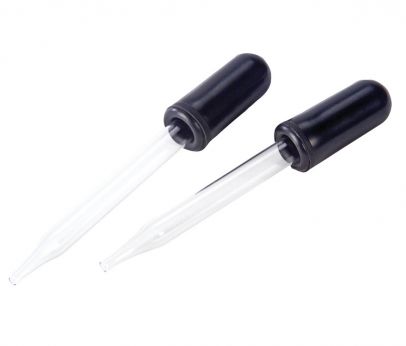
- Disposable pipets
- Iron Magic Wand
- Iron powder
- Arduino software
- Arduino moisture sensor
- Blood typing kit
- Milk, water, vinegar, dye
Procedure
NOTE: Some biological experiments require a lot of wait time. To maximize time, many experiments of this nature are usually performed simultaneously. In this lab, the multitasking technique that is used by professional scientists will be used. Please read the procedures carefully when jumping between different experimental procedures.
Preparation of Sample for Restriction
| Tube | Lambda DNA | Restriction Buffer | BamH1 | Distilled H2O | Dye | |
|---|---|---|---|---|---|---|
| 1 | 4 µL | 5 µL | 2 µL | 8 µL | 2 µL | |
| Control | 4 µL | 5 µL | 0 µL | 10 µL | 1 µL |
- Load the micropipette with a tip and obtain four µL of the lambda DNA using the micropipette.
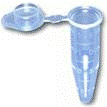
- Pipette it into a microcentrifuge tube and dispose of the micropipette tip. Dispose of the tip after each use.
- Reload the micropipette with another tip and obtain five µL of the restriction buffer. Dispose of the tip.
- Get another tip and get two µL of BamH1, which is the restriction enzyme used to cut the DNA. Dispose of the tip.
- Add eight µL of distilled water. After this is done, call the TA.
- A TA will oversee the rest of the procedure. As step 6 is occurring, proceed to the DNA extraction portion at step 16.
Restriction of DNA Sample
- Place the microcentrifuge tube into the incubator. It should be set to 37 °C. The sample will incubate for 30 minutes.
- Add two µL of dye. This will show the DNA as it runs through the gel.
Gel Electrophoresis
- Prepare the electrophoresis gel when there are 15 minutes left for the incubation.
- Plug the power base in.
- Open the package containing the gel.
- Insert the gel, right edge first, and press firmly at the top and bottom to seat the gel in the base. A snap will be heard when it is in place. A steady red light will appear.
- Press and hold either button until the red light turns into a flashing green light. This indicates that the two-minute pre-run of the gel has started. At the end of the pre-run, the flashing green light will change to a flashing red light and the base will rapidly beep.
- Press and release either button to stop the beeping. One more beep will be heard. The light will change from a flashing red to a steady red light.
- Remove the comb from the gel by pulling it straight up from both sides and remove any excess fluid using a pipette.
- Load the samples in 20 µL volumes into the wells. Load 20 µL of distilled water into any remaining empty wells.
- Press and release the 30-minute button to start the 30-minute electrophoresis run. The light will change to a steady green light.
- Wait 30 minutes for the run to complete. The light will flash red and there will be a rapid beeping.
- While waiting for the gel electrophoresis to complete, proceed to step 28.
- Press and release either button to stop the beeping and the light will turn to a steady red light.
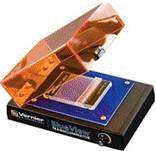
- Remove the gel from the base and analyze the results using a UV transilluminator.
DNA Extraction
- Contaminants such as sugars remain in the DNA collected from the fruit sample. Typically, to properly run it through the electrophoresis gel and get results, it must be sized down considerably and thoroughly rinsed to get rid of the excess. Instead, Lambda DNA is used because it is already prepared and able to run in the electrophoresis gel.
- Obtain a fruit sample that is about two inches wide and put it in the Ziploc bag provided.
- Close the bag so there is as little air as possible inside.
- Mash the sample gently by hans. Be careful not to burst the bag. After about five minutes, the fruit sample will be transformed into a creamy paste. This process is known as homogenization.
- Prepare the buffer solution while the homogenization of the fruit sample is occurring.
- Fill a cup ¼-way with distilled water.
- Add one teaspoon of table salt.
- Mix the solution until the salt dissolves in the water.
- Add two teaspoons of soap.
- Stir gently with the spoon so that it does not foam. Keep stirring until the texture of the solution is even.
- Pour the prepared buffer solution into the Ziploc bag and close it. Make sure that there is no trapped air in the bag.
- Mix the smashed fruit and the buffer solution gently in the bag. Do it slowly. It is important that it does not foam a lot.
- Let the mixture sit for about five minutes. If it has foamed, allow the foam to go away during this time. By letting the mixture stay still, the foam will disappear.
- Filter the solution by using another clear plastic cup. Hold the strainer on top of the empty cup while carefully pouring out the contents of the Ziploc bag. Make sure it does not foam. Pour slowly. Occasionally shake the strainer to make the liquid filter through. There is a lot of debris.
- Add ice-cold 95% isopropyl alcohol to the filtered solution by pouring the alcohol against the wall of the cup. Do not mix the alcohol with the solution; it should float on top. Alcohol dissolves within water, but it can float if it is poured slowly against the side of the container because it is less dense than water. Pour the alcohol until the total volume reaches ¾ of the cup’s volume. After about one minute, threads of DNA will form into translucent gel-like globs at the interface of the filtered solution and the alcohol.
- Collect the DNA by spooling it with a paperclip.
- Split the spooled DNA into two sample containers. Label one S for sugars and the other P for proteins.
- Return back to step 7.
Chemical Tests for Biological Substances
- Obtain the Benedict's and Biuret reagents.
- Note the original color of the Benedict's and Biuret reagents as well as the color of the original spooled DNA sample.
- Use a transfer pipet to place three drops of Benedict's reagent onto the spooled DNA in the sample container marked S and note any color change.
- Repeat step 29 with the Biuret reagent in the container marked P and note color change.
- Clean up all materials. Throw out the extracted DNA and go back and complete steps 14 and 15.
Assignment
Individual Lab Report
Follow the lab report guidelines laid out in the page called Specifications for Writing Your Lab Reports in the Technical Communication section of this manual. The following discussion points should be addressed in the appropriate section of the lab report:
- Discuss the structure of a plant cell.
- Justify the use of salt, soap, and alcohol in the extraction procedure.
- Explain how to reach the DNA and the barriers that were overcome to get to it.
- Describe the major techniques used in this lab: DNA Restriction, Gel Electrophoresis, etc.
- Important properties of DNA directly having an impact on the extraction procedure.
- Clearly describe the procedural steps the way they were carried out in lab.
- Describe the steps carried out with the TA.
- Explain the test results for the Biuret test and Benedict's test.
- Include appropriate figures to support the observations made.
- Specify the location in the gel of the DNA sample that belonged to the team.
- Compare the results with the control group.
- How would procedure change if meat was used instead of fruit?
Remember: Lab notes must be taken. Experimental details are easily forgotten unless written down. EG1004 Lab Notes Paper can be downloaded and printed from the EG1004 Website. Use the lab notes to write the Procedure section of the lab report. At the end of each lab, a TA will scan the lab notes and upload them to the Lab Documents section of the EG1004 Website. One point of extra credit is awarded if the lab notes are attached at the end of the lab report. Keeping careful notes is an essential component of all scientific practice.
Team PowerPoint Presentation
Follow the presentation guidelines laid out in the page called EG1004 Lab Presentation Format in the Introduction to Technical Presentations section of this manual. When preparing the presentation, consider the following points:
- Rely heavily on graphics and pictures.
- Make sure the Experimental Work is described simply and thoroughly.
- Discuss the real-life application of DNA sequencing.
- Demonstrate clear understanding of each procedural step carried out and why it worked.
References
Nasco Website
The Science Creative Quarterly
http://www.hhmi.princeton.edu/documents/labprotocols
http://porpax.bio.miami.edu/~cmallery/255/255chem/255chemistry.htm
http://library.thinkquest.org/20465/DNAstruct.html
| ||||||||
